Configure Xsquash in Jira
Xsquash and Xsquash Cloud enhance the integration between SquashTM and Jira Data Center, and Cloud. They retrieve the test cases and executions associated with requirements synchronized with Xsquash4Jira in SquashTM, to display them directly in Jira requests.
Focus
It is imperative to use the Xsquash4Jira plugin in SquashTM to be able to use Xsquash or Xsquash Cloud on the Jira side.
To learn more about using the Xsquash4Jira plugin, visit the page Configure Xsquash4Jira in SquashTM.
An administrator must have configured the SquashTM public URL.
Learn more
The page Follow testing activity in Jira describes how test cases and executions are displayed in Jira.
Configure Xsquash on Jira Data Center
Xsquash is an additional component for Jira Data Center available on the Atlassian Marketplace.
Install Xsquash
To install Xsquash on Jira Data Center:
- Log into Jira as an administrator;
- Go to the Jira administration and choose the option Manage apps. The Jira Atlassian Marketplace appears;
- Search for "Xsquash" on the Marketplace;
- Click on the [Install] button to download and install the plugin.
Info
By default, the last version of Xsquash compatible with the Jira version will be installed.
To install a previous version of the Xsquash plugin on Jira:
- Visit the Xsquash page Version history on the Marketplace;
- Download the version you want on your computer;
- Log into the Jira instance as an administrator;
- Manually import the plugin by using the "Import app" feature on the "Manage apps" page.
Declare a Server in Xsquash
You can configure the Xsquash plugin from the Jira administration, in the "Manage apps" part. In the menu on the left of your screen, search for "Xsquash", then click on "Configuration". Xsquash enables you to configure multiple Xsquash4Jira servers from different SquashTM instances:
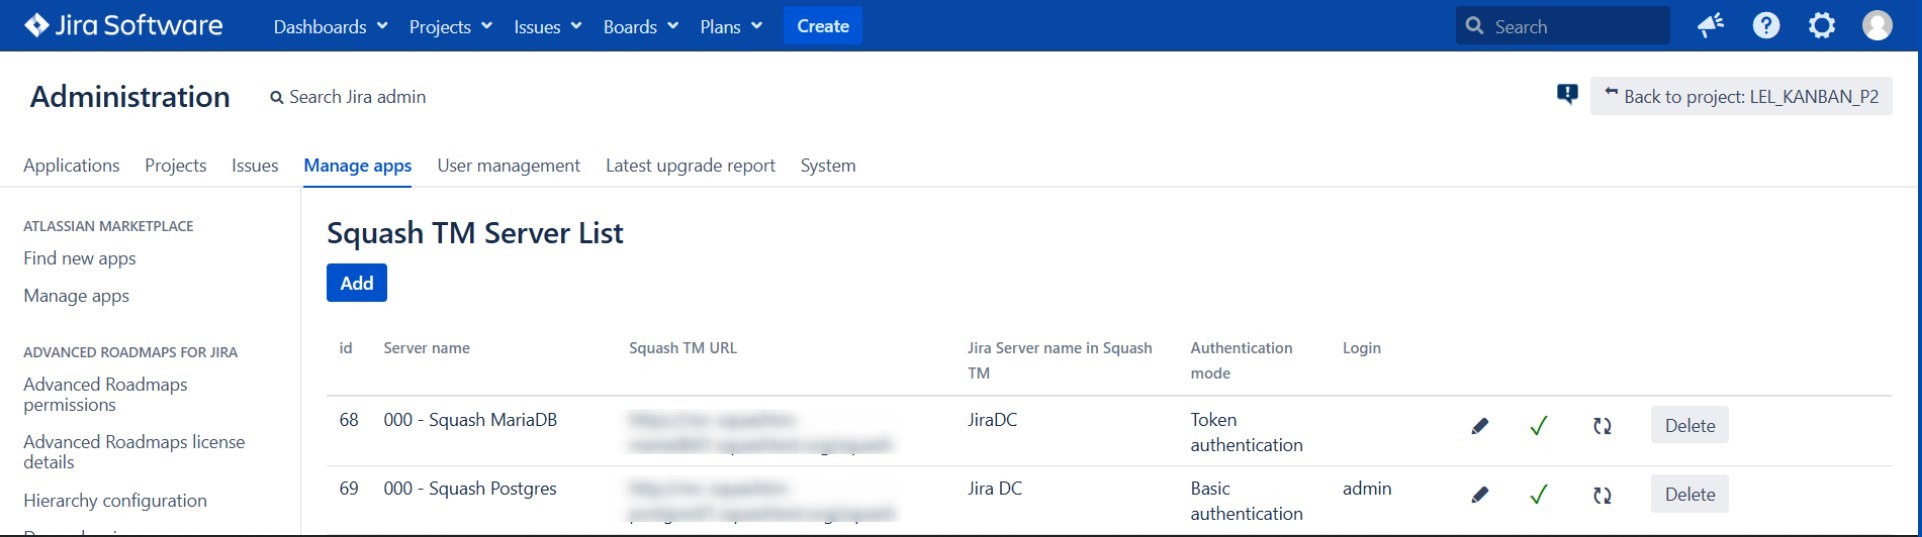
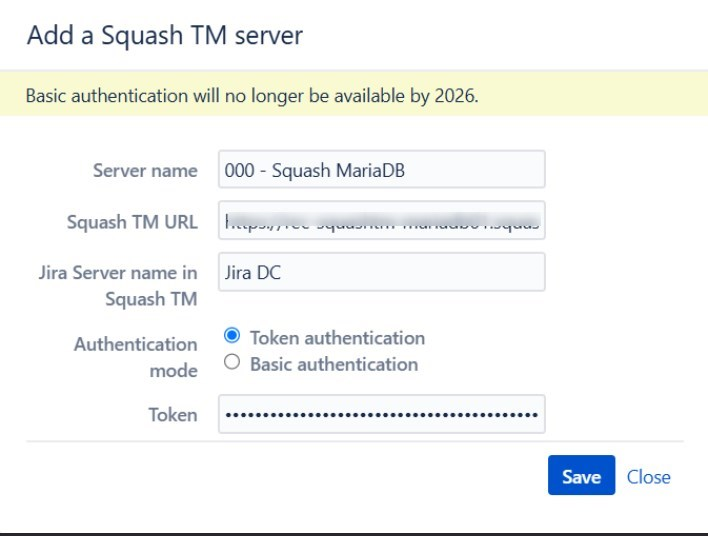
To add a new server, click on the [Add] button and fill in the form with the following information:
- Server name;
- SquashTM's base URL (stop at
/squash); - Name of the
jira.xsquashserver declared in SquashTM corresponding to the Jira instance (case-sensitive); Depending on the authentication mode, login and password, or API token with read permission of a SquashTM account. This account will be used for all the API requests the plugin will send to SquashTM.
Warning
Basic authentication will no longer be available by mid-2027, learn more here.
Learn more
For more information about generating API tokens in SquashTM, see Personal API tokens section.
We recommend that you use a SquashTM administrator account for this configuration because this one has access to all the projects on the instance. However, you can still use a guest profile with only reading permissions for projects containing acceptance data (test cases and executions) to be synchronized in Jira.
Configure Xsquash for a Project
You must configure the Xsquash plugin independently for each Jira project.
To configure Xsquash for a project, go to [Project parameters], search for "Xsquash" in the vertical menu, then click on [Configure]. Activate Xsquash via the radio button, then select the server you want in the list.
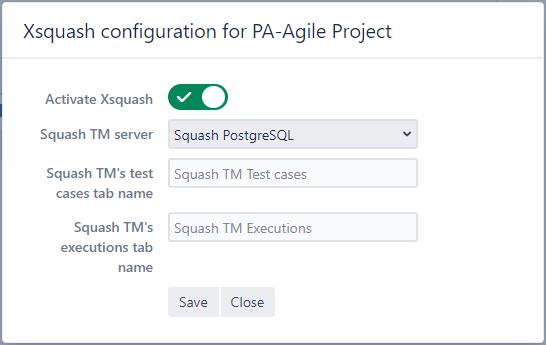
By default, the synchronization tabs of the SquashTM acceptance data are named SquashTM test cases and SquashTM executions. The configuration pop-up enables you to rename these tabs that appear in the Jira requests of the project. Once the configuration is done, click on [Save].
Focus
You must have administration rights for the Jira project to be able to activate the Xsquash plugin.
Configure Xsquash Cloud on Jira Cloud
Xsquash Cloud (Forge) is an application available on the Atlassian Marketplace
Warning
- Xsquash Cloud (Forge) is compatible with SquashTM 14 and later versions.
- Xsquash Cloud (Forge) requires a SquashTM Premium license 👑 or a SquashTM Ultimate License 💎.
- Xsquash Cloud (Forge) versions are independent from SquashTM versions. Compatibility details are available in the release notes of each application version.
Migrate data from Xsquash Cloud (Connect) to Xsquash Cloud (Forge)
This feature allows a Jira administrator to import the configuration of the previous application (servers and associated project settings) directly into the new application. To do this, the configuration file must be obtained from our teams upon request. Once this file is imported, servers are automatically created and activated on the relevant Jira Cloud projects.
Feature available for a limited time
- Data migration from the old application to the new one is only available when upgrading directly from SquashTM 13 to SquashTM 14.
- This migration is only possible until early October 2026. Customers still on version 13 after this date will no longer be able to migrate their data: it is therefore essential to perform this upgrade before the deadline.
- This operation is carried out at the user's request. To benefit from it, please contact support SquashTM.
- This action will result in the permanent deletion of the Xsquash Cloud instance currently hosted on Henix's internal infrastructure. This action is irreversible, and no rollback will be possible.
To import existing servers and activate them on Jira projects, follow these steps:
- Install the application from the Atlassian Marketplace;
- Contact SquashTM support, explicitly stating the request to migrate from Xsquash Cloud (Connect) to Xsquash Cloud (Forge);
- Support will provide one or more migration file(s) in JSON format;
- Import this/these JSON file(s) into the application to restore the server configuration and automatically activate it on the relevant projects. If several JSON files were provided, the one containing the server configuration must be imported first.
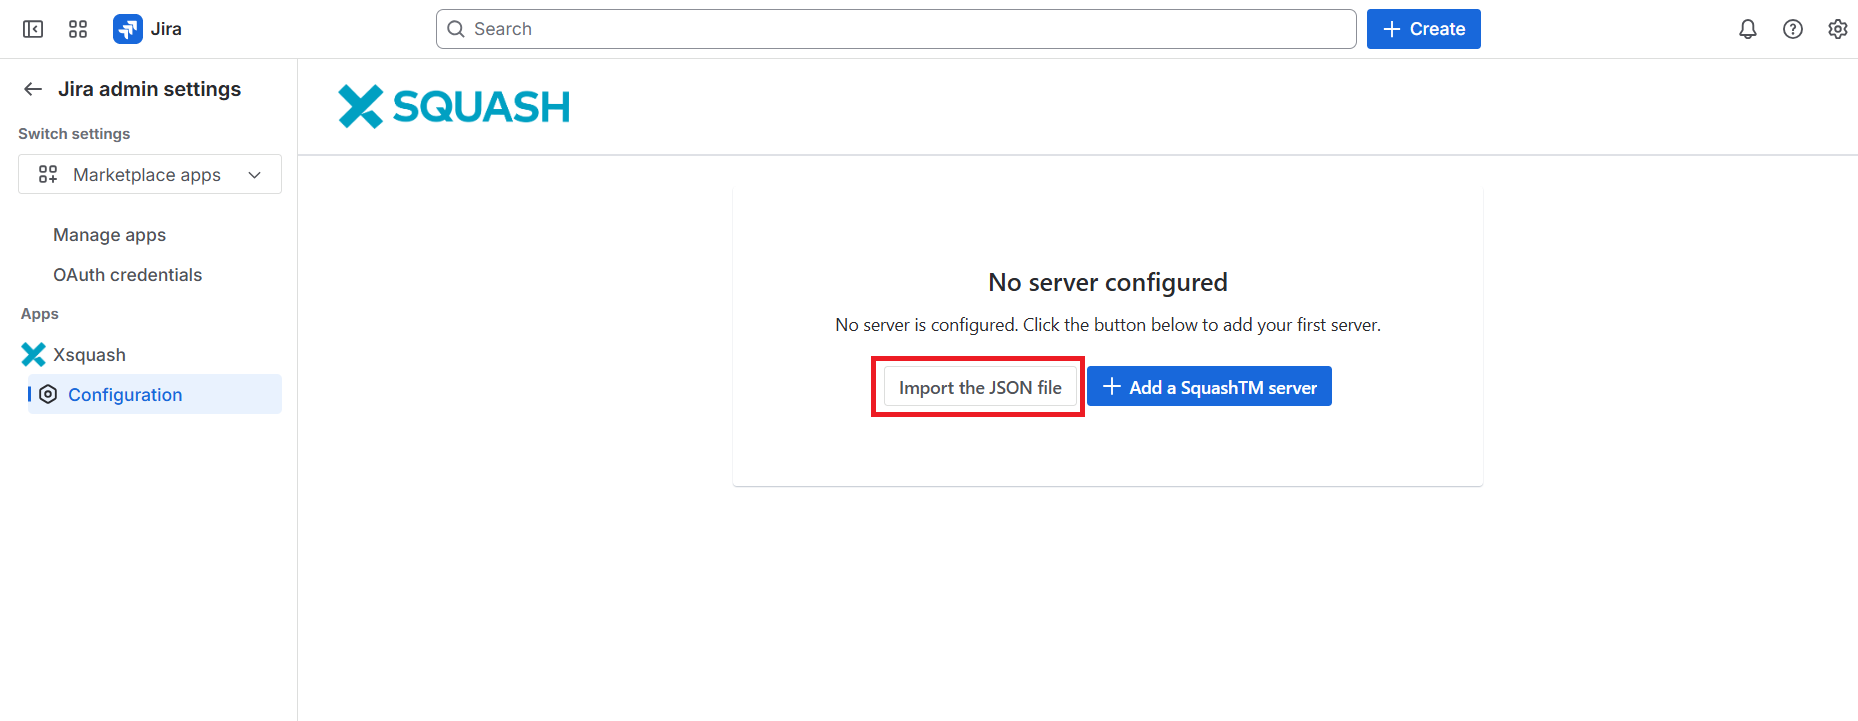
Install Xsquash Cloud
Learn more
For more information on how to install the Xsquash Cloud app, please visit the page Install the Xsquash Cloud app in Jira Cloud.
Declare a Server in Xsquash Cloud
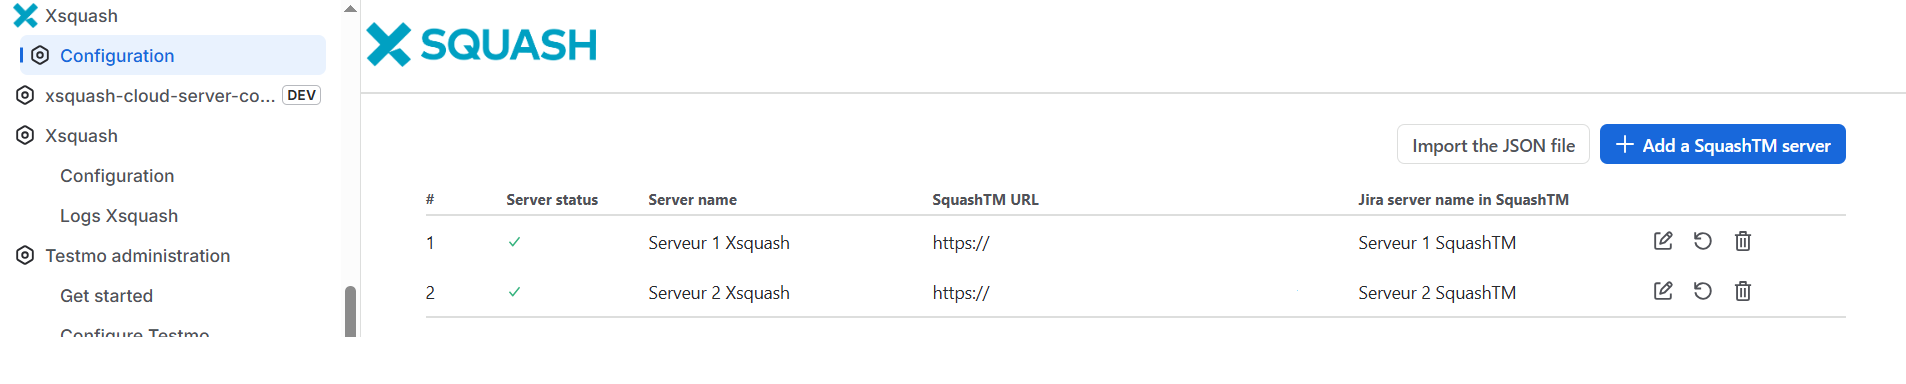
To configure Xsquash Cloud, click on [Parameters] > Marketplace apps. In the menu on the left of your screen, search for "Xsquash", then click on [Configuration]. Xsquash enables you to configure multiple Xsquash4Jira servers from different SquashTM instances:
Info
A check mark at the beginning of each server row indicates that the communication between the SquashTM server and Jira Cloud is working.
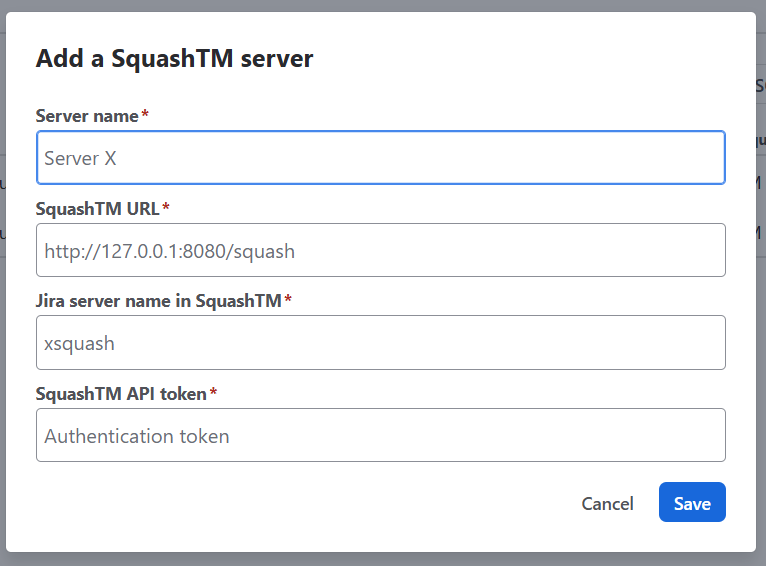
Click the [Add SquashTM server] button to add a new SquashTM server and fill in the form with the following information:
- Server name;
- SquashTM's base URL (stop at
/squash); - Name of the
jira.xsquashserver declared in SquashTM corresponding to the Jira instance (case-sensitive); an API token from SquashTM with read access. This account will be used for all API requests sent to SquashTM by the plugin.
Warning
Basic authentication will no longer be available by mid-2027, learn more here.
Learn more
For more information about generating API tokens in SquashTM, see Personal API tokens section.
It is recommended to apply the principle of least privilege: use a read-only API token corresponding to a technical account with only the "Guest" profile on the SquashTM projects that need to be accessible from Jira.
Configure Xsquash Cloud for a Project
You have to configure the Xsquash Cloud app independently for each project.
To configure Xsquash Cloud for a project, go to Project parameters, then click on Configure Xsquash in the vertical menu. Enable Xsquash using the radio button, then select the desired server from the list.
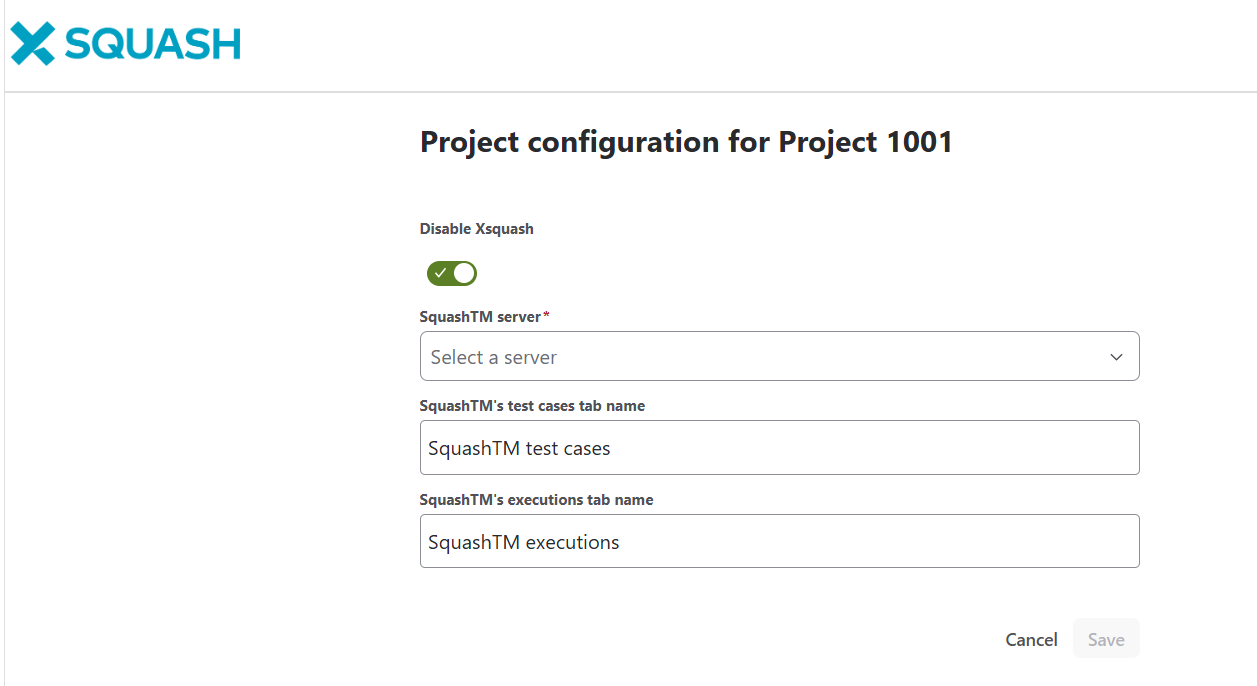
By default, the synchronization tabs of the SquashTM acceptance data are named SquashTM test cases and SquashTM executions. The configuration pop-up enables you to rename these tabs that appear in the Jira requests of the project. Once the configuration is done, click on [Save].
Preview of a Jira Request
In Jira Data Center and Jira Cloud, the tabs added by Xsquash appear in the Activity block of the configured project's requests.
See the Follow testing activity in Jira page for more information.