Configure Plugins to Connect to third-Party Tools
Squash TM can connect to third-party tools thanks to its plugins.
In most cases, you simply have to install the plugin and then configure it in the Squash TM administration workspace to use it.
Learn More
To learn more about how to configure plugins, please visit the page Manage servers in the Squash TM Administrator Guide.
However, some plugins require additional configuration when it comes to the server:
- Xsquash4jira
- Jira Workflow Automation
- Jira Bugtracker
- Redmine Bugtracker
- Redmine Requirements
- Tuleap
Xsquash4Jira and Jira Automation Workflow
Xsquash4Jira and Jira Automation Workflow are synchronziation plugins that work with Jira Server, Jira Data Center, and Jira Cloud.
The synchronization interval of these two plugins is managed in Squash TM configuration file squash.tm.cfg.properties via the following property:
squash.external.synchronisation.delay = 300
By default, the delay between two synchronizations is set at 300 seconds (= 5 minutes). To change it, enter the value in seconds, save, and restart Squash TM.
In Squash TM's file squash.tm.cfg.properties, a second property allows you to define the batch size for synchronizations (number of issues handled by package):
plugin.synchronisation.jira.batchSize = 50
By default, the batch size is set at 50, which corresponds to the default value in Jira. In Jira Server, this value is managed by the property jira.search.views.default.max. It is better that values are identical in both Jira and Squash TM.
The Jira Automation Workflow plugin only works if the Jira Bugtracker Server plugin or Jira Bugtracker Cloud is already installed in Squash TM.
Configure OAuth for Jira
For Jira connectors (Jira Bugtracker and Xsquash4Jira), you can use a OAuth 1a protocol for authentication.
For this, you must configure the URLs involved in the exchange of tokens, and the methods for signing requests.
The configuration elements specific to Jira are:
-
Temporary tokens URL: POST [Jira address] /plugins/servlet/oauth/request-token
-
Access token URL: POST [Jira address] /plugins/servlet/oauth/access-token
-
Authorization URL: [Jira address]/plugins/servlet/oauth/authorize
-
Signature method: RSA-SHA1
-
Consumer Key and Secret: See below.
In Jira server, you must configure an app link using the option "Create incoming link". Configuring an incoming link allows you to configure links in both ways, in other words from Jira to Squash TM and from Squash TM to Jira. For this, you must, as an administrator:
-
Go to Administration menu > Application
-
Click on "Links between apps" under the item "Integrations" in the menu bar on the left. The page "Configure links between apps" appears
-
Enter the simple Squash TM URL in the field, then click on [Create new link]
-
In the pop-up "Configure App URL", confirm the use of the Squash TM URL for the link, then click on [Continue]
-
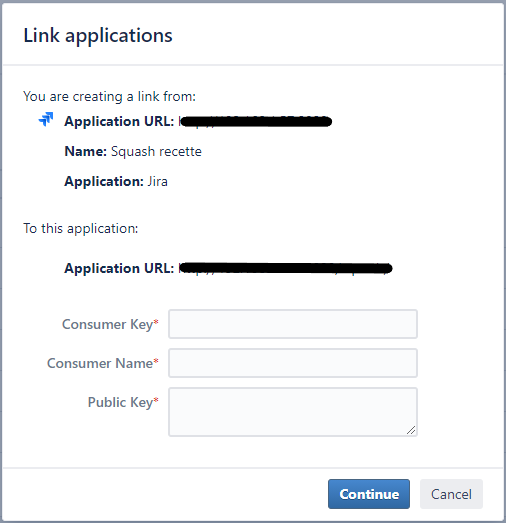
In the "Link apps" pop-up, freely enter the first part of the form and make sure you check the case "Create incoming link", then click on [Continue]
-
Enter the second part of the form, which aims to define the following information:
-
Consumer key: to be entered in Squash TM. It identifies the tokens exchange service for SSO
-
Consumer name: name under which Squash TM will be known by Jira. It will allow the user to recognize that they are authorizing Squash TM
-
Public key: public key -- or "shared secret" in OAuth language for Jira -- that corresponds to the private key -- or "secret" in Squash TM
-

Secret and shared secret are respectively a private key and a public key. You can generate them thanks to openssl:
openssl genrsa -out jira_privatekey.pem 1024
openssl req -newkey rsa:1024 -x509 -key jira_privatekey.pem -out jira_publickey.cer -days 365
openssl pkcs8 -topk8 -nocrypt -in jira_privatekey.pem -out jira_privatekey.pcks8
openssl x509 -pubkey -noout -in jira_publickey.cer  > jira_publickey.pem
Focus
The public key is asked by Jira, not the certificate (hence the name jira_publickey.pem)
The private key is in PCKS#8 format (jira_privatekey.pkcs8).
Once secret and shared secret are shared, you must respectively enter them in Squash TM and Jira. Do not forget to delete the private key's headings and spaces beforehand.
Learn more
To configure OAuth1a protocol in Squash TM, please read Configure OAuth 1a authentication protocol in the Squash TM Administrator Guide.
Redmine Bugtracker and Redmine Requirements
Squash TM's Redmine Bugtracker and Redmine Requirements plugins require an additional plugin in Redmine.
Focus
The plugin installation in Redmine is not optional. This Redmine plugin is needed for the Squash TM plugins to work.
To install the plugin in Redmine, you must:
-
Download the plugin redmine-rest-ext-api-plugin-1.0.0.zip for Redmine 3 or redmine4-rest-ext-api-plugin-1.0.0.zip for Redmine 4
-
Stop Redmine
-
Extract then put the plugin's content in Redmine's "plugins" folder
-
Restart the Redmine app
Then, in the Redmine interface, as an administrator:
- Activate the API by checking the case "Activate the REST API" in Administration > Configuration > API Tab
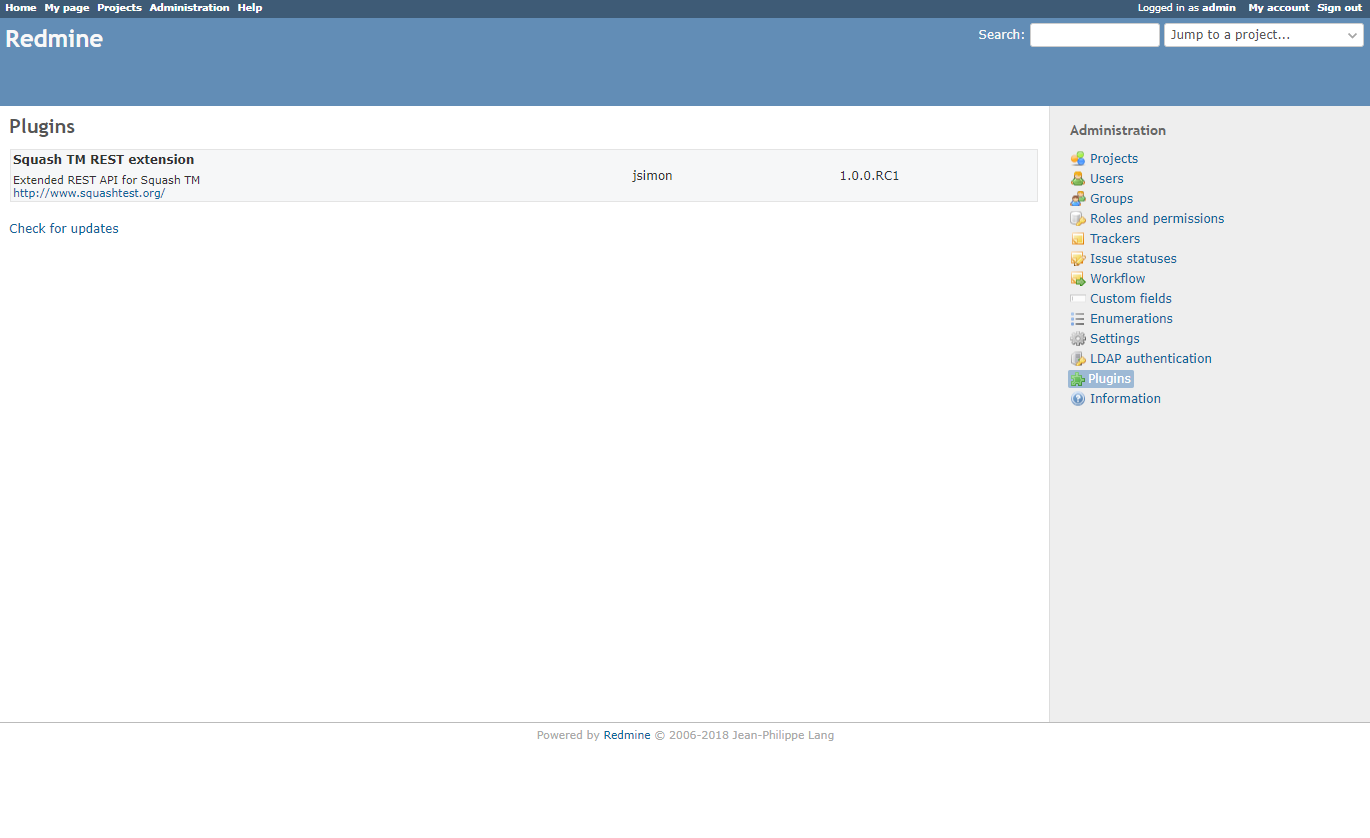
- Verify that the Squash TM plugin is installed in Redmine by going to Administration > Plugins

Apart from this plugin, the Redmine Requirements plugin can only work if the Redmine Bugtracker plugin is already installed in Squash TM.
Tuleap
Configuring Mapping Properties
The Tuleap Bugtracker plugin can be configured with properties. These properties have to be entered in Squash TM's configuration file. A file delivered with with this plugin presents a model configuration. You can copy and paste this file's content in the Squash TM configuration file squash.tm.cfg.properties.
The expected properties are the following:
| Property | Comment |
|---|---|
| plugin.bugtracker.tuleap.field.summary | Name of the field "Summary" in Tuleap |
| plugin.bugtracker.tuleap.field.details | Name of the field "Details" in Tuleap |
| plugin.bugtracker.tuleap.field.assignee | Name of the field "Assigned to" in Tuleap |
| plugin.bugtracker.tuleap.field.severity | Name of the field "Severity" in Tuleap |
| plugin.bugtracker.tuleap.field.status | Name of the field "Status" in Tuleap |
| plugin.bugtracker.tuleap.field.attachment | Name of the field "Attachment" in Tuleap |
All the properties of the group plugin.bugtracker.tuleap.field are mappings that indicate to squash the technical name of certain Tuleap fields. These properties are only used for displaying issues in "Known Issues" tables of executions and executions steps as well as other workspaces.
Import the Certificate to the JVM
By default, the Tuleap API is only accessible through the https protocol. To communicate using this protocol, the JVM hosting Squash TM must know the Tuleap certificate. The procedure depends on your system, but generally, you must use keytool to import the certificate to the JVM. The procedure is described down below.
Connect to a Third-Party Tool using HTTPS
To use a third-party tool configured in https, you must install the matching plugin's jar in Squash TM, then import the tool's certificate in Squash TM's JVM.
Here are the steps to follow to recover and import the tool's certificate to Squash TM's JVM:
- Stop Squash TM
- Download the tool certificate:
- Enter the tool's URL using HTTPS in your browser
- Click on the lock in the address bar
- For example in Firefox, please click on the arrow next to "Connection Secure" > "More Information" > "View Certificate". Then, download the "PEM (cert)" file in the Miscellaneous section
- Identify Squash TM's JVM
-
In Linux: Run this command (compatible with a unix system) by changing the values of the variables depending on the environment:
export hostname= serveurOutil export cacerts=/usr/lib/jvm/java-openjdk/jre/lib/security/cacerts export cert=/etc/ssl/certs/ssl-cert-outil.pem keytool -importcert -alias $hostname -file $cert -keystore $cacerts -storepass changeit -noprompt -
In Windows :
- Open Command Prompt
-
To enter in the JVM's bin, enter the following command:
cd C:\ProgramFiles\Java\jre\bin -
Run this command to import the certificate:
keytool -importcert -alias Outil -file "C:/Downloads/outil-org.pem" -keystore "C:/ProgramFiles/Java/jre/lib/security/cacerts" -storepass changeit -nopromptTool : server alias
"C:/Downloads/outil-org.pem": Tool certificate location;
"C:/ProgramFiles/Java/jre/lib/security/cacerts": JVM cacert location.
-
Restart Squash TM for the certificate to be taken into account