Define a link with a Squash TF Execution Server
Necessary Transition from Squash TF to Squash Orchestrator
Squash TF is no longer maintained.
To give its users time to migrate to Squash Orchestrator, Squash TF is still currently usable for running automated tests from Squash TM (the end date for this support has not yet been defined).
Squash TF should therefore not be used for new Squash instances.
From Squash, you can start the execution of automated tests on the Jenkins automation server via Squash TF.
The aim of the Squash-Squash TF link is to provide you with a simple way to manage Squash TF automated tests from Squash. For this, Squash sends a request to the Squash TF server to start the test, then Squash TF sends back the results to Squash.
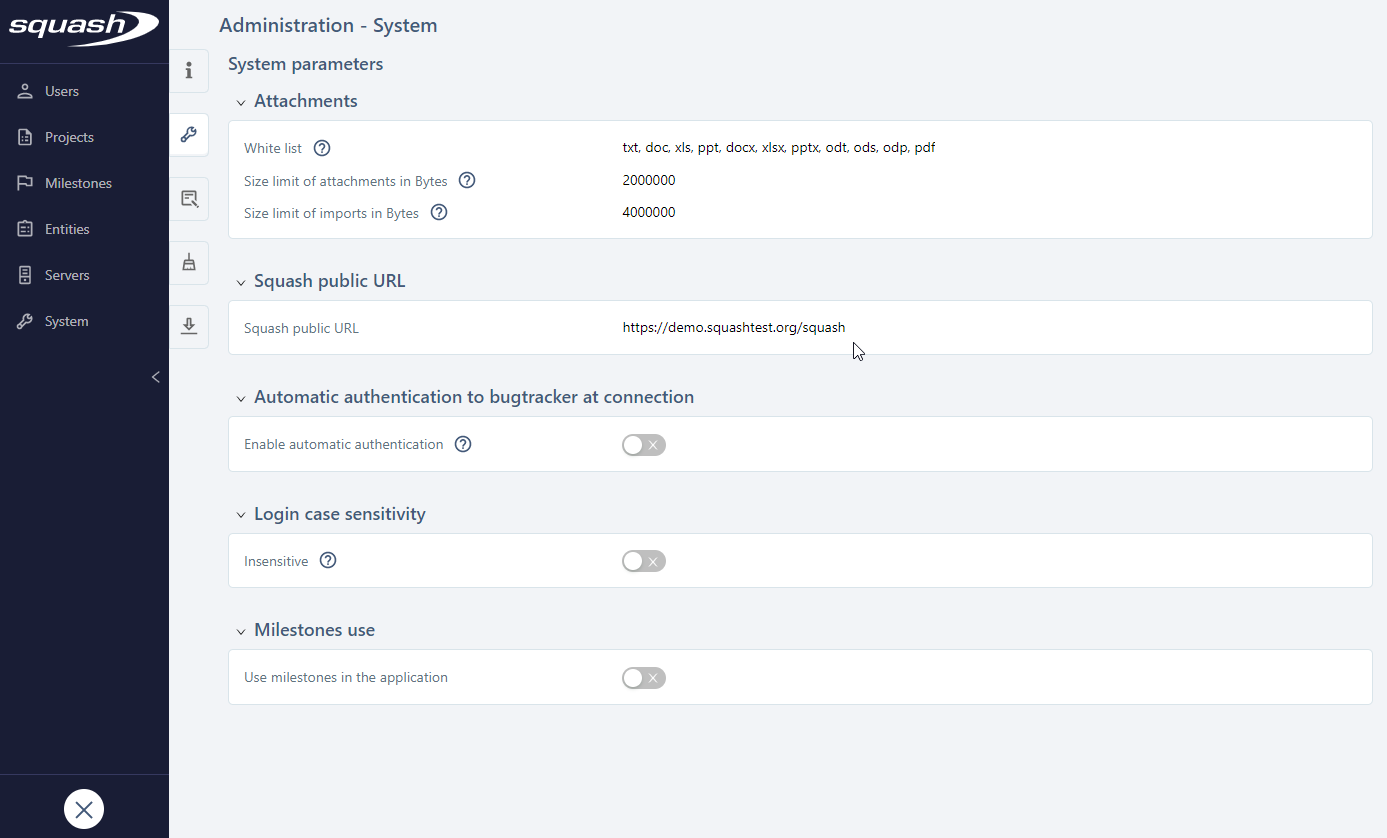
Define Squash Public URL
Squash public URL must imperatively be set in the System Parameters of the Administration workspace for the execution results of the automated tests executed with Squash TF to be transmitted to Squash.
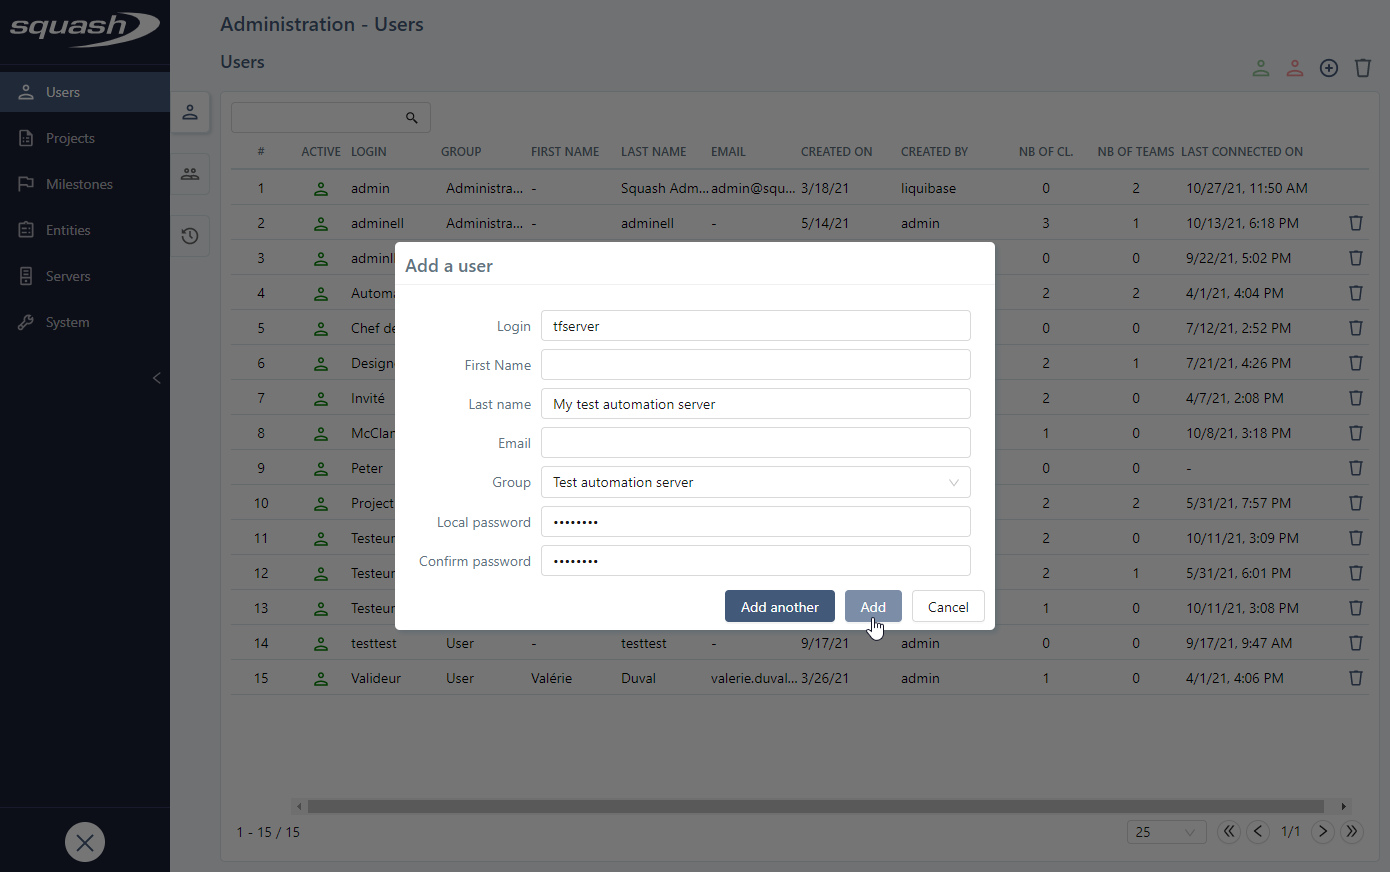
Create a User for the Test Automation Server
To executed automated tests with Squash TF, you must imperatively create a user belonging to the group "Test Automation Server" in Squash.
Configure the project
To configure a project, in the Administration workspace, click on the Projects submenu. Click on your desired project to display its consultation page.
Info
Only an administrator or project leader can configure a project.
The Automation anchor  enables you to configure the automation of the project.
From this block, you can:
- configure the implementation technology and the language of BDD scripts;
- activate an automation workflow (Squash or Jira);
- manage the cleanup of automated suites:
- set a retention period for automated suites;
- delete automated suites;
- delete attachments from executions;
- associate a source code management server as well as a repository (if an automation workflow is activated);
- associate a test automation server and associate jobs for Squash TF servers.
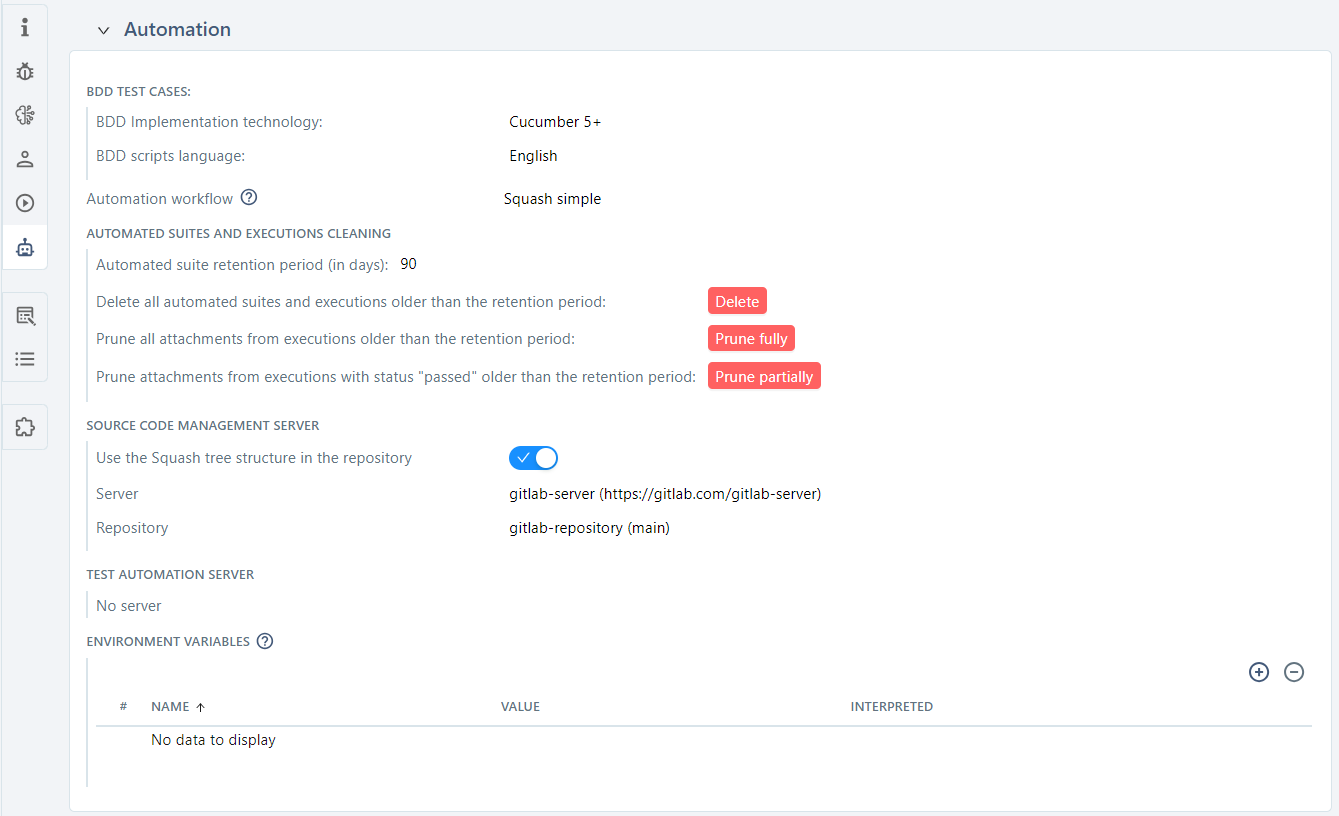
Implementation technology and script language
For each project, you can configure the implementation technology of BDD test cases as well as the language of BDD scripts. The project leader can choose between Cucumber and Robot Framework for the implementation technology.
If you select the Cucumber technology, you can choose between the four following languages for the script: English, French, Spanish, and German.
If you select the Robot Framework technology, English is the only language available.
Automation workflow
You can activate the automation workflow for a project via a drop-down list.
By default, the "None" option is selected.
Selecting the "Squash advanced" option starts the Advanced Squash Workflow, whereas selecting "Squash simple" starts the Simple Squash Workflow.
When the Jira Automation Workflow plugin is activated for the project, the automation workflow is set to "Remote server".
When you activate an automation workflow, new fields appear in a test case's Automation block. For the advanced Squash workflow, the tests to automate can be tracked in the Automation workspace by both the testers and the automation test writers. For the simple Squash workflow or the Jira workflow, you can track tests to automate directly from the Automation block of the test cases.
When you activate an automation workflow, a new part, Source code management server also appears in a project's Automation block.
Automated Suite cleaning
Retention period
The retention period for the project's automated test suites is set in days. During a cleanup (of either automated suites or attachments), all items within this retention period are kept, while others are deleted.
If no retention period is defined, the test suites' lifespan is considered infinite. By default, no value is set.
Deleting Automated Suites
It is possible to delete all automated suites whose creation date is older than the previously defined retention period.
Clicking the [Delete] button opens a confirmation pop-up, indicating that the deletion is permanent and showing a count of the automated suites and executions that will be deleted.
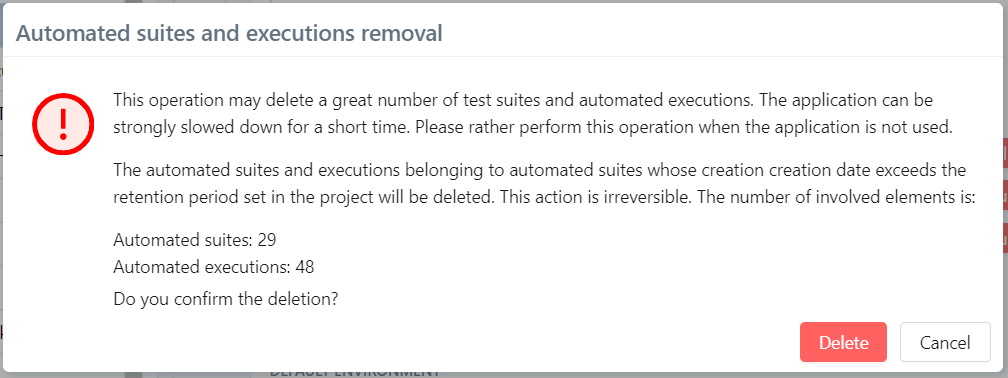
The deletion removes the automated suites as well as everything they contain: executions and attachments.
Deleting Attachments
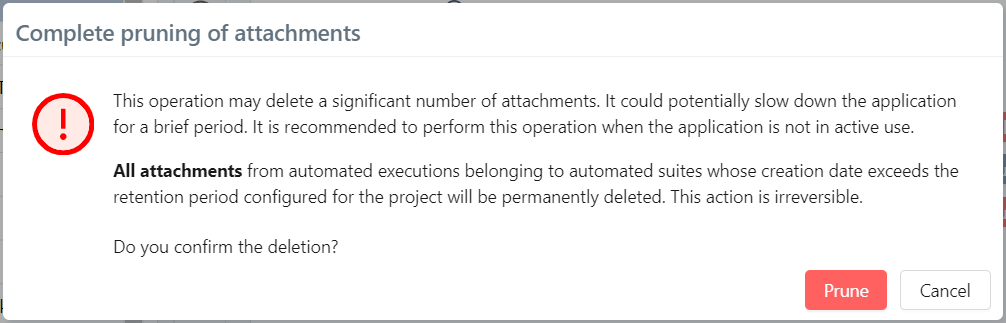
It is possible to delete all attachments associated with executions of automated suites whose creation date is older than the previously defined retention period.
Clicking the [Prune fully] button opens a confirmation pop-up, indicating that the deletion is permanent, and that it concerns all attachments associated with executions (including execution reports for test cases whose status is not passed).
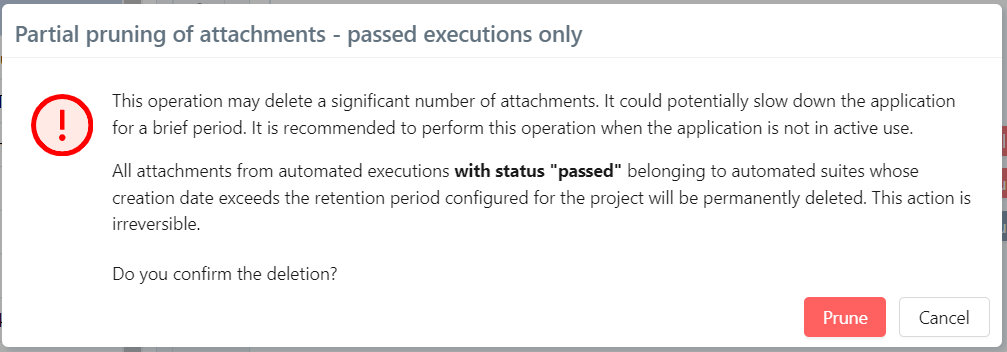
It is possible to delete attachments associated with executions with passed status of automated suites whose creation date is older than the previously defined retention period.
Clicking the [Prune partially] button opens a confirmation pop-up, indicating that the deletion is permanent and only concerns attachments associated with executions whose status is passed.
Declare a Test Automation Server
You must declare a "Jenkins" automation server by following the procedure to Add a Test Automation Server to allow Squash to connect to Jenkins.
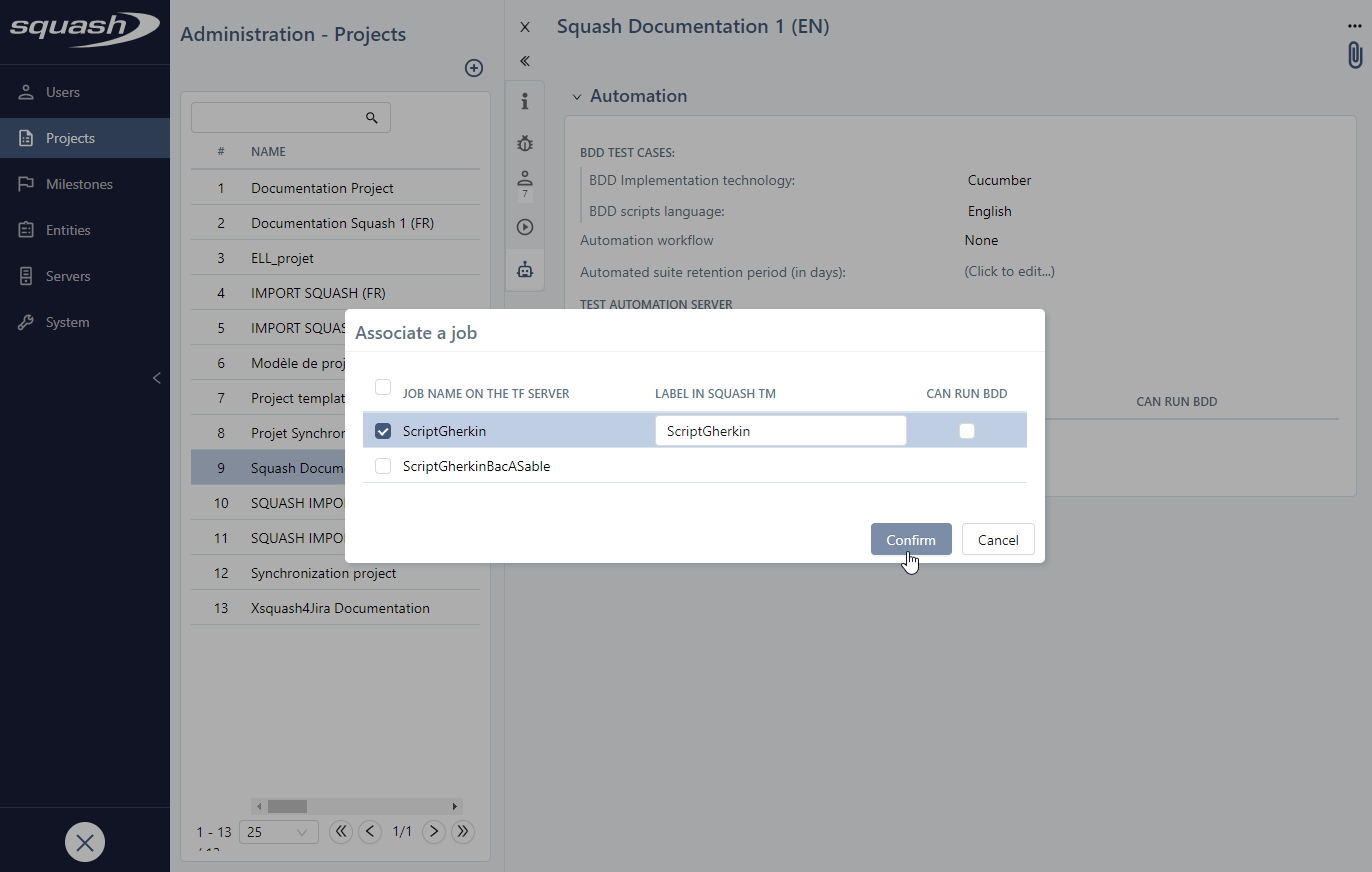
Once the server is saved, you must associate it with the Squash project from the Automation block of the project's configuration page.
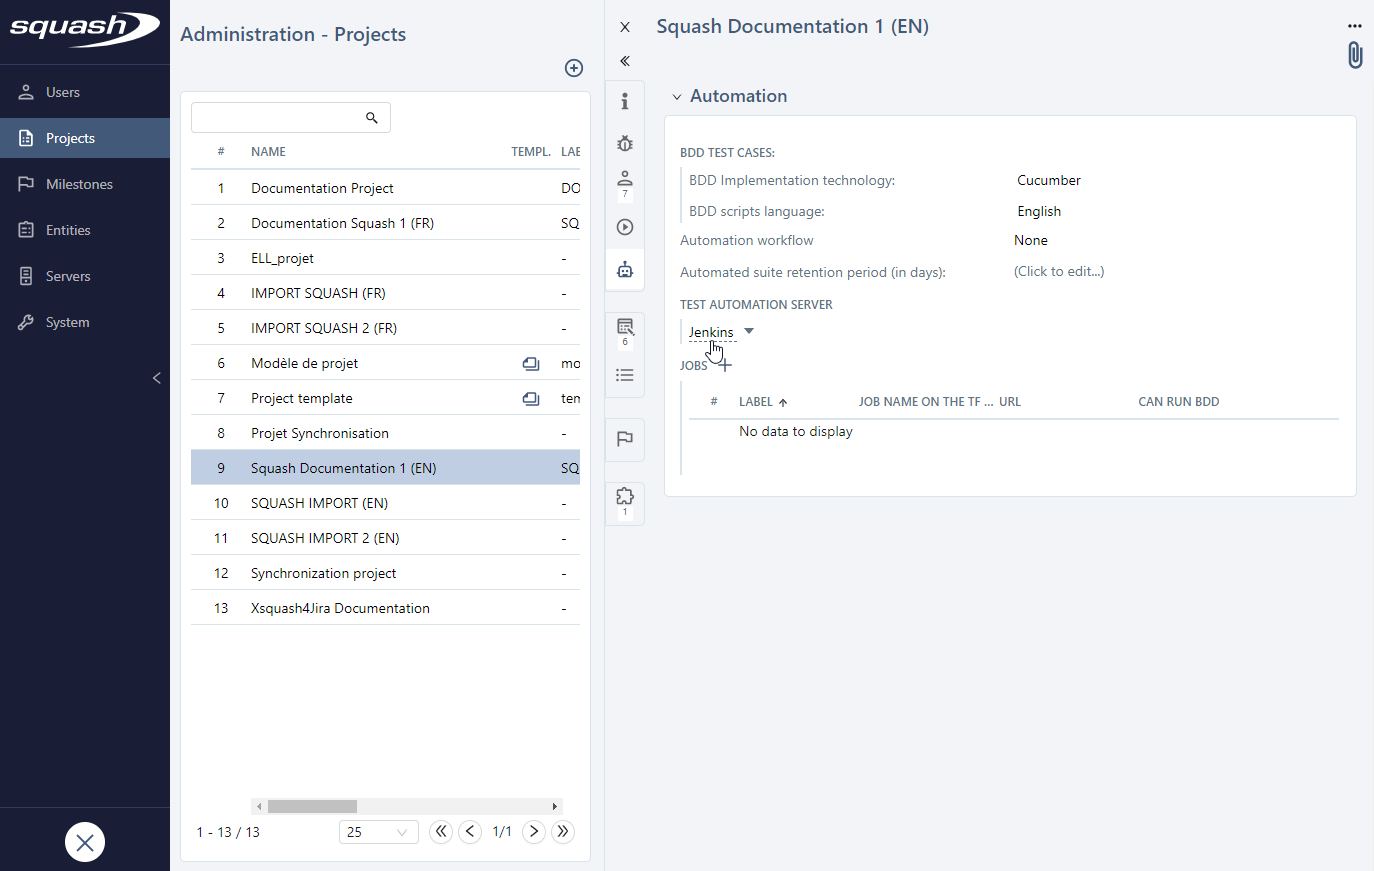
Once the test automation server is associated with the project, you must select the Jenkins jobs that will be used for the execution of the automated tests.
You can modify a job by clicking on the button  . In the field Possible execution server(s) (separated by semicolons), you can choose the secondary servers that will be used to execute the automated test cases. You must fill in the field with the names of the servers separated by semicolons (e.g.
 SecondaryServer1; SecondaryServer2).
Add a Source Code Server (Optional)
Squash enables you to create scripted test cases (Gherkin and BDD). These test cases can then be transmitted for automation in .feature or .robot formats into a Git repository hosted on a source code management server.
You can access the management page of the source code management servers from the Administration workspace. It enables you to add a source code management server and to declare the repositories in question.
Once you have added the repository, you can associate it with a project containing scripted test cases to push into the repository inside the Automation anchor. Once the server is selected, the repositories names and their branches will be displayed in a dropdown list.
Info
For a project configured with a Jenkins server, if the repository source code management server configured in the project is identical to the one configured in the job associated with Squash and the "Can run BDD" option is checked, automated scripts are automatically associated with the scripted test cases (Gherkin or BDD).
In the Jobs table, only one job can be configured to run BDD scripts.
Learn More
To learn more on how to transmit scripted test cases, please visit this page Transmit a Scripted Test Case to a SCM.
Configure Squash TF
Configure Security Parameters
For Squash to be able to send an order to Squash TF to execute a job, a user with the execution rights must be created on the Squash TF server beforehand.
Configuring the security of the Squash TF server equats to configuring the security of the embedded Jenkins server. To configure Jenkins's standard security, we recommend that you choose the best option according to your environment. For this, please read the Jenkins documentation.
Configure the Squash callback
Once the Squash TF server has executed a test suite following a request of the Squash server, Squash TF sends back information on the execution to the Squash server. This feature works as follows:
- When Squash sends an execution request to the Squash TF server, it gives Squash TF its callback URL;
- Squash TF uses this callback URL to retrieve the login and password to use, and sends the execution event to Squash.
Squash TF associates the callback URL and the login/password pair thanks to a properties file. You can edit this file from the Configuration files menu of the Manage Jenkins workspace.
In the taLinkConf.properties file, for each Squash server using this Squash TF server, you have to define a callback URL and the login/password associated with the automated execution user created on Squash.
Example:
For a Squash TM server with http://myServeur:8080/squash as the callback URL and tfserver/tfserver as the login/password of the automated execution server user, you must define the following properties in the taLinkConf.properties:
endpoint.1=http://myServer:8080/squash
endpoint.1.login=tfserver
endpoint.1.password=tfserver
Configure the Jenkins URL
From the Squash TF framework 1.8.0, when the framework sends execution information to Squash, it provides the URL of the HTML report. To make the URL of the HTML report, the JENKINS_URL variable is used. You must configure this variable in Jenkins from the Configure system menu of the Manage Jenkins workspace, in the Jenkins URL field.
Focus
When you first launch Jenkins, even if the Jenkins URL property contains the right value, you must click on Save or Apply. Otherwise, the JENKINS_URL variable will not be correctly configured.