Configure Xsquash in Jira
Xsquash and Xsquash Cloud are two tools that enable you to enhance the integration between Squash TM and Jira Server, Datacenter, and Cloud. They retrieve test cases and executions associated with requirements synchronized with Xsquash4Jira directly in Squash TM to display them directly in Jira requests.
Focus
You must use the Xsquash4Jira plugin in Squash TM to be able to use Xsquash or Xsquash Cloud in Jira.
To learn more about how to use the Xsquash4Jira plugin, please visit this page: Configure Xsquash4Jira in Squash TM
Warning
2.0.0 versions of the Xsquash and Xsquash Cloud plugins are only compatible with 2.X+ versions of Squash TM.
For previous versions of Squash TM, you must use a lower compatible version of Xsquash and Xsquash Cloud.
Configure Xsquash on Jira Server and Datacenter
Xsquash is an additional component for Jira Server and Jira Datacenter available on the Atlassian Marketplace.
The Xsquash plugin requires:
- Jira Server or Jira Datacenter version 8.X+
- Squash TM version 2.X+ with the Squash TM Rest API plugin version 2.X+ and the Xssquash4Jira plugin version 2.X+
Install Xsquash
To install Xsquash on Jira Server or Jira Datacenter:
- Log onto Jira as an administrator;
- Go to the Jira administration and choose the option "Manage apps". The Jira Atlassian Marketplace appears;
- Search for "Xsquash" on the Marketplace;
- Click on the [Install] button to download and install the plugin.
Info
By default, the last version of Xsquash compatible with the Jira version will be installed.
To install a previous version of the Xsquash plugin on Jira:
- Visit the Xsquash page Version history on the marketplace;
- Download the version you want on your computer;
- Log onto the Jira instance as an administrator;
- Manually import the plugin by using the "Import app" feature on the "Manage apps" page.
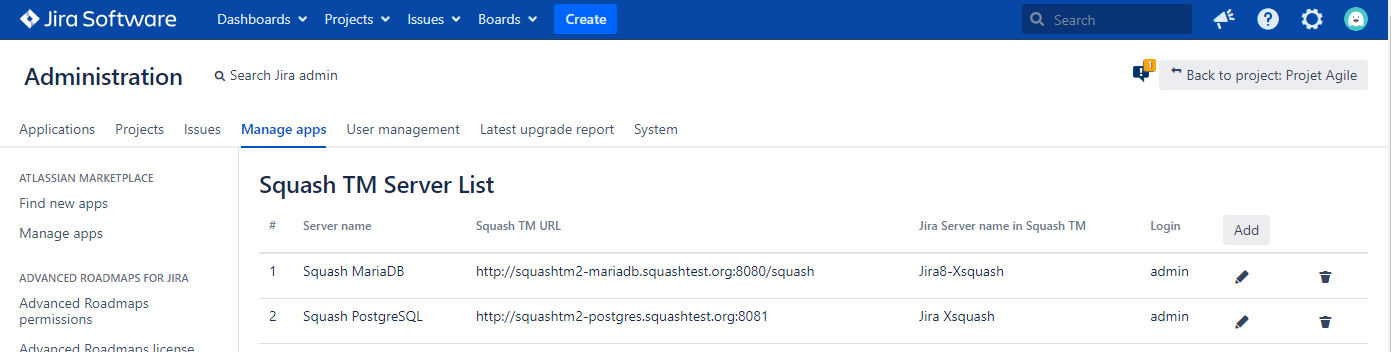
Declare a Server in Xsquash
You can configure the Xsquash plugin from the Jira administration, in the "Manage apps" part. In the menu on the left of your screen, search for "Xsquash", then click on "Configuration". Xsquash enables you to configure multiple Xsquash4Jira servers from different Squash TM instances:
To add a new server, click on the [Add] button and fill in the form with the following information:
- Server name (unrestricted);
- Squash TM's base URL (stop at /squash);
- Name of the jira.xsquash server declared in Squash TM corresponding to the Jira instance (case-sensitive);
- Login and password of a Squash TM account. This account will be used for all the API requests the plugin will send to Squash TM.
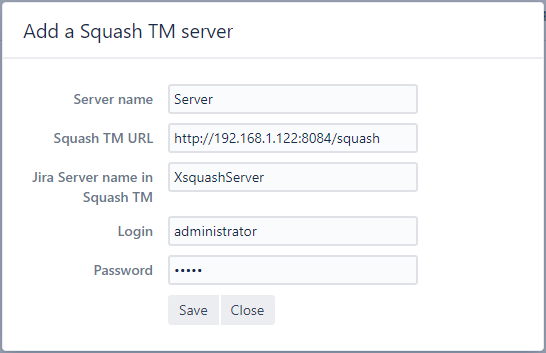
We recommend that you use a Squash TM administrator account for this configuration because you will have to all the projects on the instance. However, you can still use a guest profile with only reading permissions for projects containing acceptance data (test cases and executions) to synchronize on Jira.
Configure Xsquash for a Project
You must configure the Xsquash plugin independently for each Jira project.
To configure Xsquash for a project, go to "Project parameters", search for "Xsquash" in the vertical menu, then click on "Configure". Activate Xsquash via the radio button, then select the server you want in the list.
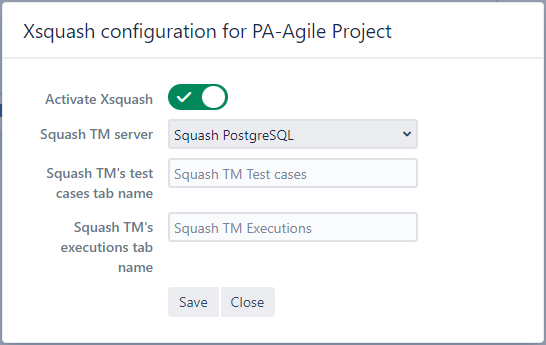
By default, the synchronization tabs of the Squash TM acceptance data are named "Squash TM test cases" and "Squash TM executions". The configuration popup enables you to rename these tabs that appear in the Jira requests of the project. Once the configuration is done, click on [Save].
Focus
You must have administration rights for the Jira project to be able to activate the Xsquash plugin.
Configure Xsquash Cloud on Jira Cloud
Xsquash Cloud is an application hosted on an internal server of the company Henix.
Warning
Xsquash Cloud is only available for clients with a Squash TM Premium License.
The Xsquash Cloud application requires: - Jira Cloud - Squash TM version 2.X+ with the Squash TM Rest API plugin version 2.X+ and the Xsquash4Jira plugin version 2.X+
Install Xsquash Cloud
There are two ways you can install the Xsquash Cloud app on Jira Cloud:
Manually Install Xsquash Cloud
To manually install Xsquash Cloud:
- Log onto the Jira Cloud instance as an administrator.
- Click on the [Parameters] button, choose "Apps", then the "Manage apps" option.
- Click on "Parameters" to open the "Settings" window.
- Check the option "Enable development mode", then click on the [Apply] button.
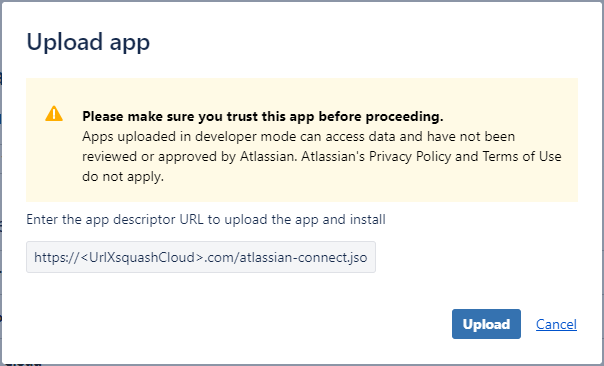
- On the "Manage apps" page, click on "App importable" to open the "Upload app" window.
- Enter the URL provided by the Squash Support Team, then click on the [Upload] button.
- The Xsquash Cloud application appears in the installed applications list.
Install Xsquash Cloud via the API
Before installing the Xsquash Cloud application in Jira Cloud via API, you must have an administrator account with an API token beforehand.
Learn More
To learn how to generate an API token, please visit this page.
Here are the steps to follow to install the Xsquash Cloud app via the API:
- Make a GET request with BASIC AUTH at the following URL:
https://<UrldeJira>.atlassian.net/rest/plugins/1.0/?os_authType=basicwith the following information in the header:
Accept: application/vnd.atl.plugins.installed+jsonand for the authentication, use the administrator's username and their API token. 2. Retrieve the value of the header "upm-token" in the response 3. Make a POST request with BASIC AUTH at the following URL:
https://<UrldeJira>.atlassian.net/rest/plugins/1.0/?token=upm-tokenwith the following information in the header:
Content-type: application/vnd.atl.plugins.uri+json
Accept: application/json
and the following command in the body with the URL provided to you by the Squash Support Team,
{
"pluginUri": "https://<UrlXsquashCloud>.com/atlassian-connect.json",
"pluginName": "Xsquash Cloud"
}
and for the authentication, use the administrator's username and their API token.
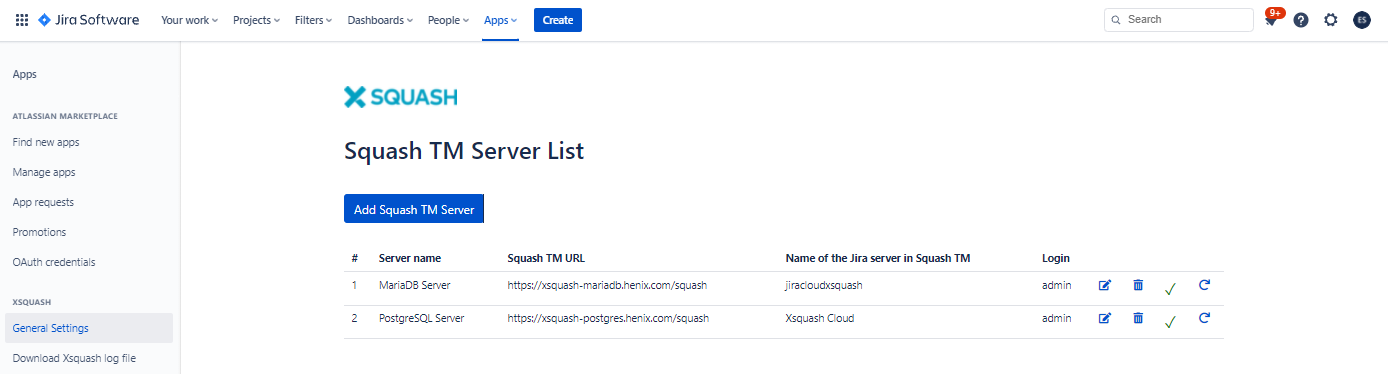
Declare a Server in Xsquash Cloud
To configure Xsquash Cloud, click on [Parameters] > Apps. In the menu on the left of your screen, search for "XSQUASH", then click on "Configure". Xsquash enables you to configure multiple Xsquash4Jira servers from different Squash TM instances:
Info
A check mark at the end of each server row indicates that the communication between the Squash TM server and Jira Cloud is working.
You can download the logs of the Xsquash Cloud plugin from the "Xsquash Logs" option.
Click on the [Add Squash TM server] button to add a new Squash TM server and fill in the form with the following information:
- Server name (unrestricted);
- Squash TM's base URL (stop at /squash);
- Name of the jira.xsquash server declared in Squash TM corresponding to the Jira instance (case-sensitive);
- Login and password of a Squash TM account. This account will be used for all the API requests the plugin will send to Squash TM.
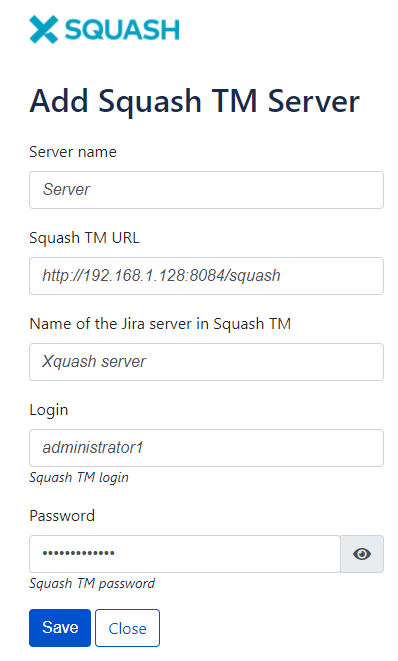
We recommend that you use a Squash TM administrator account for this configuration because you will have to all the projects on the instance. However, you can still use a guest profile with only reading permissions for projects containing acceptance data (test cases and executions) to synchronize on Jira.
Configure Xsquash Cloud for a Project
You have to configure the Xsquash Cloud plugin independently for each project.
To configure Xsquash Cloud for a project, go to "Project parameters", then click on "Configure Xsquash" in the vertical menu. Activate Xsquash via the radio button, then select the server you want in the list.
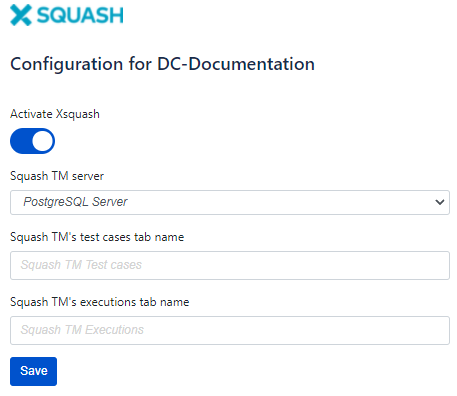
By default, the synchronization tabs of the Squash TM acceptance data are named "Squash TM test cases" and "Squash TM executions". The configuration popup enables you to rename these tabs that appear in the Jira requests of the project. Once the configuration is done, click on [Save].
Preview of a Jira Request
In Jira Server and Jira Datacenter, the tabs added by the Xsquash plugin appear in the "Activity" block of the configured project's requests.
In Jira Cloud, a "Xsquash" block with two tabs is added to the screen of the Jira requests of the configured project.
The first tab, dedicated to test cases, and the second one, dedicated to executions, enable you to track the progress of acceptance in Squash TM from Jira.
The "Squash TM Test Cases" Tab
In the "Squash TM Test Case" tab, a table displays different information on the test cases related to the Jira request regardless of their format (Classic, Gherkin, BDD). This table is first sorted by the importance, then the reference, and finally the description of the test case.
In the table, by clicking on the button at the end of a test case's row, you can display extra information on the test case such as its description or test steps.
You can also click on: - the test case's description to display it in Squash TM; - the dot indicating the status of the last execution to display it in Squash TM.
Preview of the "Squash TM test cases" tab in a Jira Server request:

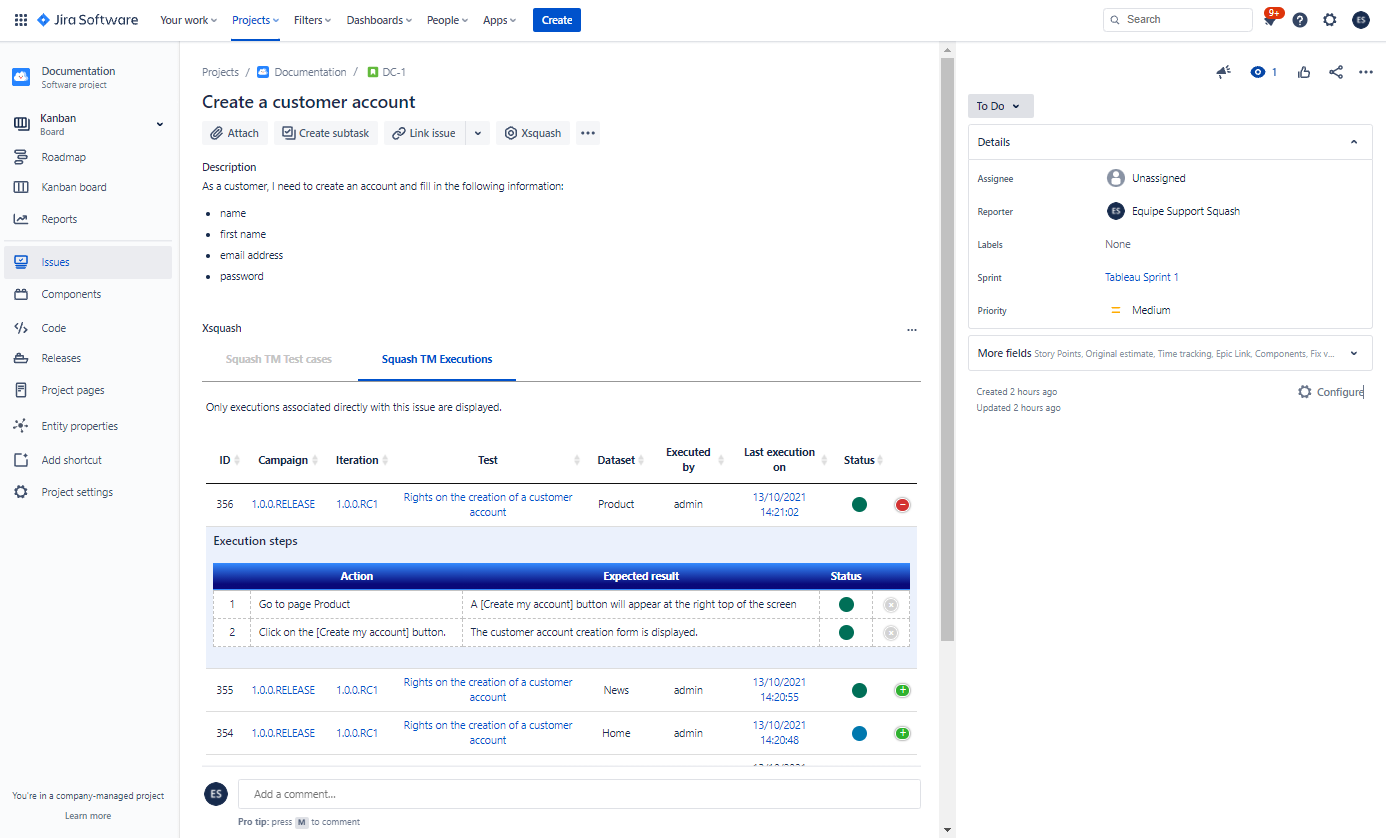
"Squash TM Execution" Tab
The "Squash TM Execution" tab displays a table with information related to the last execution of each execution plan item. Thus, if the test case is added to x execution plans, then the tab will display the last execution of these x occurrences.
In the table, by clicking on the button at the end of each row, you can display extra information on the last execution, such as the executed test steps, and execution steps comments.
You can also click on:
- The name of the campaign to display the campaign in Squash TM;
- The name of the iteration to display the iteration in Squash TM;
- The description of the test to display the test case in Squash TM;
- The last execution date to display the ITPI's last execution in Squash TM.
Preview of the "Squash TM Execution" in a Jira Cloud request:
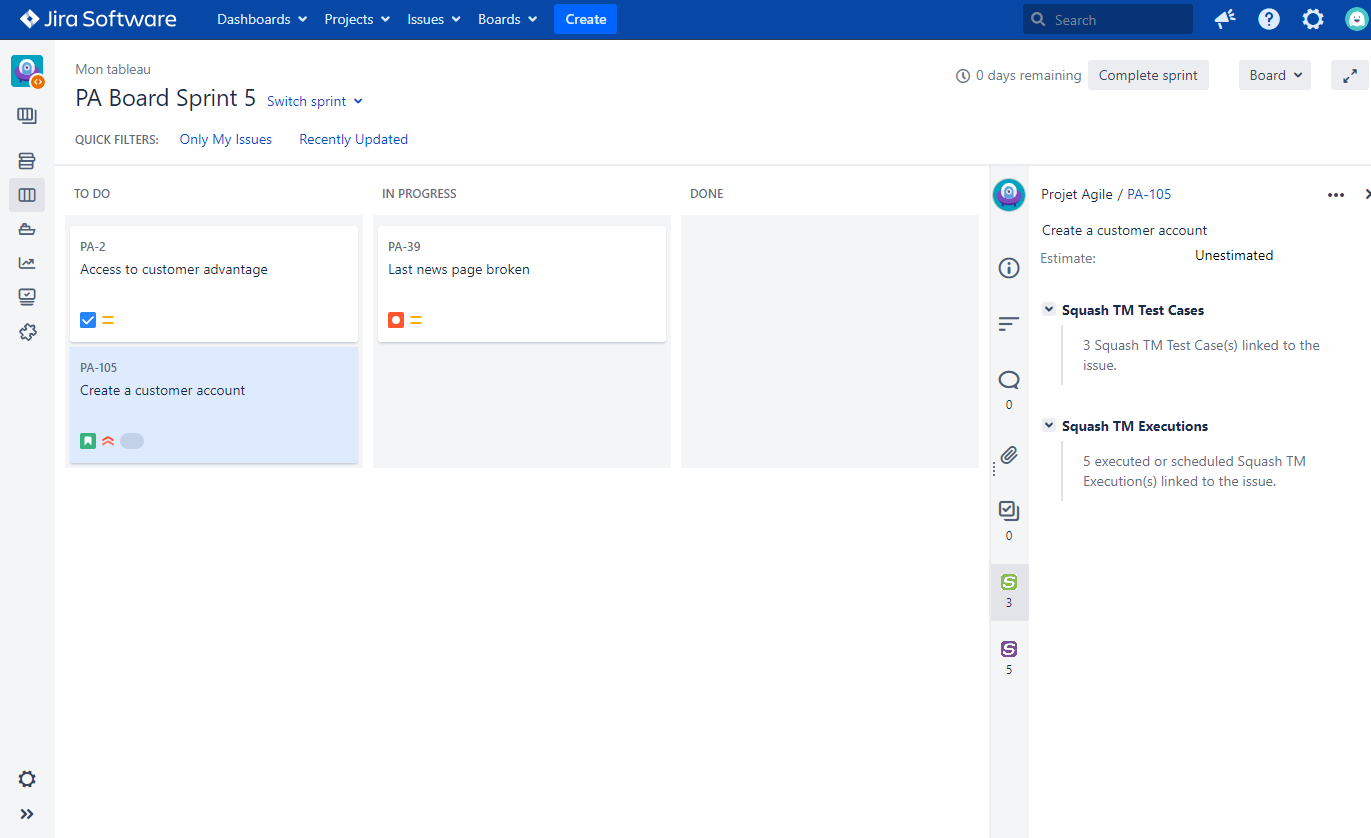
Quick Overview from a Table
In Jira Server and Jira Datacenter, from the Scrum and Kanban tables, you can get a quick overview of each request by clicking on their name.
The Xsquash plugin adds two more blocks:
- Squash TM Test Case: displays the number of tests linked to the request;
- Squash TM executions: displays the number of executions (planned or finished) of the test cases linked to the request.