Configure Xsquash4GitLab in Squash TM
The Xsquash4GitLab plugin is a Squash TM plugin dedicated to the synchronization of issues from GitLab. It has two main features:
-
An automatic synchronization module that enables Squash TM to import and keep GitLab issues updated as requirements in the Requirements workspace.
-
A reporting module that enables you to display information in the issues about the course of acceptance testing in Squash TM. This information can be displayed on GitLab issues in notes that are created and updated by Squash TM.
Most of the Xsquash4GitLab's features are automatic and start on their own once the configuration is fully completed:
| Name | Start | Flow direction |
|---|---|---|
| Synchronization of GitLab issues | Automatic once the configuration is completed | From GitLab to Squash TM |
| Squash TM acceptance data reporting | Automatic once the configuration is completed | From Squash TM to GitLab |
Attention
During these automatic actions, the plugin will never erase requirements synced in Squash TM or issues in GitLab. If issues were to be deleted or moved in GitLab, the corresponding requirements would remain in Squash TM and would have to be manually deleted by Squash TM users if needed.
Learn More
This page is dedicated to the configuration of the Xsquash4GitLab plugin from the Squash TM administration.
To learn more about synced requirements, please visit the page: Synchronize GitLab Agile Objects in Squash
Installation and Prerequisites
Info
The Xsquash4GitLab plugin is available for free. To use it, you must download it and install it on Squash TM. GitLab Bugtracker must also be installed.
For more information, please visit these pages: Downloads and Install Squash TM plugins
Attention
The Xsquash4GitLab plugin is compatible with GitLab.com and GitLab EE Self-Managed. But, it is not compatible with GitLab CE Self-Managed.
Squash TM/GitLab Communication
The Xsquash4GitLab plugin is based on a bidirectional communication between Squash TM and GitLab. It is a server to server communication that goes through GitLab GraphQL API. For the plugin to work, the communication must be possible. Often, this requires interventions on the network's infrastructure: opening flows in the firewalls, adding certificates in the JVMs, etc.
If the same GitLab server is already used with success as a bugtracker thanks to the GitLab Bugtracker plugin, it means that the communication is already possible.
Should there be a problem, you must directly test the Squash TM server to verify if it can access GitLab. For this, try to make a request directly to the GitLab GraphQL API or from the server hosting Squash TM using a curl or wget. If it doesn't work, it means it's a network problem.
GitLab account authorizations
To work, the plugin must be able to communicate with GitLab, or through a GitLab user. That user must at least have Read permissions on the API for all the issues to synchronize. If reporting from Squash to GitLab is activated, the user must have writing rights on the API for all the tickets in question.
Create the Xsquash4GitLab server in Squash TM
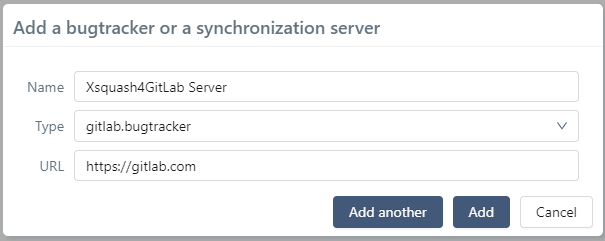
To use the Xsquash4GitLab plugin, you must declare a synchronization server of the type gitlab.bugtracker in the Squash TM Administration, in the Servers>Bugtrackers and Synchronization servers workspace.
In the popup to create a new server, enter the server name (unrestricted), "gitlab.bugtracker" as the type, and the simplest GitLab URL, then click on "Add".
Warning
An Xsquash4GitLab synchronization server cannot be deleted if it is being used for synchronizations. You must delete the synchronizations beforehand to be able to delete the server.
Credentials used for the synchronizations
The plugin uses the GitLab GraphQL API to retrieve data with a basic authentication, using the credentials of the GitLab account used for each synchronization.
Learn More
For security reasons, the login and password entered to connect to third-party tools are encrypted in the database with an encryption key. The Xsquash4GitLab plugin also has two properties that must be directly configured in Squash TM's configuration file squash.tm.cfg.properties. To learn more, please visit this page: Manage Squash TM's Configuration File
Technical account
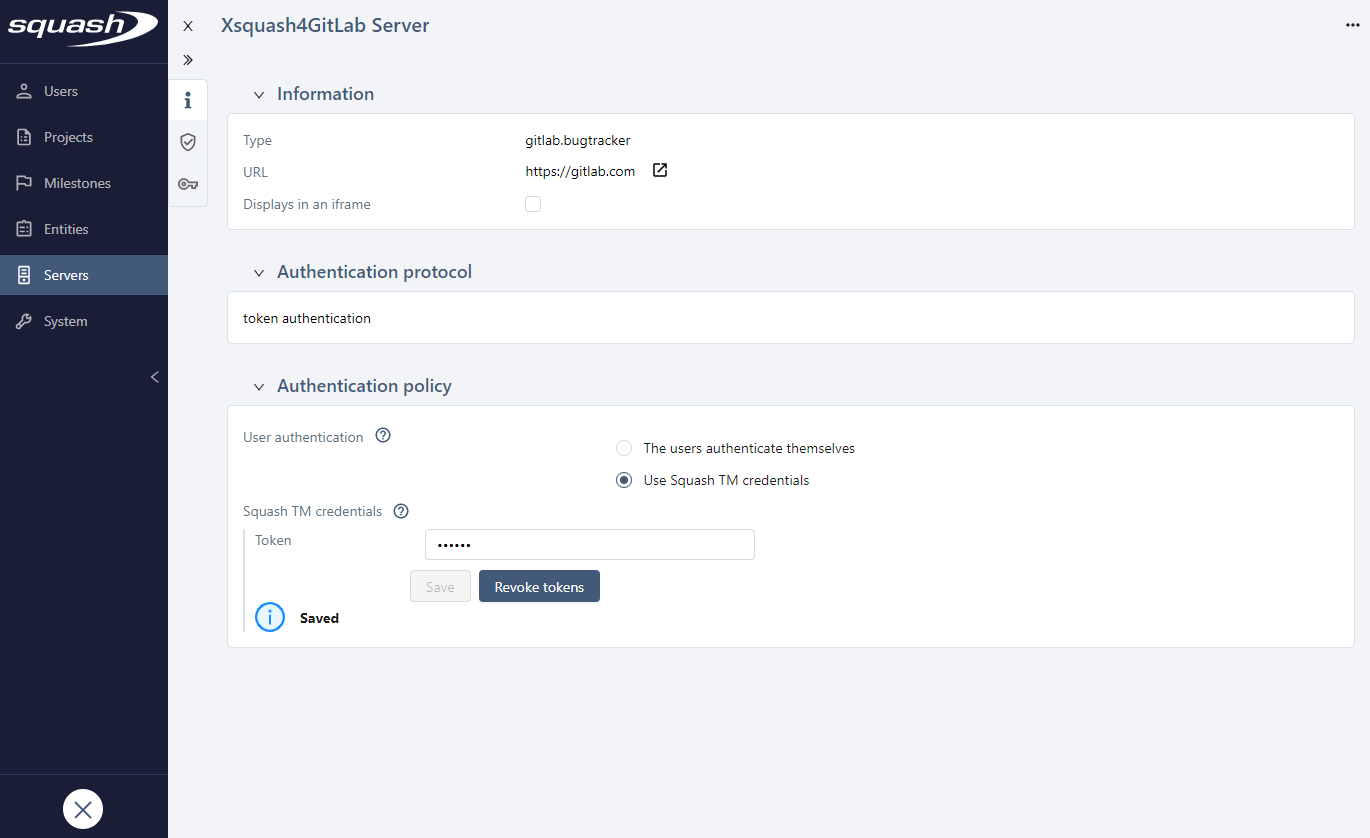
This option enables all the synchronizations to be done with the same GitLab account. The usual solution we recommend is to create a technical account dedicated to the plugin in GitLab with the necessary rights only for the desired GitLab projects.
Then, on a synchronization server configuration page, in the Authentication Policy block, it is necessary to add the GitLab technical account token generated in GitLab in the Squash TM credentials section.
Configure Xsquash4GitLab for a Project
You can configure GitLab issue synchronizations individually for each Squash TM project. For this, go to your project's consultation page, then click on the Plugins anchor 
First, activate the Xsquash4GitLab connector plugin to access its own specific configuration page by clicking on the button  .
.
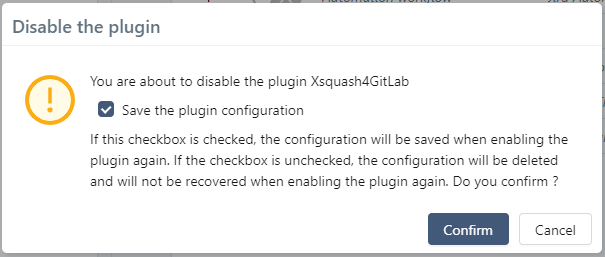
To deactivate the plugin for the project, click on the same button you clicked on to activate it. When checked, the option "Save plugin configuration" enables you to save the plugin's configuration while it is being deactivated, and the project's synchronizations. If unchecked, the project's configuration and synchronization are permanently deleted when the plugin is deactivated.
You can access Xsquash4GitLab's configuration page clicking on the button  at the end of the Xsquash4GitLabConnector row.
The Xsquash4GitLab configuration page has 4 blocks:
- The Synchronizations block enables you to configure the synchronization perimeters.
- The Field mappings block enables you to configure the mapping for GitLab and Squash TM fields.
- The Field value mappings block enables you to configure the value mapping for list-type fields: "Criticality", "Category", and "Status".
- The TM acceptance data reporting block allows you to enable or disable the reporting to see the course of acceptance testing with GitLab issues.
Configure Synchronizations
A synchronization is the work unit of the Xsquash4GitLab plugin. It represents all the GitLab issues defined by a dynamic perimeter that are retrieved by Squash TM. This dynamic perimeter is recalculated every time there is an update. By default, there is a 5-minute delay between each synchronization.
The synchronization perimeter is defined by two elements:
- the issues' perimeter: the group or project in which the issues to be synchronized are
- the synchronization type: combined with the issues' perimeter, it enables you to define if the issues to be synchronized must match filters on their fields or are in a GitLab issue board
Here is the perimeter retrieved according to the chosen synchronization type:
| Issues perimeter | Type | Synchronization perimeter | Note |
|---|---|---|---|
| Group or project | Filters on issues | All the group or project's issues that match the filters applied on their field. If the issues' perimeter is a group, the issues are those that are included in the group's projects. | Squash TM controls the synchronization perimeter. |
| Group or project | Board | Issues that are included in a board of the selected group or project. The board configuration is taken into account. | Squash TM controls the synchronization perimeter. If the board configuration is modified on GitLab, the synchronization perimeter is modified in Squash TM, without warning. If the board is deleted in GitLab, the synchronization fails with an error message in Squash TM logs. |
Create a synchronization
To create a synchronization, click on the button ![]() on top of the Synchronizations block.
on top of the Synchronizations block.
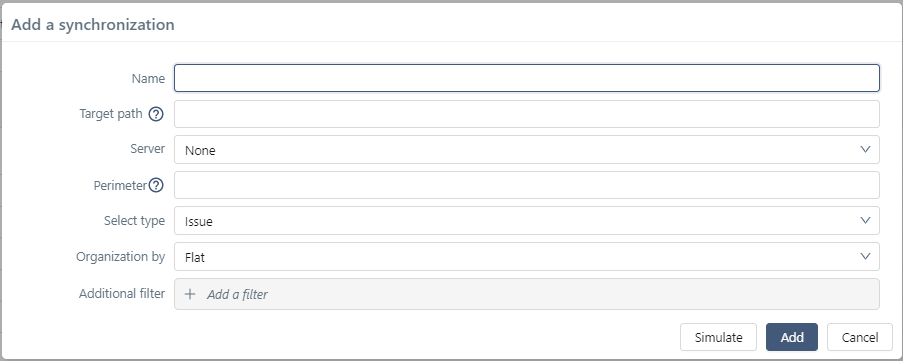
This table details the popup fields and how to fill them out.
| Name | Mandatory | Editable | Notes |
|---|---|---|---|
| Name | Yes | Yes | Unrestricted name. Must be unique in all the Squash TM instance. |
| Target Path | Yes | No | Initial path of the synchronization's target repository. This repository must not be in the Requirements workspace. It is created by Xsquash4GitLab during the first update. The path must not begin by a / (ex: folder1/subfolder1) |
| Server | Yes | No | Xsquash4GitLab used in the synchronization. Choose it in the list of configured servers, on the Bugtrackers and Synchronization Servers Administration page. |
| Perimeter | Yes | No | Group, subgroup or project path where the issues to synchronized are. This should be the path as it appears in the GitLab URL. e.g. group-1/sub-group-1/project-1 to synchronize the "Project 1" issues, or group-1 to synchronize the "Group 1" issues. |
| Select by | Yes | No | Synchronization type. There are two options available: Issue or Board. The next fields in the popup will change depending on the option you choose. |
| Board | Yes | Yes | Board to synchronize. It is displayed only if the "Perimeter" field is filled and if the synchronization type is "Board" |
| Organization by | Yes | No | How the synchronized issues are organized in the Squash TM requirements library. There are four options depending on the synchronization type: - Flat (Issue) : all the GitLab issues are synchronized at the root of the synchronization's target repository. - Iteration (Issue and Board) : a repository is created for each iteration of the perimeter - Milestone (Issue and Board) : a repository is created for each milestone of the perimeter - Tree (Issue) : if the perimeter is a group, a repository is created for each subgroup and project |
| Active filters | No | Yes | Allows to refine the synchronization perimeter by applying filters on the issue fields. For example, allows to restrain the synchronization to the current iteration or milestone. Only available for the "Issue" synchronization type. |
Simulate a synchronization
When adding a new synchronization, you can simulate it before confirming its creation.
For this, click on the [Simulate] button in the "New synchronization" window. This enables you to view the number and details of the tickets the synchronization contains. Thus, you can verify that they belong to your desired perimeter.
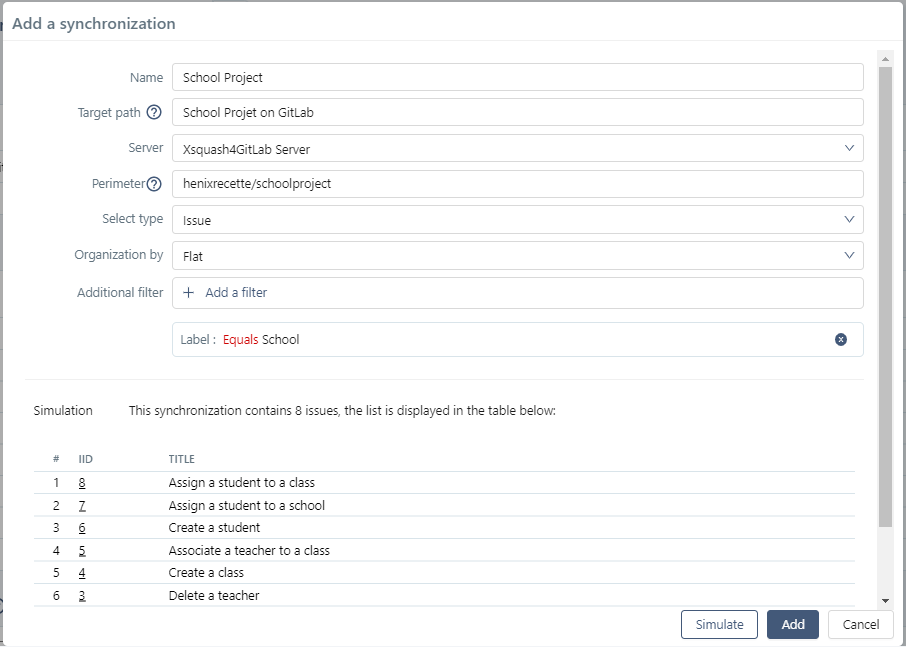
Track Synchronizations
Once you have configured the synchronization, an additional row appears in the synchronization table. During the next update, all the synchronized requirements corresponding to the perimeter will be created. If the synchronization fails because of an error, nothing is created in Squash TM. The status of every synchronization is displayed in the synchronization table.
The button enables you to refresh the configuration page to see if the status of the synchronizations was updated following the update.
Force a Complete Synchronization
By default, the plugin only updates the synchronized requirements that were modified in GitLab since the last known update, and that are in success.
In the case of a change of field or value mapping in Squash TM, you must resynchronize all the requirements in Squash TM, even if nothing has changed in GitLab.
The button enables you to force the update of all the synchronized issues in the current perimeter of one or multiple synchronizations.
Info
To avoid useless updates, we recommend that you do the mapping before declaring the synchronizations.
If the mapping must evolve afterward, we recommend that you first do all the changes of the field and value mappings, and then force all the project synchronizations just once.
Deactivate a Synchronization
The radio button at the beginning of each row enables you to deactivate or reactivate a synchronization without deleting it. When a synchronization is deactivated, the issues in its perimeter are no longer synchronized. The row is grayed out and can no longer be edited, but you can still delete the synchronization.
When it is reactivated, the issues are synchronized again in Squash TM and retake their synchronization attributes, as well as the mapping and reporting defined in the other blocks.
Delete a Synchronization
The button  enables you to delete one or multiple synchronization. In keeping with the non-deletion policy, synchronized requirements are not deleted but transformed into Squash TM native requirements (displayed in black). They are no longer updated from GitLab and behave as any other Squash TM requirement would. It is the same for synchronized repositories (target and iteration, milestone and project repositories).
If you to delete these requirements, you must do it manually as you would for any Squash TM requirement.
Configure Field Mappings
For Squash TM to display the information contained in the fields of GitLab issues, you must configure the field mappings. For this, go to the 2nd block on the Xsquash4GitLab configuration page.
The button ![]() on top of the block enables you to add a new mapping.
on top of the block enables you to add a new mapping.

The Squash TM fields available are in a drop-down list. You can add more fields to this list by adding custom fields to the project's requirements. For most cases, we recommend that you use "Simple text" or "Tag" Squash TM custom fields to retrieve the data from GitLab issues.
Learn More
To learn more about custom fields, please visit this page: Manage custom fields.
The GitLab fields are also available in a drop-down list. The same GitLab field can be mapped with several Squash TM fields. There are some default mapping that can't be modified and/or deleted.
Once you have configured the block, don't forget to force the project's synchronization for your changes to be taken into account. You must also force the synchronization after deleting a mapping in the table. Otherwise, errors will appear in the logs.
Info
Some GitLab fields in the drop-down list are only available with GitLab Premium or Ultimate. If there is a mapping with one of these fields with GitLab Community, the field's synchronization will be ignored.
Configure Field Value Mappings
In GitLab, the issue information is mostly defined as labels or scoped labels in a unique field. Criticality, status and category are usually defined as labels.
If a field value mapping was configured between the GitLab field "Label" and the Squash TM fields "Criticality", "Category", or "Status", you must configure the field value mappings to get a complete mapping. For this, go to the 3rd block.
To configure them, you must use YAML syntax. You must follow this format, which is explained in the Configuration help.
In the configuration help:
- squashfield corresponds to the name of the Squash TM field in English and in lowercase, as displayed in the list of fields and values available at the end of the help
- gitlabvalue is the value of the GitLab label as defined in GitLab, it is case-sensitive. Scoped labels' syntax must be 'key::value'
- squashvalue is the value of the Squash TM field as displayed in the list of fields and values available at in the help section
Here is an example to configure these 3 fields:
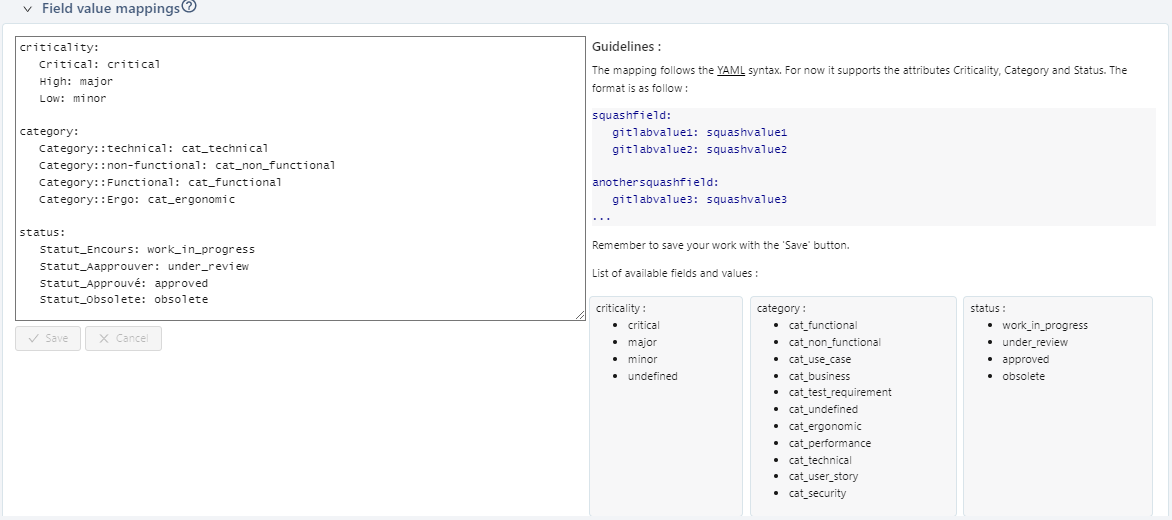
Once you have configured this block, don't forget to force the project's synchronizations for your changes to be taken into account. You also must force the synchronization after deleting a mapping.
Learn More
You can associate an information list to the "Category" field of the project's requirement to retrieve the value of GitLab issues in Squash TM as in the example above.
To learn more about custom list, please visit this page: Manage Custom Lists.
Warning
The statuses "Approved" and "Obsolete" block all requirement changes.
If you do a mapping with these two statuses, the requirements that will automatically get these statuses will no longer be updated afterward.
You will have to manually modify the status 'Writing in progress' or 'To be approved' to reactivate the requirement's update.
Configure the Reporting from Squash to GitLab
The Xsquash4GitLab plugin is able to transfer information related to acceptance in Squash TM to GitLab. This information is directly reported in GitLab issues, as a note.
There are 4 types of information: 3 testing progress rates (Writing of test cases, Verification of GitLab issues, Validation of GitLab issues) and 1 field, "Testing Status", presenting a summary analysis of these 3 rates.
This reporting is optional. You can enable it or disable it in the "TM acceptance data reporting" block.
If it is enabled, a note is created in each synchronized GitLab issue. This note is then updated during a synchronized cycle, only if the indicators values have changed.
If it is disabled, nothing is created in GitLab. However, if the reporting was previously enabled, the existing GitLab notes won't be deleted when disabling it.

Focus
For the reporting to work, the Squash TM public URL must be configured. Only a Squash TM administrator can do it. The procedure is described on the page Squash TM public URL
Configure real-time synchronization
GitLab issues can be synchronized in real-time in Squash TM, without waiting for the next synchronization cycle.
The configuration has to be done in GitLab and is based on webhooks.
This Real-time synchronization panel allows you to copy the information you need to set up the integration in GitLab:
- Webhook URL: To see this URL, Squash TM public URL must be configured
- Secret token: Optional, only if a token has been configured in the properties file by a system administrator. Depending on the configuration, it is shown or hidden in Squash TM UI.
In GitLab, the configuration can be set up for a project, a group, or an instance (for GitLab Self-Managed). The following procedure describes the configuration for a project:
- On the top bar, select Main menu > Projects and find your project
- On the left sidebar, select Settings > Integrations
- Select Squash TM
- Ensure that the Active toggle is enabled
- In the "Trigger" section, indicate which type of issue is concerned by the real-time synchronization
- In the "Squash TM webhook URL" field, paste the webhook URL
- In the "Secret token (Optional)" field, paste the secret token (only if configured in Squash TM)
- Save