Configure Xsquash4Jira in Squash TM
The Xsquash4Jira plugin is a Squash TM plugin dedicated to the synchronization of issues from Jira Server, Jira Datacenter and Jira Cloud. It has three main features:
-
An automatic synchronization module that enables Squash TM to import and keep Jira (Server, Datacenter, and Cloud) issues updated as requirements in the Requirements workspace.
-
A reporting module that enables you to display information in the tickets about the course of acceptance testing in Squash TM. This information can be displayed in custom fields you can add in Jira issues, which Squash TM then completes.
-
A module to create test plans from Jira objects. You can access this wizard from the Campaigns workspace. It enables you to create test plans by filtering delivered versions, sprints, or JQL requests from Jira. All the test cases associated with the issues within the chosen perimeter are suggested to the user to be added to the execution plan.
Most of the Xsquash4Jira's features are automatic and start on their own once the configuration is fully completed:
| Name | Start | Flow direction |
|---|---|---|
| Synchronization of Jira issues | Automatic once the configuration is completed | From Jira to Squash TM |
| Squash TM acceptance data reporting | Automatic once the configuration is completed | From Squash TM to Jira |
| Create a test plan in Squash TM from Jira objects | Manual from the Squash TM Campaigns workspace | From Jira to Squash TM |
Attention
During these automatic actions, the plugin will never erase requirements synced in Squash TM or issues in Jira. If issues were to be deleted or moved in Jira, the corresponding requirements would remain in Squash TM and would have to be manually deleted by Squash TM users if needed.
Learn More
This page is dedicated to the configuration of the Xsquash4Jira plugin from the Squash TM administration.
To learn more about synced requirements and the Jira execution plan designer, please visit the page: Synchronize Jira Agile Objects in Squash
Installation and Prerequisites
Info
By default, the Xsquash4Jira plugin is included with the Squash TM Freeware. Therefore, it is already installed in Squash TM.
To learn more, please visit this page: Squash TM plugins
Squash TM/Jira Communication
The Xsquash4Jira plugin is based on a bidirectional communication between Squash TM and Jira. It is a server to server communication that goes through Jira's Rest API. For the plugin to work, the communication must be possible. Often, this requires interventions on the network's infrastructure: opening flows in the firewalls, adding certificates in the JVMs, etc.
If the same Jira server is already used with success as a bugtracker thanks to the Jira Bugtracker plugin, it means that the communication is already possible.
Should there be a problem, you must directly test the Squash TM server to verify if it can access Jira. For this, try to make a request directly to the Jira API or from the server hosting Squash TM using a curl or wget. If it doesn't work, it means it's a network problem.
Jira account authorizations
To work, the plugin must be able to communicate with Jira, or through a Jira user. That user must at least have Read permissions on the API for all the issues to synchronize. If reporting from Squash to Jira is activated, the user must have writing rights on the API for all the tickets in question.
Create the Xsquash4Jira server in Squash TM
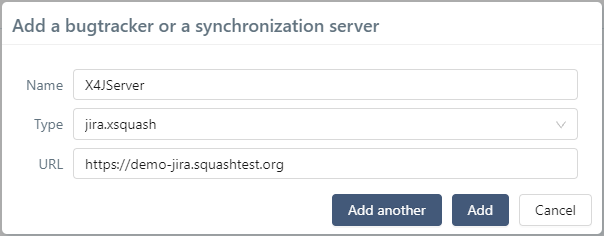
To use the Xsquash4Jira plugin, you must declare a synchronization server of the type jira.xsquash in the Squash TM Administration, in the Servers>Bugtrackers and Synchronization servers workspace.
In the popup to create a new server, enter the server name (unrestricted), "jira.xsquash" as the type, and the simplest Jira URL, then click on "Add". The "Xsquash4Jira" plugin is compatible with Jira Server, Jira Datacenter, and Jira Cloud.
Warning
An Xsquash4Jira synchronization server cannot be deleted if it is being used for synchronizations. You must delete the synchronizations beforehand to be able to delete the server.
Credentials used for the synchronizations
The plugin uses the Jira API to retrieve data with a basic authentication, using the credentials of the Jira account used for each synchronization.
Focus
Depending on Jira hosting, Jira user credentials are: login/password for Jira Server/Data Center or email adress/token for Jira Cloud. For more information about API tokens, visit the page Jira Cloud API tokens
Learn More
For security reasons, the login and password entered to connect to third-party tools are encrypted in the database with an encryption key. The Xsquash4Jira plugin also has two properties that must be directly configured in Squash TM's configuration file squash.tm.cfg.properties. To learn more, please visit this page: Manage Squash TM's Configuration File
Two options are available to synchronize issues.
Technical account
This option enables all the synchronizations to be done with the same Jira account. The usual solution we recommend is to create a technical account dedicated to the plugin in Jira with the necessary rights only for the desired Jira projects.
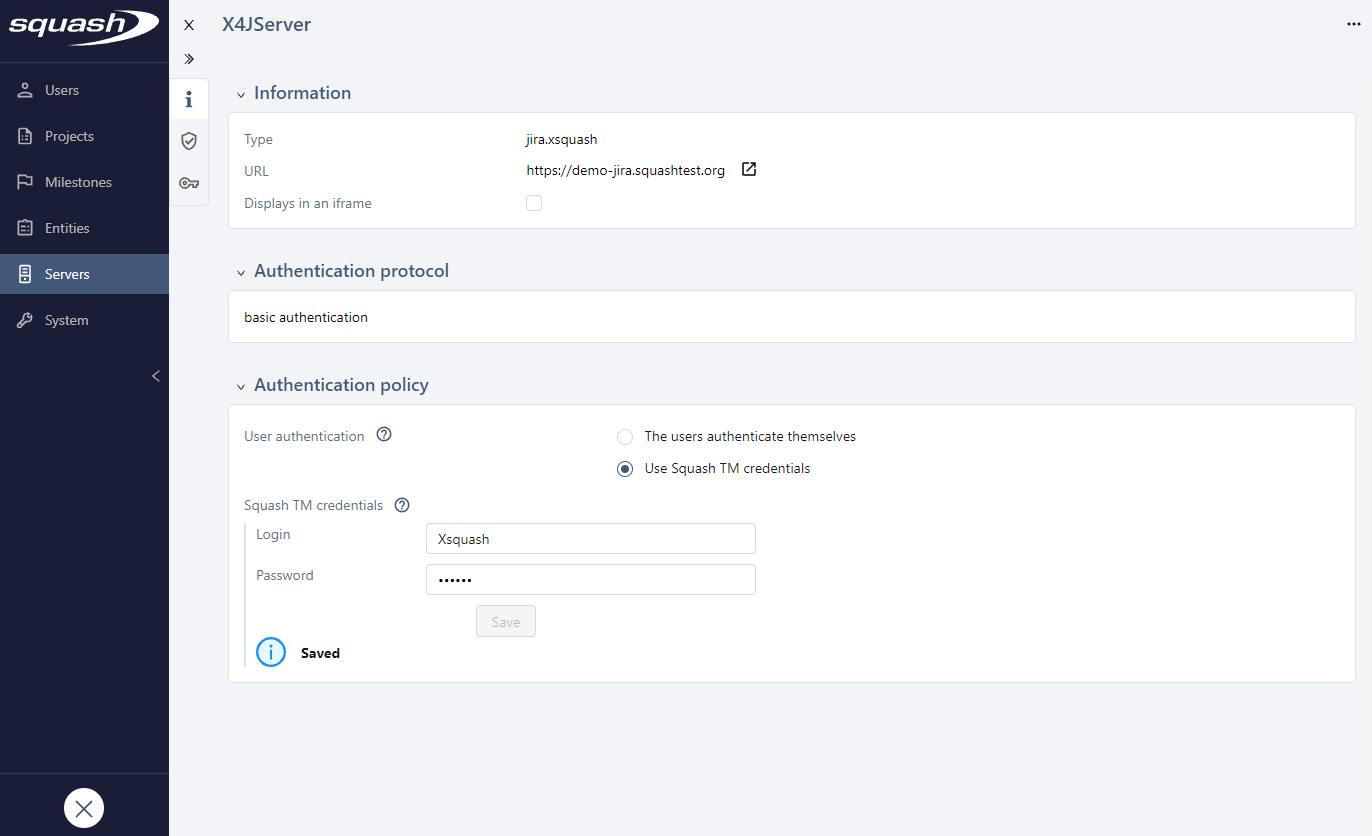
Then, on a synchronization server configuration page, in the Authentication Policy block, it is necessary to add the Jira technical account credentials in the Squash TM credentials section.
User credentials
This option enables each synchronization to be done with different Jira accounts. It is useful when the Jira projects are partitioned because it allows to have more control on the issues' perimeter that could be synchronized. With this option, the credentials of the user who is the synchronization owner are used. Those are the credentials added in the Configuration mode of the bugtrackers block on 'My account' workspace. The default owner is the user who has created the synchronization, but another user can become the new owner afterwards.
If this option is chosen, on a synchronization server configuration page, in the Authentication Policy block, Squash TM credentials fields must be left empty.
Configure Xsquash4Jira for a Project
You can configure Jira issue synchronizations individually for each Squash TM project. For this, go to your project's consultation page, then click on the Plugins anchor 
First, activate the Xsquash4Jira connector plugin to access its own specific configuration page by clicking on the button  .
.
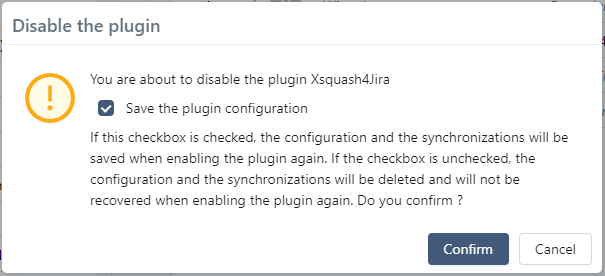
To deactivate the plugin for the project, click on the same button you clicked on to activate it. When checked, the option "Save plugin configuration" enables you to save the plugin's configuration while it is being deactivated, and the project's synchronizations. If unchecked, the project's configuration and synchronization are permanently deleted when the plugin is deactivated.
You can access Xsquash4Jira's configuration page clicking on the button at the end of the Xsquash4Jira Connector row
The Xsquash4Jira configuration page has 5 blocks:
- The Synchronizations block enables you to configure the synchronization perimeters.
- The Reporting fields from Squash to Jira block enables you to configure the reporting to see the course of acceptance testing with Jira issues.
- The Field mappings block enables you to configure the mapping for Jira and Squash TM fields.
- The Field value mappings block enables you to configure the value mapping for list-type fields: "Criticality", "Category", and "Status".
- The Link between requirements mappings block enables you to configure the mapping of the links between Jira issues as links between requirements in Squash TM.
Configure Synchronizations
A synchronization is the work unit of the Xsquash4Jira plugin. It represents all the Jira issues defined by a dynamic perimeter that are retrieved by Squash TM. This dynamic perimeter is recalculated every time there is an update. By default, there is a 5-minute delay between each synchronization.
You can define this perimeter from the "Synchronization type". This synchronization type can either be a "Table", a "Filter", or a "JQL Request". For tables, you can refine the filter with the field "Extra JQL" and the option "Limit to active sprint".
Here is the perimeter retrieved according to the chosen synchronization type:
| Type | Perimeter | Note |
|---|---|---|
| Table | All the issues included in the filter used to build the table in Jira. | In Jira, a filter controls the perimeter. This filter is in fact the filter linked to the targeted table. As a reminder, a Jira table is first and foremost a filter, to which are added more filters. |
| Filter | All the issues sent back by this filter call in Jira | In Jira, a filter controls the perimeter. If the filter is modified in Jira, the perimeter in Squash will be modified, without any warning nor message. If the filter is deleted in Jira, the synchronization will fail, and you will receive an error message in the logs. |
| JQL | All the issues sent back by sending this to Jira's search API | Squash TM controls the perimeter. This is useful when you can't create the right filters in Jira. |
Create a synchronization
To create a synchronization, click on the button  on top of the Synchronizations block.
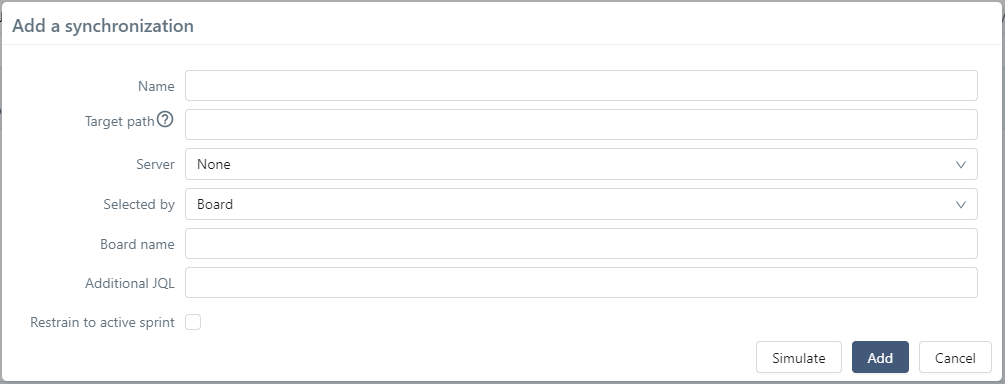
This table details the popup fields and how to fill them out.
| Name | Mandatory | Editable | Notes |
|---|---|---|---|
| Name | Yes | Yes | Unrestricted name. Must be unique in all the Squash TM instance. |
| Target Path | Yes | No | Initial path of the synchronization's target repository. This repository must not be in the Requirements workspace. It is created by Xsquash4Jira during the first update. The path must not begin by a / (ex: folder1/subfolder1) |
| Server | Yes | No | Xsquash4Jira used in the synchronization. Choose it in the list of configured servers, on the Bugtrackers and Synchronization Servers Administration page. |
| Select by | Yes | No | Perimeter type. There are three options available: Table, Filter, or JQL Request. The next fields in the popup will change depending on the option you choose. |
| Table Name | Yes | Yes | Name of the table to synchronize as it appears in Jira. Case-sensitive. |
| Extra JQL | No | Yes | Enables you to refine the perimeter using an extra JQL clause. This clause must not contain any operator (AND, OR...) at the beginning or the end of any clause; it must only contain selection criteria (no ORDER BY or any other clauses...). |
| Limit to active sprint | - | No | Enables you to keep synchronized only the issues in a sprint with an "Active" status in Jira. This only makes sense for a "Table"-type, which indicates a SCRUM-type table, since the other tables do not have any sprints. |
| Filter name | Yes | Yes | Name of the filter to synchronize, as it appears in Jira. Case-sensitive. |
| JQL Request | Yes | Yes | JQL request that defines the synchronization perimeter. It must not contain any operator (AND, OR…) at the beginning or the end of any clause; it must only contain selection criteria (no ORDER BY or any other clauses...). |
Simulate a synchronization
When adding a new synchronization, you can simulate it before confirming its creation.
For this, click on the [Simulate] button in the "New synchronization" window. This enables you to view the number and details of the tickets the synchronization contains. Thus, you can verify that they belong to your desired perimeter.
Track Synchronizations
Once you have configured the synchronization, an additional row appears in the synchronization table. During the next update, all the synchronized requirements corresponding to the perimeter will be created. If the synchronization fails because of an error, nothing is created in Squash TM. The status of every synchronization is displayed in the synchronization table.
The button  enables you to refresh the configuration page to see if the status of the synchronizations was updated following the update.
Force a Complete Synchronization
By default, the plugin only updates the synchronized requirements that were modified in Jira since the last known update, and that are in success.
In the case of a change of field or value mapping in Squash TM, you must resynchronize all the requirements in Squash TM, even if nothing has changed in Jira.
The button  enables you to force the update of all the synchronized issues in the current perimeter of one or multiple synchronizations.
Info
To avoid useless updates, we recommend that you do the mapping before declaring the synchronizations.
If the mapping must evolve afterwards, we recommend that you first do all the changes of the field, value, and link mappings, and then force all the project synchronizations just once.
Deactivate a Synchronization
The radio button at the beginning of each row enables you to deactivate or reactivate a synchronization without deleting it. When a synchronization is deactivated, the issues in its perimeter are no longer synchronized. The row is grayed out and can no longer be edited, but you can still delete the synchronization.
When it is reactivated, the issues are synchronized again in Squash TM and retake their synchronization attributes, as well as the mapping and reporting defined in the other blocks.
Delete a Synchronization
The button  enables you to delete one or multiple synchronization. In keeping with the non-deletion policy, synchronized requirements are not deleted but transformed into Squash TM native requirements (displayed in black). They are no longer updated from Jira and behave as any other Squash TM requirement would. It is the same for synchronized repositories (target and sprint repositories).
If you to delete these requirements, you must do it manually as you would for any Squash TM requirement.
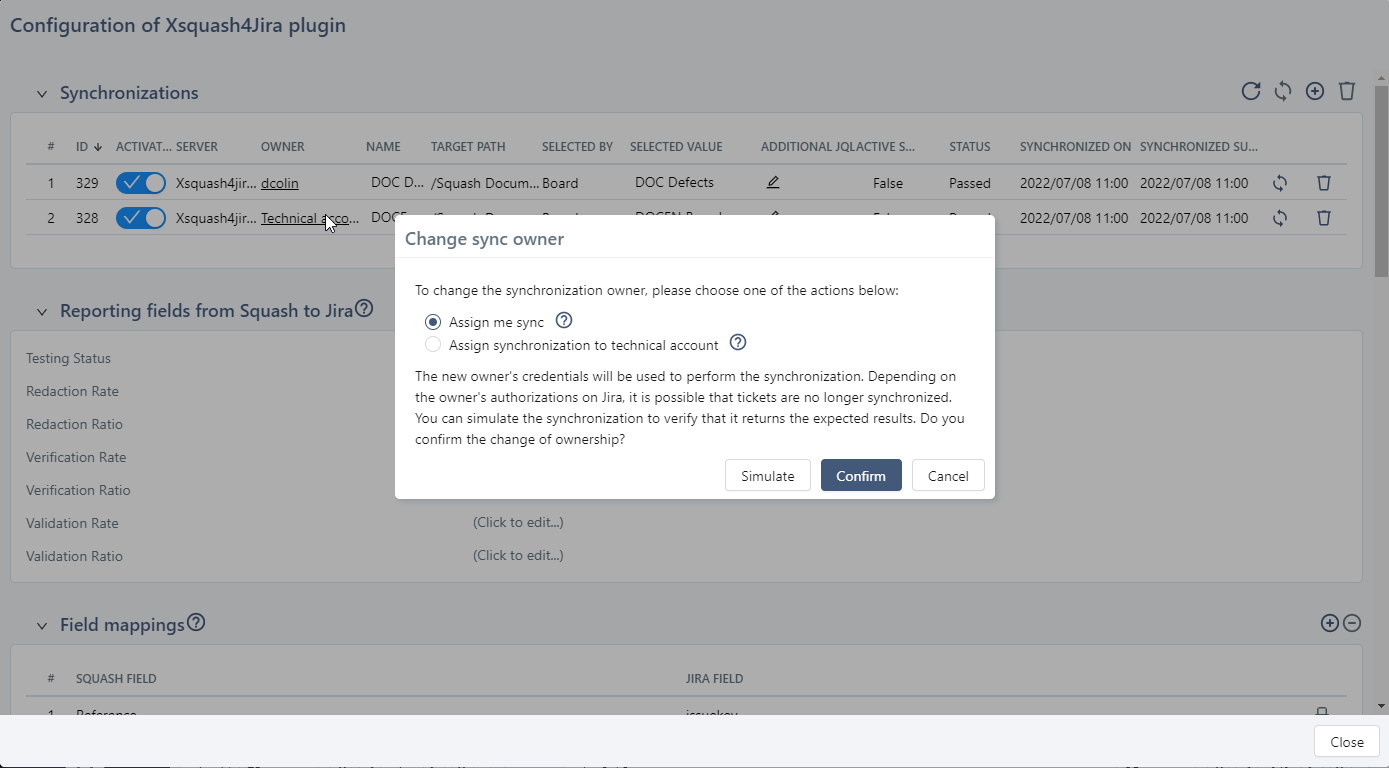
Synchronization owner
In the synchronizations table, the Owner column shows which credentials were used for each synchronization. There are several possibilities:
- the synchronization is done with the technical account, e.g. synchronization server's credentials. The synchronization owner is the "Technical account".
- the synchronization is done with the user credentials. The synchronization owner is a user. The default owner is the user who has added the synchronization.
It is possible to modify an existing synchronization owner by assigning it to either another user, or to the technical account. The synchronization will be done with the new owner credentials.
To do so, when clicking on a synchronization owner, a popup window allows the user to assign the synchronization to himself or to the technical account. He can also do a synchronization simulation to make sure that the synchronization brings back the expected issues with the new owner credentials.
Warning
It is impossible to delete a user who is a synchronization owner. The synchronization owner must be modified first.
Configure the Reporting from Squash to Jira
The Xsquash4Jira plugin is able to transfer information related to acceptance in Squash TM to Jira. This information is directly reported in Jira issues, more precisely in the custom fields especially configured for this purpose.
There are 7 types of information: 3 acceptance progress rates (Writing of test cases, Verification of Jira issues, Validation of Jira issues); 3 ratios using these progress rates as well as the number of tests involved; and 1 field, "Acceptance Status", presenting a summary analysis of these 3 rates.
This reporting is optional. You can configure Xsquash4Jira to not retrieve anything in Jira or only part of all this information.
Focus
The fields "rates" and "ratios" contain similar information. Therefore, it is useless to synchronize all of them, and more interesting to choose only one of the two.
"Rates" fields are a number between 0 and 100.
"Ratios" fields consist on the "Rates" fields value with a % symbol followed by the number of relevant test cases (X/Y test cases).
Create Reporting Fields in Jira
In Jira, reporting is done thanks to custom fields you can add directly in the Jira issues involved in the synchronization:
| Acceptance information | Custom fields to create in Jira |
|---|---|
| Progress rate (Writing, Verification, Validation) | In Jira, you must create a numerical custom field for each of the three rates suggested by the plugin you want to retrieve in Jira. The name is unrestricted. |
| Progress ratios (Writing, Verification, Validation) | In Jira, you must create a custom text field (single line) for each of the three ratios suggested by the plugin you want to retrieve in Jira. The name is unrestricted. |
| Testing status | In Jira, you must create a custom text field (single line) for this field. You must choose "Wiki Style Renderer" for this field renderer to activate the icon display. The name is unrestricted. |
Then, you must create Jira custom fields. They must:
- Be assigned to every type of issue that is likely to be synced in Squash TM;
- Be accessible in the editing screens of the issue types and relevant projects;
- Be editable by the technical user declared in Squash TM.
The field names declared in Jira are unrestricted. However, be careful that all the Jira issues involved in the synchronizations of one single project all have the same fields since in Squash TM, it is the project you have to configure.
These fields will be completed by Squash TM according to the acceptance's progress and transferred to Jira during each update cycle if needed.
Configure Reporting Fields in Squash TM
In Squash TM, to configure the reporting, go to "Configure the Xsquash4Jira plugin", and then to the second block "Reporting Fields from Squash to Jira".
To configure them, complete the case-sensitive fields corresponding to the data you want to retrieve.
Once you have configured the block, don't forget to force the synchronization so that the changes you made are taken into account.
If you do not want any reporting in Jira, please leave these fields empty.

Display Reporting Data in Jira
When reporting fields are correctly configured in Jira and entered correctly in Squash TM, Xsquash4Jira automatically completes these fields during synchronizations and updates if needed.
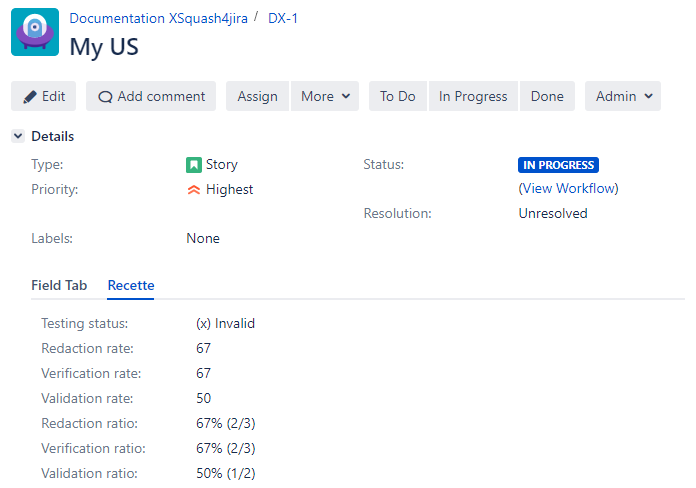
Redaction Rate:
This rate enables you to see the progress of the test case redaction. For a synced requirement, this rate is equal to:
Number of test cases covering the requirement or one of its children with the status "Under review" or "Approved" / Number of test cases covering the requirement or one of its sub-requirements no matter their status.
If a requirement is not covered, this rate equals 0.
Redaction Ratio:
This field uses the value of the redaction rate followed by the number of relevant test cases (X/Y test cases).
Verification Rate:
This rate enables you to track the execution progress of the test cases linked to a requirement or one of its children. For a given synced requirement, this rate is equal to:
Number of ITPIs linked to a TC covering the synced requirement or one of its children with a final execution status (Blocked, Failed, Untestable, Success, Settled), only taking into account the last execution (or last fast pass) / Number of ITPIs linked to test cases covering the synced requirement or one of its children
Verification Ratio: This field re-uses the value of the verification rate followed by the number of test cases involved (X/Y test cases).
Validation Rate:
This rate enables you to track the validation of a requirement. For a synced requirement, this rate is equal to:
Number of ITPIs linked to a TC covering the synced requirement or one of its children with a validated execution status (Success or Settled), only taking into account the last execution (or last fastpass) / Number of ITPIs linked to a TC covering the synced requirement or one of its children with a final execution status, only taking into account the last execution (or last fast pass)
Validation Ratio:
This field re-uses the value of the validation rate, followed by the number of test cases involved (X/Y test cases).
Testing Status:
It's a synoptic field that summarizes the different possible acceptance statuses for a given requirement.
The calculation method is as follows:
| Writing Rate | Verification Rate | Validation Rate | Acceptance Status |
|---|---|---|---|
| 0 | 0 | 0 | Not initialized |
| 0 < Writing Rate < 100 | 0 | 0 | Design in progress |
| 100 | 0 | 0 | To execute |
| All | 0 < Verification Rate < 100 | 100 | Execution in progress |
| All | 0 < Verification Rate | Validation Rate < 100 | Not validated |
| All | 100 | 100 | Validated |
You can display only this field in Jira if it was configured separately. The rates will be calculated but not transmitted to Jira.
Configure Field Mappings
For Squash TM to display the information contained in the fields of Jira issues, you must configure the field mappings. For this, go to the 3rd block on the Xsquash4Jira configuration page.
The button on top of the block enables you to add a new mapping.
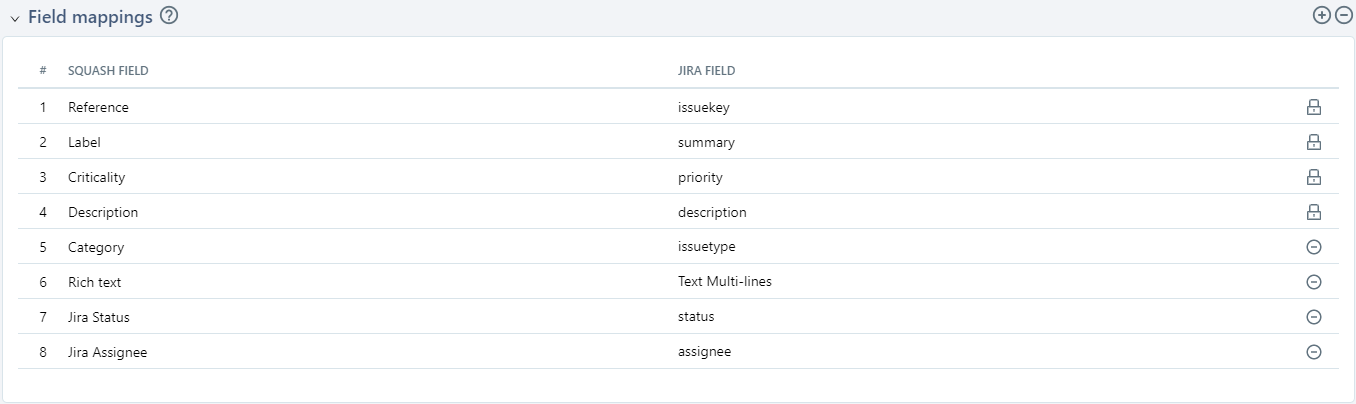
The Squash TM fields available are in a drop-down list. You can add more fields to this list by adding custom fields to the project's requirements. For most cases, we recommend that you use "Simple text" Squash TM custom fields to retrieve the data from Jira issues. To map Jira "Multi-line (Advanced) Text" fields, we recommend that you use a "Rich text" Squash TM custom field.
Learn More
To learn more about custom fields, please visit this page: Manage custom fields.
Jira fields must be entered with their name as it appears in JQL for native fields. Jira native fields, i.e. "Type", "Status", and "Priority" must be entered in English using lowercase in the mapping table: issuetype, status, priority.
Once you have configured the block, don't forget to force the project's synchronization for your changes to be taken into account. You must also force the synchronization after deleting a mapping in the table. Otherwise, errors will appear in the logs.
Info
If a mapping does not work, check how the Jira name is displayed in the JQL requests, then try again with that value.
Configure Field Value Mappings
If a field value mappings was configured for the Squash TM fields "Criticality", "Category", or "Status", you must configure the field value mappings to get a complete mapping. For this, go to the 4th block.
To configure them, you must use YAML syntax. You must follow this format, which is explained in the Configuration help.
In the configuration help:
- squashfield corresponds to the name of the Squash TM field in English and in lowercase, as displayed in the list of fields and values available at the end of the help.
- jiravalue is the value of the Jira field as displayed in JQL requests or in Jira issues on Jira.
- squashvalue is the value of the Squash TM field as displayed in the list of fields and values available at the end of the help.
Here is an example to configure these 3 fields:
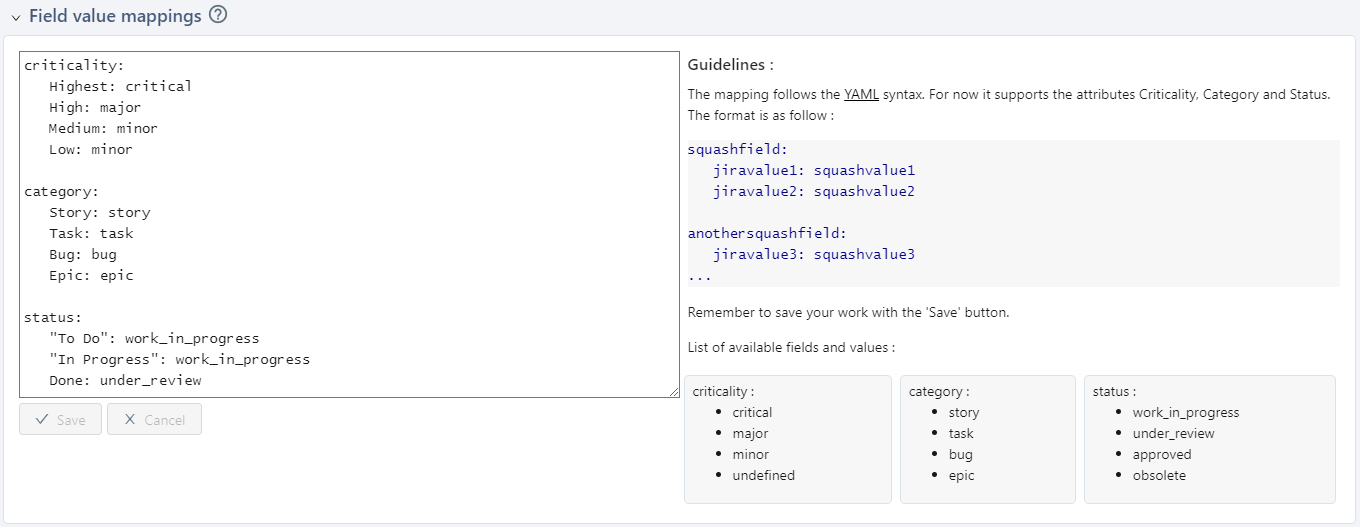
Once you have configured this block, don't forget to force the project's synchronizations for your changes to be taken into account. You also must force the synchronization after deleting a mapping.
Learn More
You can associate an information list to the "Category" field of the project's requirement to retrieve the value of Jira issues in Squash TM as in the example above.
To learn more about custom list, please visit this page: Manage Custom Lists.
Warning
The statuses "Approved" and "Obsolete" block all requirement changes.
If you do a mapping with these two statuses, the requirements that will automatically get these statuses will no longer be updated afterwards.
You will have to manually modify the status 'Work in progress' or 'Under review' to reactivate the requirement's update.
Configure the Mappings of Links Between Requirements
Xsquash4Jira also enables you to retrieve links between issues from as links between requirements in Squash TM. You can configure this in the 5th block of the Xsquash4Jira configuration page.
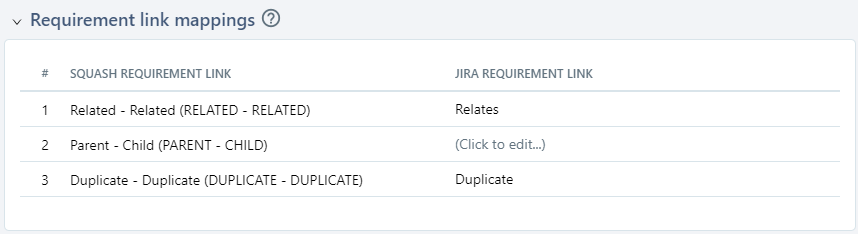
All the Squash links between requirements automatically appear in the mapping table. These are the links configured in the Squash TM administration workspace "Entities > Links between requirements".
Learn More
You can add new links between requirements from the workspace "Entities > Links between requirements".
To learn more about links between requirements, please visit this page: Manage Links Between Requirements.
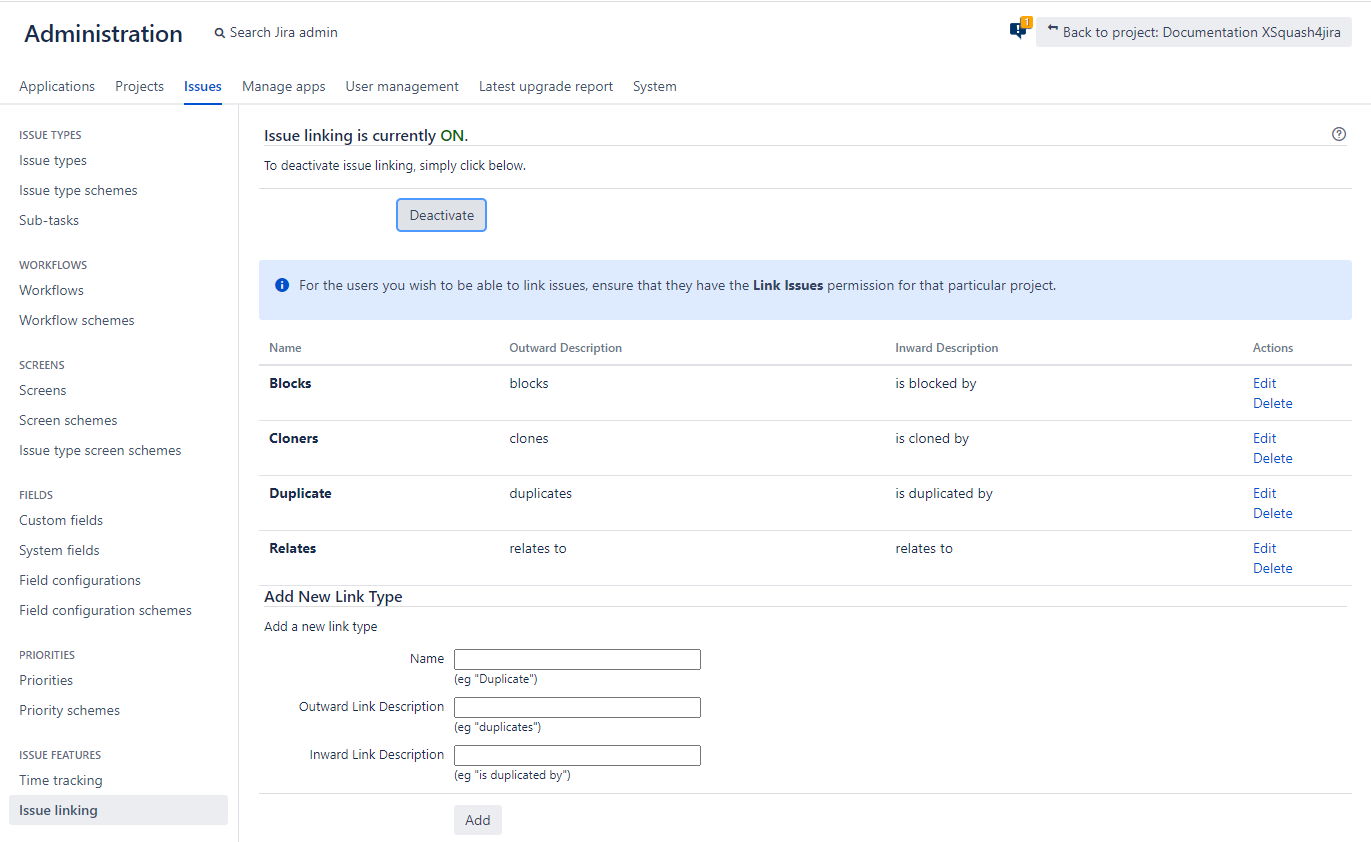
The Jira link between requirements must be referred to by its name, as displayed in the part "Create links between demands" in the Jira Server/Datacenter administration or in the Jira Cloud "Link issues" workspace.
Once you have configured the block, don't forget to force the project's synchronizations for your changes to be taken into account. You also must force the synchronization after modifying a mapping.
Xsquash4Jira Configuration in Project Templates
You can configure Xsquash4Jira in a project template. Thus, you will be able to share it with the projects associated with the template or created from the template. After, at the project level, this configuration can be transmitted to the template or evolve independently of the template.
This feature is useful when you want to configure the Xquash4Jira plugin for multiple Squash projects and the Jira issues to sync come from Jira projects with the same configuration (custom fields, types of issues, priorities, workflow, etc.)
Configure Xsquash4Jira in Project Templates
The Xsquash4Jira plugin configuration page for templates is similar to the projects one, except for the Synchronizations block which is not there for project templates.
For templates, you can configure mappings between the Squash and Jira fields, namely: - Reporting fields from Squash to Jira; - Mappings between fields; - Mappings between field values; - Mappings of the links between requirements.
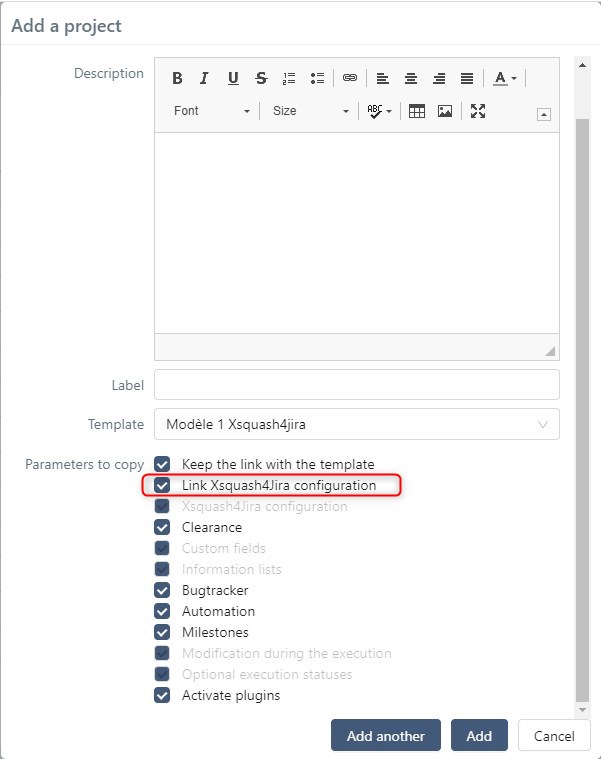
Create a Project Using the Template's Xsquash4Jira Configuration
When creating a project from a template, the option "Xsquash4Jira configuration" enables the administrator to use the template's Xsquash4Jira configuration.

Thus, in the created project, the Xsquash4Jira plugin is already configured, except for the synchronizations which will have to be added by the project manager or administrator. At the project level, Xquash4Jira's configuration can be transmitted to the template or evolve independently of the template.
Link the Template's Xsquash4Jira Configuration to the Linked Projects
When Creating a New Project
When creating a project from a template, an option allows the administrator: - To link the project's Xsquash4Jira configuration to that of the template (checked option): - The configuration at the project level is transmitted to the template, except for the synchronizations; - All the changes made in the template will be transmitted to the linked projects. - Not to link the project's Xsquash4Jira's configuration to that of the template (unchecked option): - The configuration at the project level can evolve independently of that of the linked project; - All configuration changes made at the template level will not be transmitted to the linked projects.
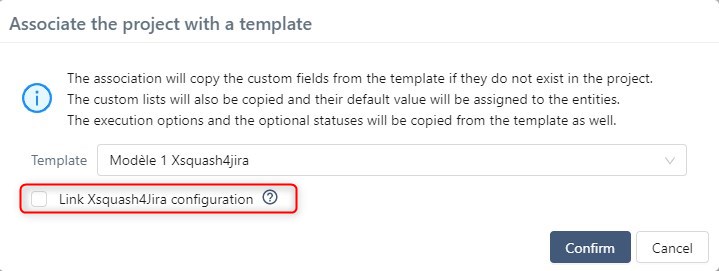
When Associating an Existing Project with a Template
You can also link Xsquash4Jira's configuration when associating an existing project to a template.
In this case, if the Xsquash4Jira plugin was already configured at the project level, this configuration is replaced by that of the template. This will only have an impact on mapping settings, the synchronizations will not be deleted.
Deactivate Xsquash4Jira in the Templates
Deactivating or deleting the configuration in the template deletes the configuration in the linked projects, except for the synchronizations.