Manage Classic Requirements
Create a Requirement
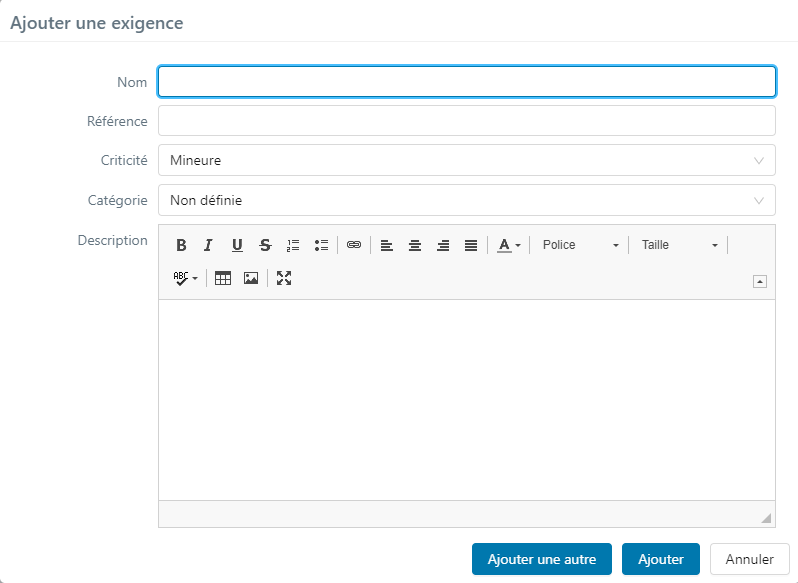
To create a requirement, go to the Requirements workspace, then click on the button  :
:
You can create a requirement at the root of a project, folder, or requirement.
When you create that requirement, you must at least enter a value for the "Name" field.
We recommend that you still enter a reference and description for your requirement, even if these fields are optional.
If you do not select anything for the fields "Criticality" and "Category", the default value will be applied.
If mandatory custom fields are associated with the Requirements entity, they also appear in the popup so that they can be filled in during the creation.
Requirement Attributes
On a requirement's consultation page, different attributes specify that requirement, especially those in the Information block.
Reference
A requirement's reference enables you to organize the repository. You must define naming conventions to organize and identify requirements.
Version number
The requirement's version number is managed by the system. You can click on it to access the page to "Manage the Requirement's Versions". On this page, you will see the list of the requirement's versions.
Status
The "Status" field enables you to assign a status to a requirement ("In progress" being the default status). You can modify the status via the drop-down list, which contains the following values:
 In progress
 To be approved
 Approved
 Obsolete
Criticality
The "Criticality" field enables you to assign a criticality to a requirement ("Minor" being the default criticality). You can modify the criticality via the drop-down list, which contains the following values:
 Critical
 Major
Major Minor
Minor Undefined
Category
The "Category" field enables you to assign a category to a requirement ("Undefined" being the default category). You can modify the category thanks to the drop-down list, which contains the following values:
- Functional
- Non-functional
- Case of use
- Job
- Test requirement
- Undefined
- Ergonomic
- Performance
- Technical
- User story
- Security
Info
For example, you can select the "Technical" value in the "Category" field of a requirement that has to do with the specifications of a technical feature of an application that needs to be tested. You can select the "Functional" value for a requirement that has to do with a functional aspect of the application that needs to be tested.
You can customize this field's values from the Squash administration via an information list.
Learn More
To learn more about information lists, please visit the page Project Information Lists in the Administrator Guide.
Nature
The "Nature" field is filled in with the "Classic" value for a classic requirement. It cannot be edited.
High-Level Requirement
The "High-level requirement" field enables you to see the name of the high-level requirement. This high-level requirement was either automatically linked via the requirement tree or manually via an association of the classic requirement you are viewing. You can click on the requirement's name to acccess the consultation page of the high-level requirement.
Learn More
To learn more about how to associate a classic requirement to a high-level requirement, please visit this page about High-Level Requirements.
Milestones
When you activate the use of milestones, the "Milestones" field enables you to associate your requirement to one or multiple milestones via the button . This enables you to organize your requirement repository.
Description
The "Description" field enables you to describe the requirement expected from the system you are going to test. The description must detail the behavior expected from the system to answer a user need. You can write it as such: "The application must enable the user to [action]".
Requirement ID and Version ID
The Requirement ID is the technical ID of the requirement in the database. One requirement can have multiple versions. The version ID is the technical ID of the requirement version.
These two fields cannot be edited.
Create and Modify
The "Created" field automatically displays the creation date and the login of the user who created the requirement.
The "Modified" field automatically displays the date of the last modification with login of the last user who modified the requirement.
These two fields cannot be edited.
Custom fields
Custom fields can have several forms: simple or rich text, checkbox, drop-down list, date, tag, or numerical. Once configured for the "Requirement" entity of the project by a project leader, they appear in the "Milestones" field of the "Information" block.
Learn More
To learn more about custom fields, please visit this page Project Custom Fields in the administrator guide.
Requirement Workflow
The values of the "Status" field of a requirement represent a conception and validation workflow:
- The "In progress" status is the default status of a qrequirement. This status enables you to identify the requirements that are currently being written.
- Once written, a requirement's status changes to "To be approved" so that it can be validated. We recommend that a contracting authority or product owner team always revises requirements.
- The "Approved" status is assigned to the requirement once it has been validated. As a result, the requirement cannot be modified. However, it is ready to be associated with one or multiple test cases.
- A requirement has an "Obsolete" status once it is no longer valid, following an evolution of the system you are testing. This status enables you to identify archived requirements without actually deleting them from the repository.
Warning
The attributes of a requirement with the statuses "Approved" or "Obsolete" cannot be edited. To be able to edit them, you must change the requirement's status again to "To be approved".
Modification History
The "Modification History" table of a requirement lists all the modifications made to a requirement as soon its status changes from "In progress" to "To be approved".
For example, the reference modification of a requirement with the status "To be approved" appears in this table with the original reference, the new reference, as well as the date and hour of the modification, and the login of the user who modified the reference.