Skip to content

Configure a Project

To configure a project, in the Administration workspace, click on the Projects submenu. Click on your desired project to display its consultation page.

Info

Only an administrator or project leader can configure a project.
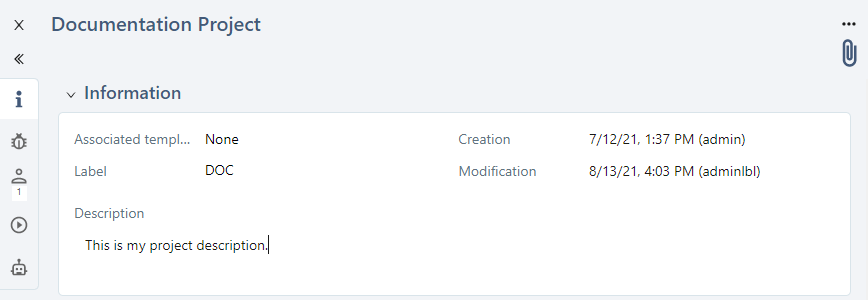
The Information anchor Information enables you to set and view the project's overall data.

Project Information

Configure a Bugtracker

You can configure the link with the bugtracker from the Bugtracker anchor Bugtracker.

To configure a bugtracker for a project, the corresponding server must be declared beforehand by an administrator in the Servers submenu. Then, you can select the bugtracker in a drop-drown list to associate it with the project.

In the Name of the project field, enter the name of the project as it is configured in the third-party tool. Make sure that the name is spelled correctly, with the correct uppercase and lowercase letters. In this field, you can associate multiple projects if you want. When reporting issues, you can choose the project in which the issue must be reported.

Configure a bugtracker in Squash

Info

For some bugtrackers such as GitLab and Azure DevOps, the Name of the project field is replaced by Project path:

  • for GitLab, you must enter the project path as it appears in the URL, and replace the spaces by -, e.g. <group-name or owner-name>/<sub-group-name>/<project-name>;
  • for Azure DevOps, you must enter the project path and keep the spaces, e.g. <organization-name>/<project name>.

Focus

During the execution, if the name of the project entered does not exist, or if it is spelled incorrectly, an error message appears when you report an issue.

Learn More

To learn more about how to create a bugtracker server, please visit the page Manage bugtrackers and synchronization servers.

Configure an Artificial Intelligence server

Info

This feature is only available with an active Ultimate license.

Associate AI server

You can associate an artificial intelligence server with a project, in order to generate test cases from a requirement. To do this, select the server to associate from the drop-down list.

Info

To learn more about configuring an artificial intelligence server, please visit the page Manage an artificial intelligence server.

Manage Project permissions

You can manage a project's permissions from the Clearance anchor Project permissions. You can give permissions to users or teams on the project.
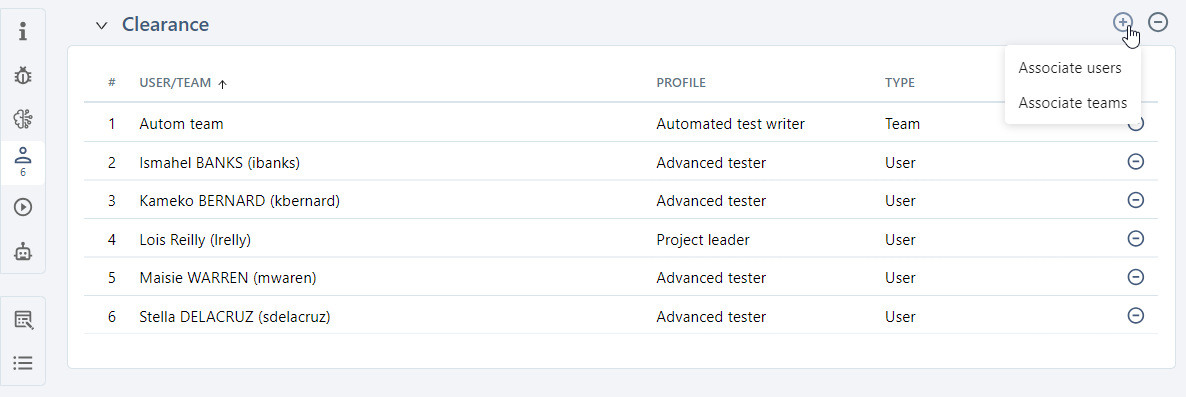
Manage project permissions

The button Remove permission enables you to remove one or multiple permissions on the project.

You can edit user or team profiles directly in the table by clicking on their profile.

Modify project permissions

A user or team can have different profiles for different projects.

Learn More

To learn more about different profiles and permissions of Squash workspaces, please visit the page Give permissions.

Define Execution preferences

To activate some features regarding test case executions, click on the Execution anchor Execution preferences:

  • Authorize the modification of test cases during their execution;
  • Activate/Deactivate the execution status "Untestable";
  • Activate/Deactivate the execution status "Settled".

Only the status "Untestable" is activated by default.

Execution preferences

Configure the Project's Automation

The Automation anchor Automation project enables you to configure the automation of the project.

From this block, you can:

  • configure the implementation technology and the language of BDD scripts;
  • activate an automation workflow (Squash or Jira);
  • manage the cleanup of automated suites:
    • set a retention period for automated suites;
    • delete automated suites;
    • delete attachments from executions;
  • associate a source code management server as well as a repository (if an automation workflow is activated);
  • associate a test automation server and:
    • define default environments for Squash Orchestrator servers;
    • associate jobs for Squash TF servers.

Configure automation for a project

Implementation technology and script language

For each project, you can configure the implementation technology of BDD test cases as well as the language of BDD scripts. The project leader can choose between Cucumber and Robot Framework for the implementation technology.

If you select the Cucumber technology, you can choose between the four following languages for the script: English, French, Spanish, and German.
If you select the Robot Framework technology, English is the only language available.

Automation workflow

You can activate the automation workflow for a project via a drop-down list.

By default, the "None" option is selected.
Selecting the "Squash advanced" option starts the Advanced Squash Workflow, whereas selecting "Squash simple" starts the Simple Squash Workflow.
When the Jira Automation Workflow plugin is activated for the project, the automation workflow is set to "Remote server".

When you activate an automation workflow, new fields appear in a test case's Automation block. For the advanced Squash workflow, the tests to automate can be tracked in the Automation workspace by both the testers and the automation test writers. For the simple Squash workflow or the Jira workflow, you can track tests to automate directly from the Automation block of the test cases.

When you activate an automation workflow, a new part, Source code management server also appears in a project's Automation block.

Automated Suite cleaning

Retention period

The retention period for the project's automated test suites is set in days. During a cleanup (of either automated suites or attachments), all items within this retention period are kept, while others are deleted.

If no retention period is defined, the test suites' lifespan is considered infinite. By default, no value is set.

Deleting Automated Suites

It is possible to delete all automated suites whose creation date is older than the previously defined retention period.

Clicking the [Delete] button opens a confirmation pop-up, indicating that the deletion is permanent and showing a count of the automated suites and executions that will be deleted.

Deleting Automated Suites

The deletion removes the automated suites as well as everything they contain: executions and attachments.

Deleting Attachments

It is possible to delete all attachments associated with executions of automated suites whose creation date is older than the previously defined retention period.

Clicking the [Prune fully] button opens a confirmation pop-up, indicating that the deletion is permanent, and that it concerns all attachments associated with executions (including execution reports for test cases whose status is not passed).

Full Attachment Pruning

It is possible to delete attachments associated with executions with passed status of automated suites whose creation date is older than the previously defined retention period.

Clicking the [Prune partially] button opens a confirmation pop-up, indicating that the deletion is permanent and only concerns attachments associated with executions whose status is passed.

Partial Attachment Pruning

Associate a Source Code Management server

When the automation workflow is activated, the Source Code Management Server section appears in the Automation block. You must have created a source code management server beforehand, in the Administration workspace > Servers to be able to select it and associate it with a project. Once you have selected the server, the repository names as well as their branch appear in a drop-down list.

You can re-use the Squash tree in the repository when you are transmitting the test cases to the source code management tool. Thus, they can be organized in the same way on both sides. You can activate this feature with the field Use the Squash tree structure in the repository.

Learn More

To learn more about how to create a source code management server, please visit the page Manage Source Code Management Servers.

Associate a Test Automation server

First, you must create a test automation server in the Administration workspace > Servers to associate it with a project.

Learn more

To learn more about creating a test automation server, visit the page Manage Test Automation Servers.

Squash Orchestrator server

Info

For a project configured with a Squash Orchestrator server, if a repository of a source code management server is configured in the project, the Automated test technology, Source code repository URL, and Automated test reference fields are automatically completed when transmitting test cases.

For Squash Orchestrator servers ("Squash Orchestrator" type), once you have selected the server, an environment section appears.
It enables you to:

  • indicate which environments are visible by the project;
  • view and define default environment tags for the project;
  • associate environment variables and define their default values;
  • retrieve information on the workflows executed in the project.

Configure AUTOM Server on project

Define environments visible by the project

In Squash Orchestrator, when generating a token, it is possible to grant it permissions to access resources. Depending on the permissions granted, each token can access a set of environments.

Learn more

For more information about token permissions, visit the page Namespaces on Squash Orchestrator documentation.

In Squash, the Token field enables you to configure a token at the project level. It replaces the one configured for the test automation server linked to the project. This feature enables you to control and compartmentalize access to execution environments for each project.

When this field is empty, the available environment for the project are those accessible by the test automation server's token.

This field is mandatory if there is no token configured for the test automation server.

View and define default environment tags for the projet

The Default environment tags field enables you to view and define default values for the project.
If default values are already defined for the test automation server and no token is configured for the project, they are automatically displayed.
However, it is possible to define new defaults values for the project. In this case, these values are offered by default to the user when running automated tests.

If a token is configured for the project, the server's default values are erased and new default values must be defined among the tags of the environments the token has access to.

Associate environment variables and define their default value

In the Environment variables section, the environment variables associated with the project are displayed.

From this section, it is possible to associate environment variables with the project and to define their default value.
To associate an environment variable with the project, click on Add and select the variable(s) to associate.
Once the environment associated, it is possible to define a default value. Depending on the environment variable type, different characters are authorized.
When running automated tests, this value is suggested by default to the user, but they can modify it.

By default, the environment variables associated with the test automation server are automatically associated with the project with their default value, if it exists.
Like environments tags, it is possible to define a new default value of the environment variables for the project.

To dissociate one or multiple environment variable from a project, click on Dissociate.

Squash TF server

For Squash TF servers ("Jenkins" type), once you have selected the server, you can associate one or multiple jobs with the project.

Info

For a project configured with a Jenkins server, if the repository source code management server configured in the project is identical to the one configured in the job associated with Squash and the "Can run BDD" option is checked, automated scripts are automatically associated with the scripted test cases (Gherkin or BDD).
In the Jobs table, only one job can be configured to run BDD scripts.

You can modify a job by clicking on the button Pencil. In the field Possible execution server(s) (separated by semicolons), you can choose the secondary servers that will be used to execute the automated test cases. You must fill in the field with the names of the servers separated by semicolons (e.g. SecondaryServer1; SecondaryServer2).

Customize the Project

Custom Fields

You can manage custom fields from the anchor Custom fields Custom fields.

Table - Associate custom fields

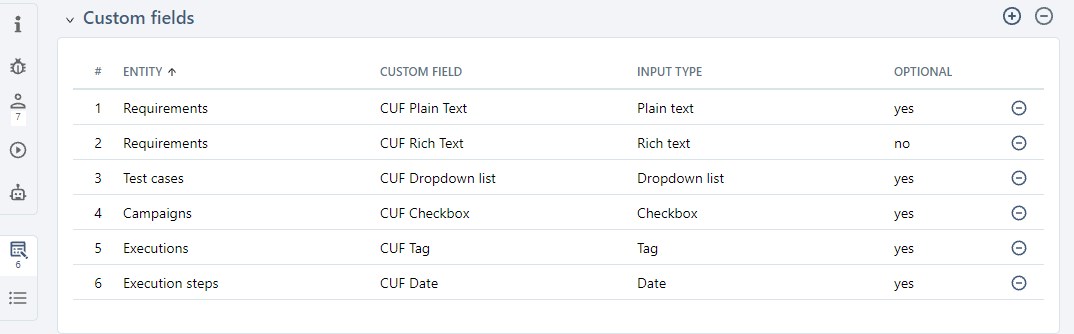
To associate custom fields with a project, you must first create them in the Administration workspace > Entities.

In the table, you can see the custom field's name, type, whether it is optional or mandatory, and the entity with which it is associated.

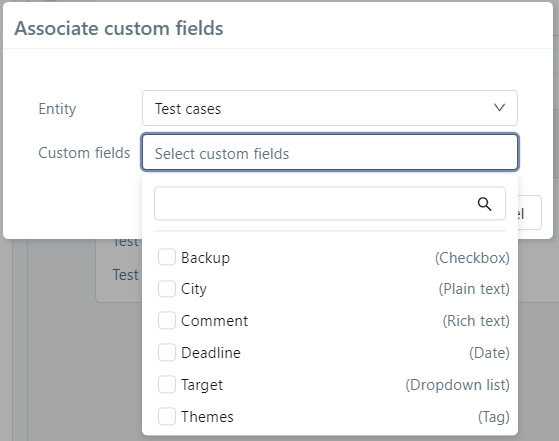
To associate a custom field with the project, click on the button Add. In the pop-up, select the entity and the custom field you want to associate. From there, you can associate multiple custom fields to one entity.

Associate custom fields

One custom field can be associated with multiple entities. Custom fields can be associated with:

  • in the Requirements workspace:

    • requirement folders;
    • requirements.
  • in the Test cases workspace:

    • test case folders;
    • test cases;
    • test steps.
  • in the Campaigns workspace:

    • campaign folders;
    • campaigns;
    • iterations;
    • test suites;
    • executions;
    • execution steps.

To dissociate one or multiple custom fields for a project, click on the button Dissociate.

Learn More

To learn more about how to create a custom field, please visit the page Manage Custom Fields.

Information Lists

You can manage information lists from the Information lists anchor Information lists.

Information lists block

To associate information lists with a project, you must first create them in the Administration workspace > Entities.

An information list can be associated with the Category field of requirements, and Nature and Type fields of test cases. Once the list is associated with the project, in your desired workspace, the values of the field you have chosen will be those of the information list. If you have assigned icons to the values of the list, they will appear in the object's Information block.

Requirements information list

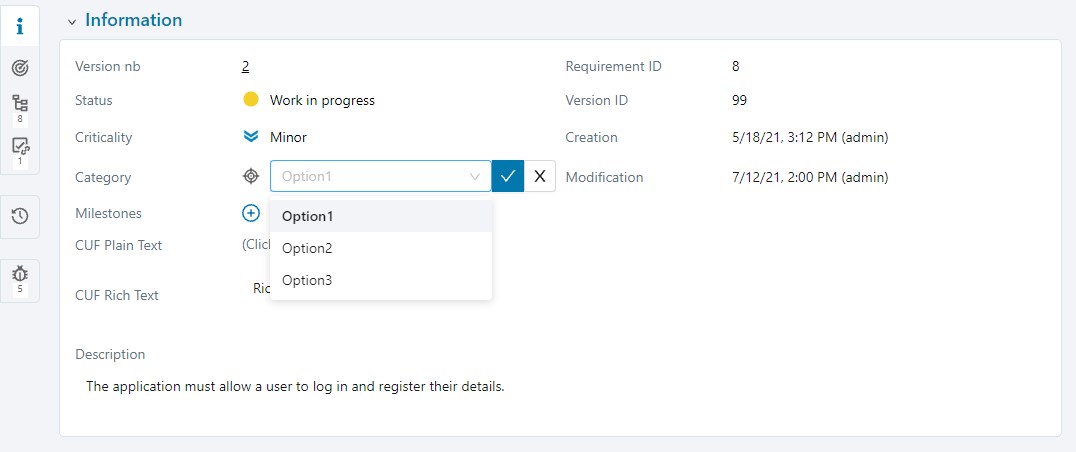
When an information list is associated with a project, the values previously entered are not saved. The default value of the selected list will appear in the field for all the relevant objects.

Learn More

To learn more about how to create information lists, please visit the page Manage information lists.

Associate Milestones to a Project

You can associate milestones to a project from the Milestones anchor Milestones.

Table - Associate Milestones

Info

To associate a milestone with a project, the milestone's status must be "Planned", "In progress", or "Finished".

Associate Milestones with the Button [+]

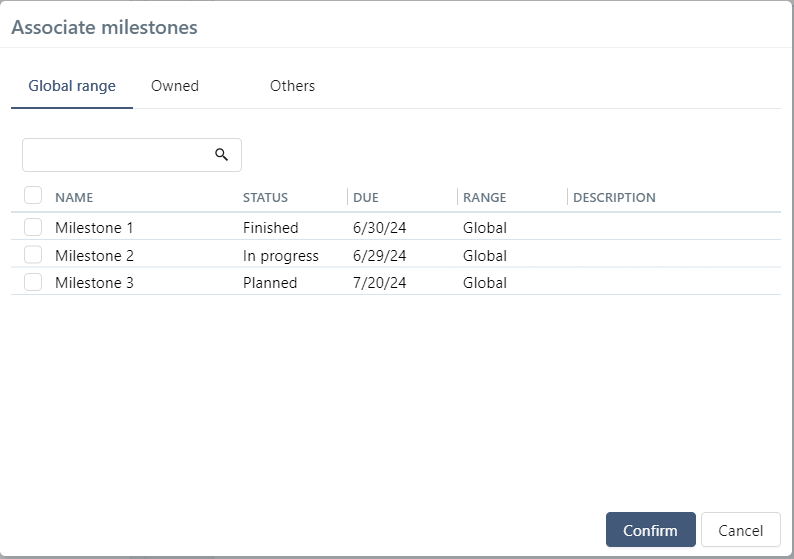
You can associate one or multiple milestones (already created) via the button Add. From the associate pop-up, you can use the search feature. Milestones are organized by scope.

Pop-up - Associate milestones

Associate Milestones with the [Create] Button

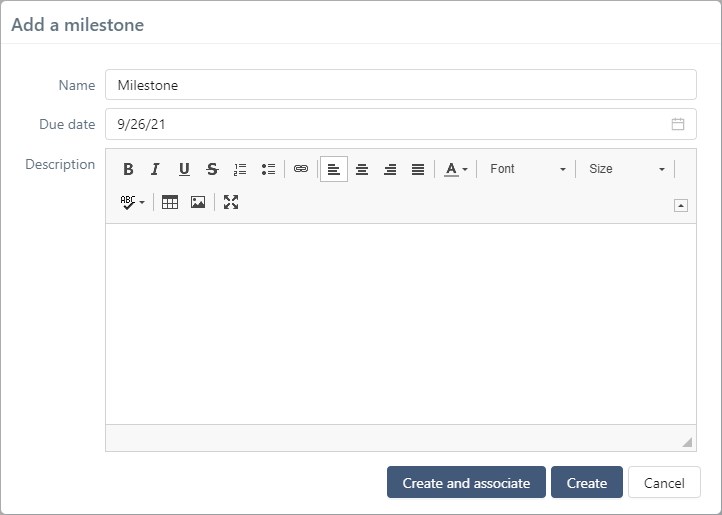
If the milestone is not created yet, you can still create it directly from the block using the [Create] button at the top of the table. From the Add a milestone pop-up, you can then directly associate the milestone you created with the project by clicking on the [Create and associate] button. The created milestone's default status is "In progress".

Create and associate a milestone

Dissociate Milestones

To dissociate one or multiple milestones from a project, click on the button Dissociate available at the end of each row or above the table.

After it has been dissociated, the milestone is no longer associated with the project nor the project's objects. The Used column indicates if the milestone is associated with objects of the project.

Learn More

To learn more about how to create milestones, please visit the page Manage a Milestone.
To learn more about how to associate a milestone with an object, please visit the page Associate a Milestone with an Object.