Execute Tests manually
Learn more
This page concerns test cases in Classic, BDD, and Gherkin formats. To execute exploratory test cases, please refer to the Manage Exploratory Testing page.
Execute a Test Case
Execute a Test Case manually
You can execute every test format manually: Classic, Gherkin, and BDD. You can start the execution from multiple locations:
- from the execution plan, with the button
 and the option Using the pop-up;
 - from the execution plan, with the button and the option New execution;
- from the execution's consultation page with the button [...] and the option Run;
- from the execution's consultation page and the anchor Execution scenario by changing the execution status for every test step, adding comments and attachments, and reporting issues;
- from the execution plan's item search page with the button located at the end of each row in the search results.
Info
No matter how you choose to execute the test, you can always start multiple test plan item executions.
The item's status taken into account is the one from its last execution.
Focus
If a Gherkin test case's script is invalid and does not follow the Gherkin syntax, an error message appears at the start of the execution.
Execute a test case in a pop-up:
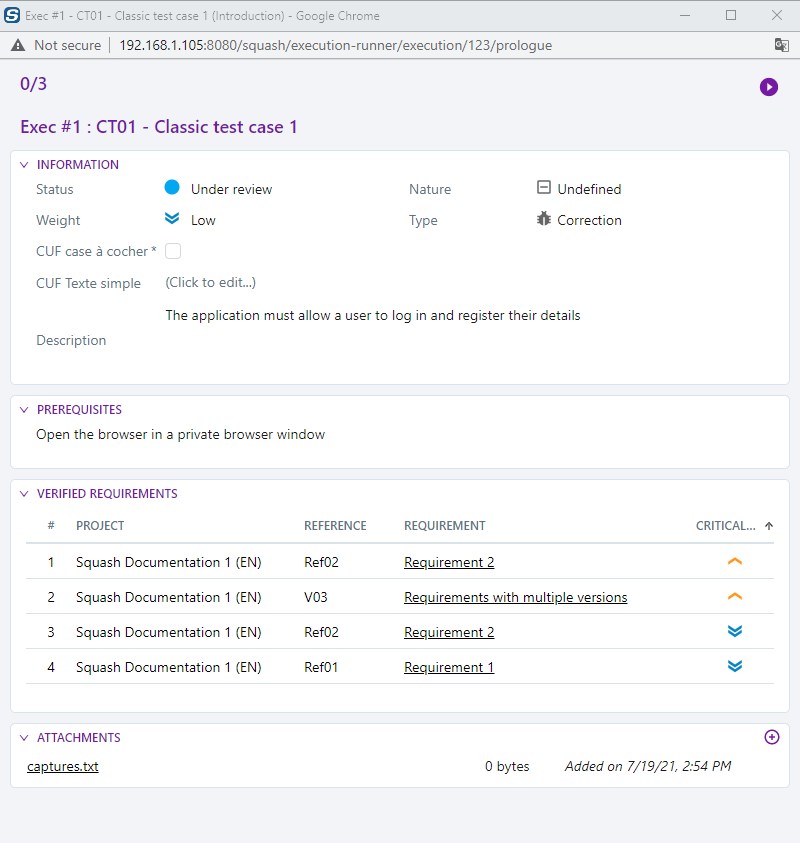
When you execute a test plan item in a pop-up, the following information appears during step 0:
- an Information block with the test case's progress status, weight, nature, type, and description as well as the dataset used for the execution. There are also custom fields linked to test case entities (identified by an asterisk, cannot be edited) or executions (editable);
- a Prerequisite block (for Classic test cases) or a Context block (for Gherkin test cases) that contains the prerequisites necessary before executing the test;
- a Verified requirements block containing the requirements linked to the test case. A clickable link enables you to view them from the table;
- an Attachments block with the attachments linked to the test case. This block enables you to add the attachments linked to the execution.
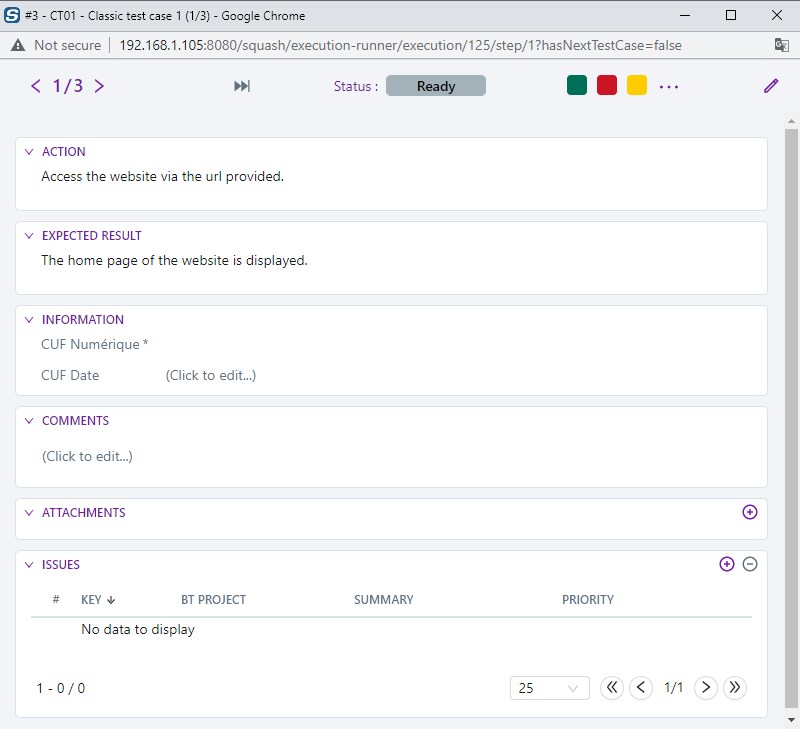
By clicking on the button [Start]  , step 1 of the test appears. It contains the following test steps:
- the action and expected result of a classic test case's
Nth test step; - the
Nth test case scenario of a Gherkin test case; - the
Nth test step action of a BDD test case.
For every execution step:
- You can assign an execution status;
- You can add a comment and attachments;
- If custom fields were linked to the entities Test step or Execution step, an Information block appears. The custom fields linked to the test step, which can be identified by an asterisk, cannot be edited as long as the ones linked to the execution steps are editable;
- If a bugtracker is activated for the project, an Issues block appears for you to link or report issues;
- Navigation arrows enable you to go from one step to another. You can also change the number of the current test step to access another test step of the test case.
Execution Status
Executing a test consists in attributing an execution status to every test step or test case. From a pop-up execution, click on the status' colored dot to display the next test step.

Info
You can activate the status "Settled" and "Untestable" in the project's configuration page, in the Executions block.
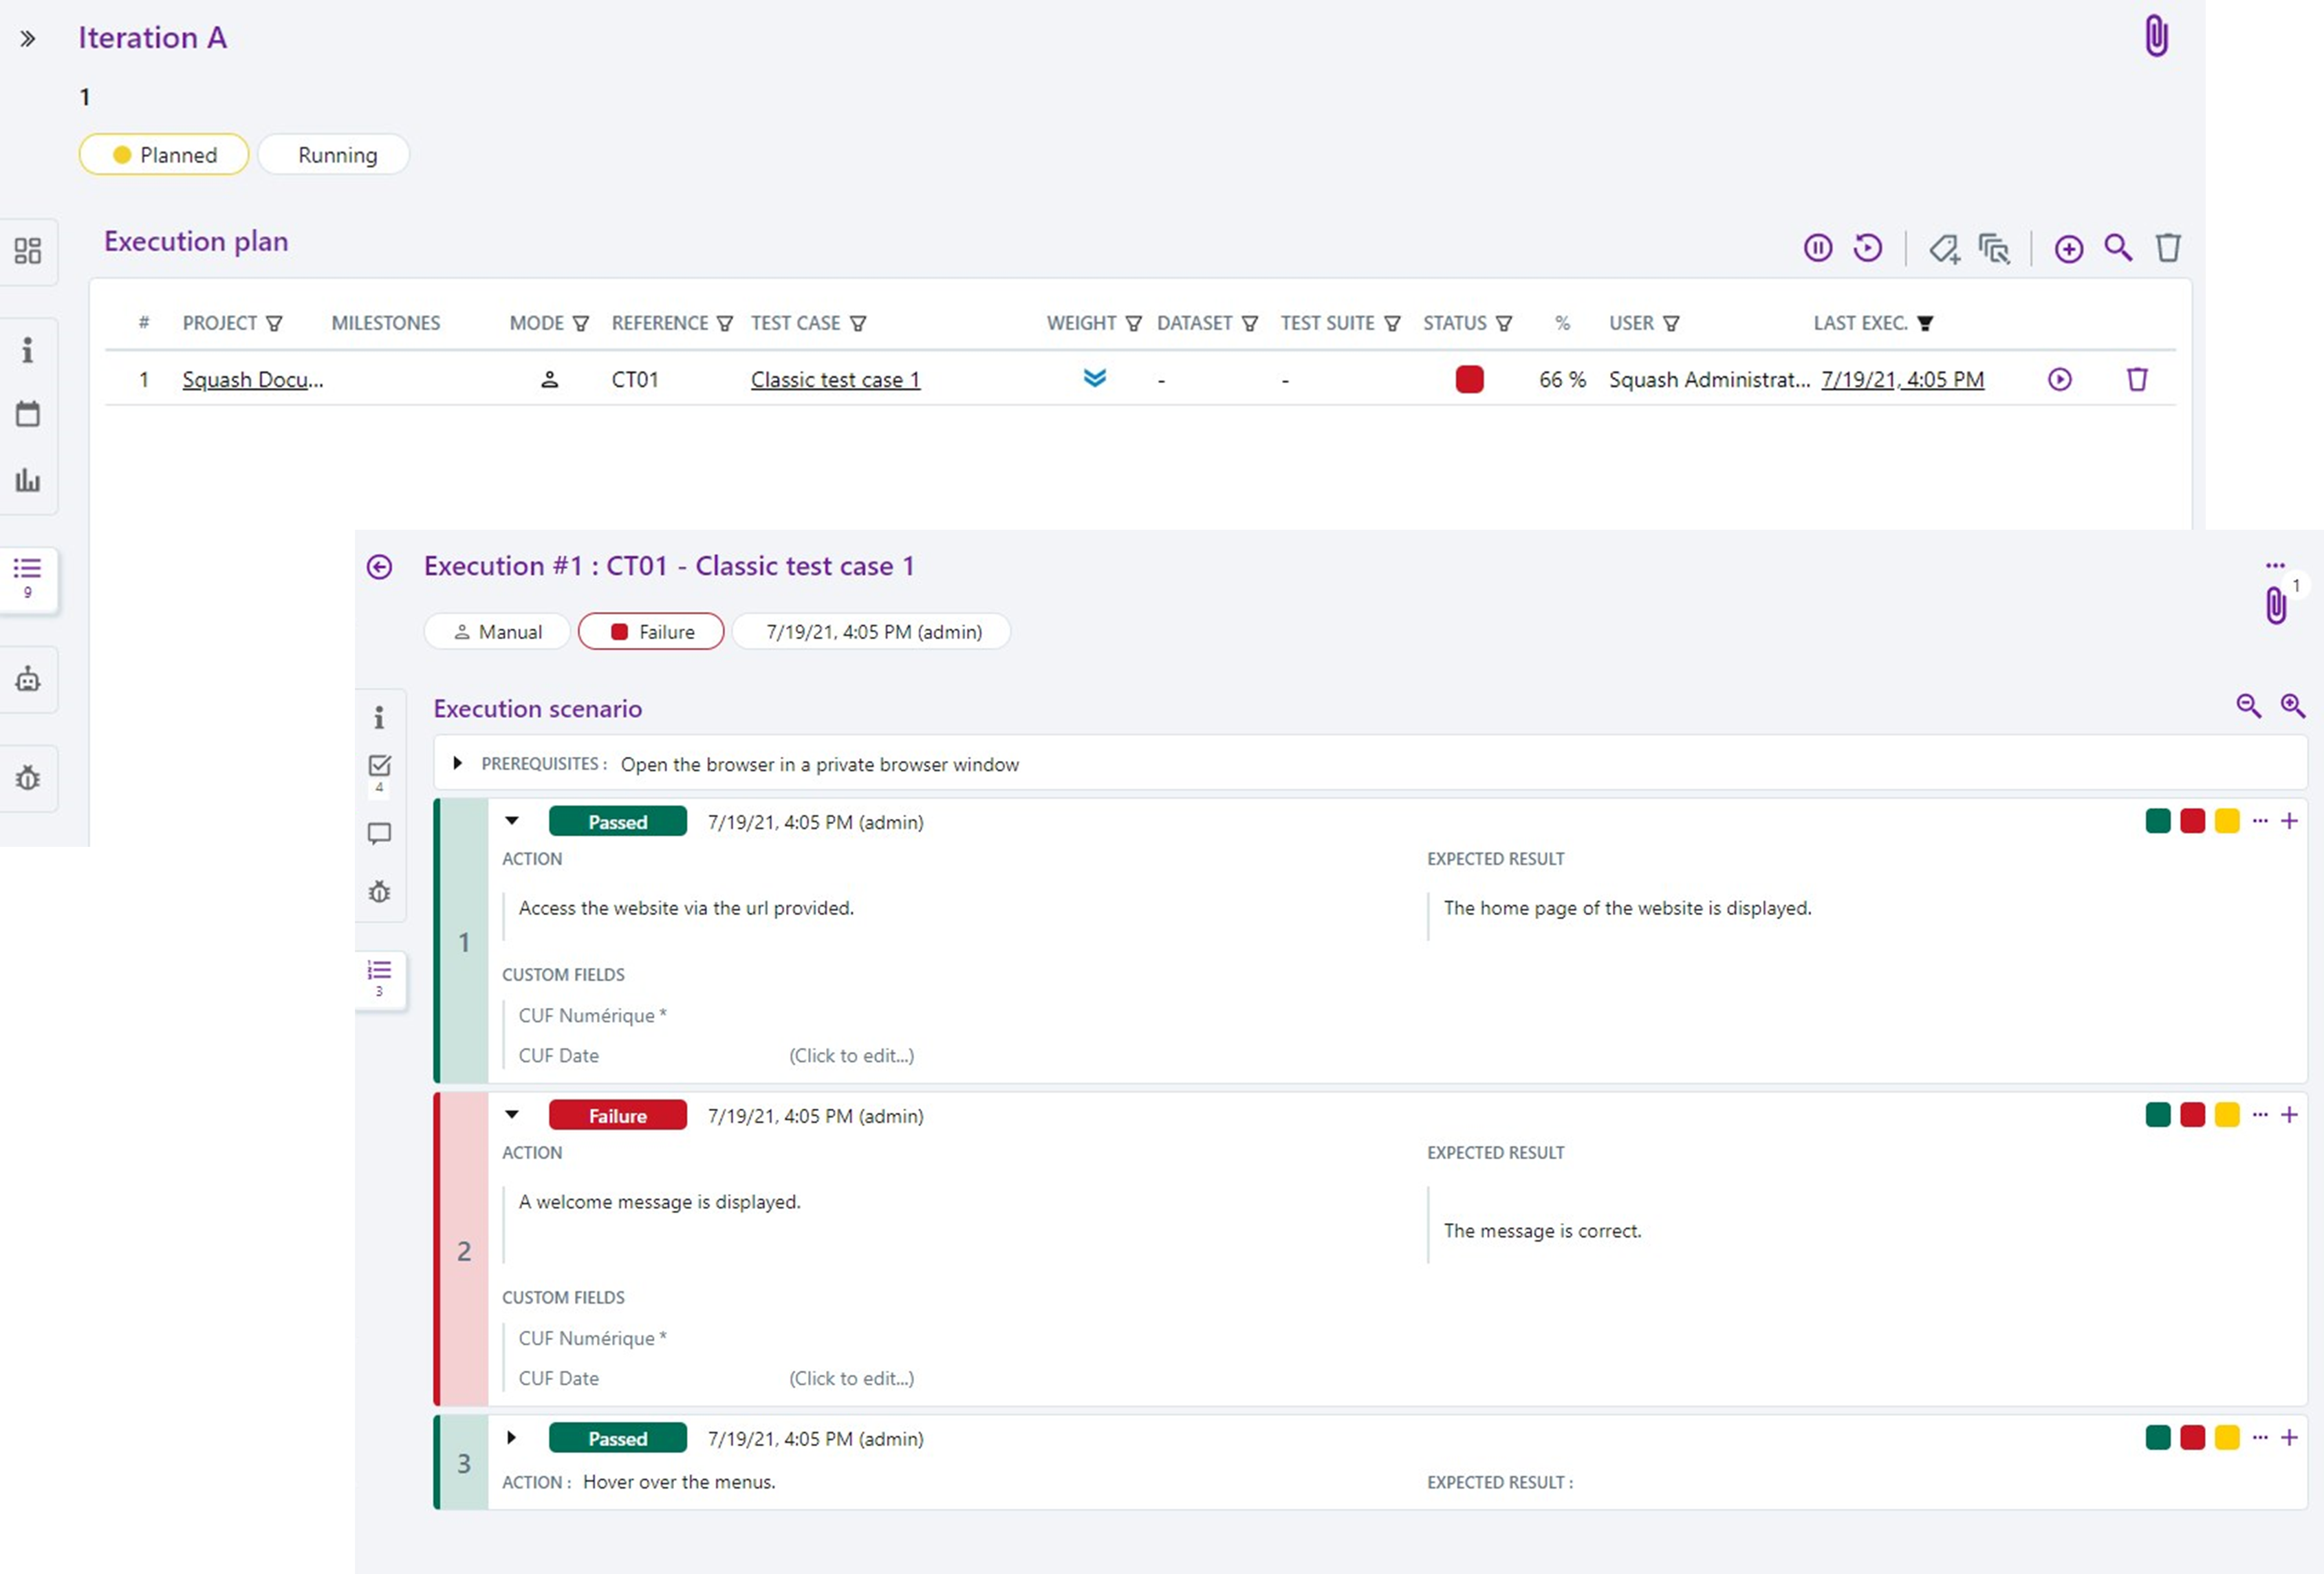
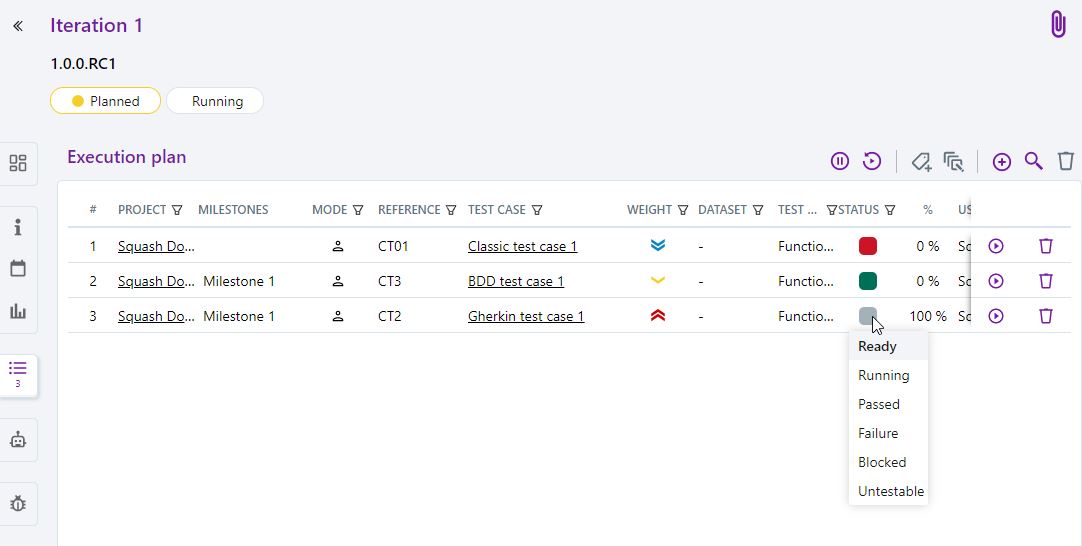
The execution plan contains a % column that corresponds to the percentage of successful test steps during the last manual execution.
The status assigned to a test case corresponds to a priority order given to every status. Here is the order assigned to the main status. There needs to be only one test step with a higher status for the test plan item to also take that status:
- Blocked;
- Failed;
- Passed:
- a test step with a "Passed" status gives the item an "In progress" status;
- a test case only has a "Passed" status if all its test steps have a "Passed" or "Settled" status.
For example: For this test case, only one test step has the status "Failed", so no matter the status of the other test steps, this test case will also have a "Failed" status.
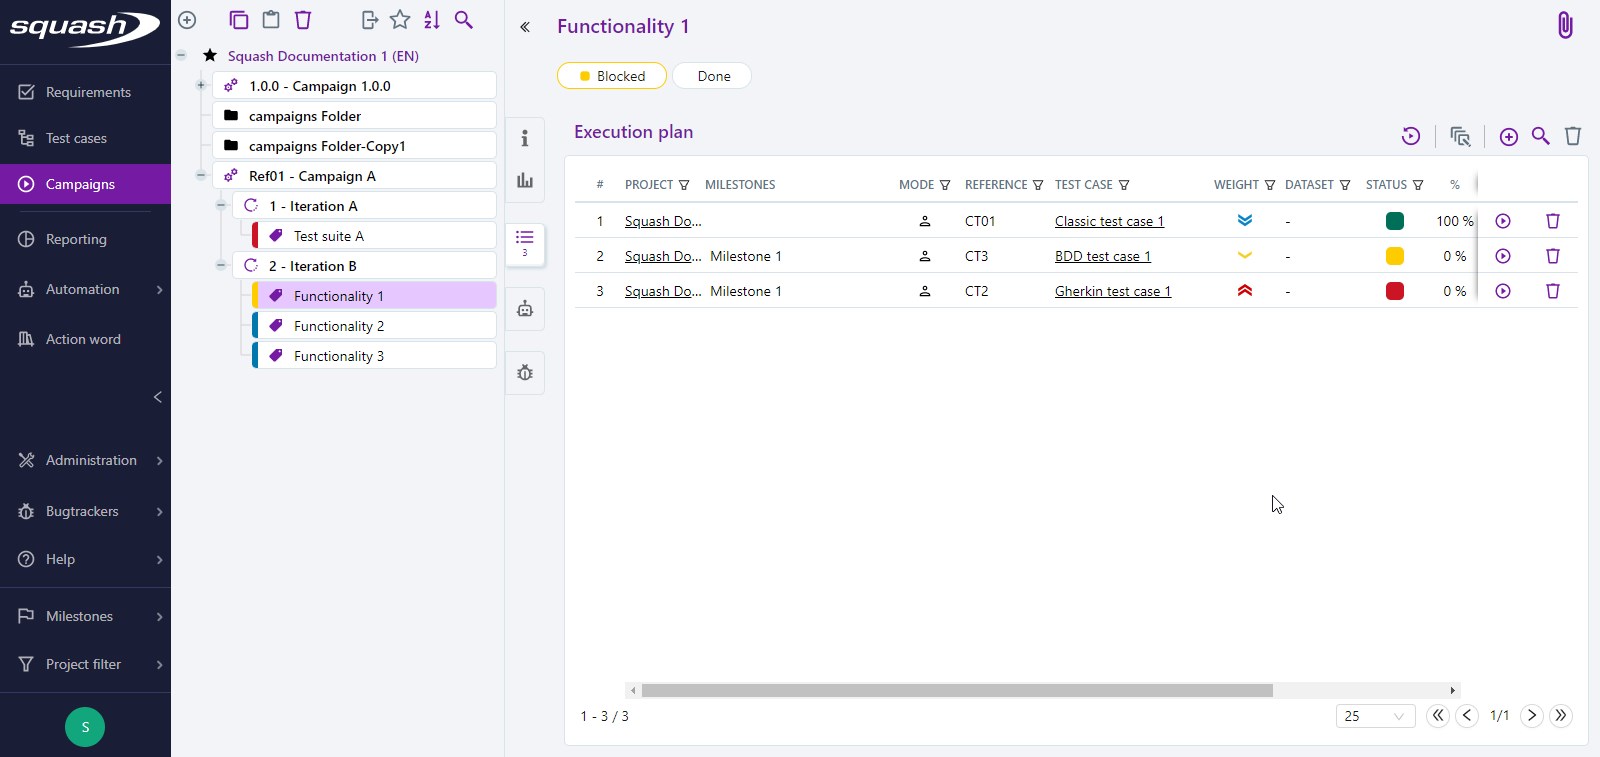
Every test suite's status is assigned according to the status of their tests. Priority is a notion that is also applicable to test suites.
For example: For this suite, only one test has a "Blocked" status. So, no matter the status of the other tests, the suite will also have a "Blocked" status.
Execute a Test in Fastpass Mode
It is possible to execute a test in Fastpass mode without executing all of its test steps. For this, in the execution plan, change the test plan item's execution status in the Status column. The item's previous executions (without Fastpass) are kept.
Fastpass mode is not considered an execution by itself. Therefore, there will not be any execution details page such as with the pop-up, nor any row for the execution in the Executions History pop-up.
Start successive Executions of multiple Tests
The block Execution plan of an iteration, test suite, or sprint includes action buttons that let you run successive tests. You can also start successive executions of the test cases in a sprint requirement's execution plan directly from the Sprint requirements table.
The [Start] Button
The [Start] button  is there by default if no execution was started.
When you click on [Start], you can execute all the tests in the execution plan successively via the execution pop-up.
The buttons [Resume] and [Restart]
When you stop successive executions even though there still remains test steps to execute, you can resume these executions with the [Resume]  .
.
If all the tests in the execution plan were executed at least once, the button [Restart] appears on the page of the execution plan. This enables you to restart the execution plan's tests by deleting all the previous executions.
Warning
The button [Restart] deletes all the previous executions of the test plan items contained in the execution plan.
Info
- You can directly go to the next test case by clicking on the button
 in the
 Nth steps in the pop-up; - When all the test steps are executed, a pop-up appears to inform you that the tests are finished.
Modify a Test Case in progress
Info
- To modify a test case in progress, you must activate this feature on the project's configuration page, in the Executions block;
- Only the test cases in Classic format can be modified during the execution.
You can modify a test case in progress by clicking on the button ![]() in a test case's execution steps. You can modify its general information and steps.
in a test case's execution steps. You can modify its general information and steps.
Modifying the Test Case at Step 0
At step 0, in the execution pop-up, click on the button ![]() . The test case's details page appears. You can then modify all the information of the test case.
. The test case's details page appears. You can then modify all the information of the test case.
From this page, click on the button [Go back to the execution]  to go back to step 0 of the execution. The changes made appear in the execution pop-up.
Modify the Test Case at Step N
At step N in the execution pop-up, click on the button ![]() . The test step's details page appears. All the test steps as well as their links to requirements can be modified. From this page, you cannot add or delete test steps.
. The test step's details page appears. All the test steps as well as their links to requirements can be modified. From this page, you cannot add or delete test steps.
From this page, click on the button [Go back to execution] to go back to the execution. The execution pop-up opens the first modified step (first as per execution order). The status of the test steps already executed take the status "To be executed" again.
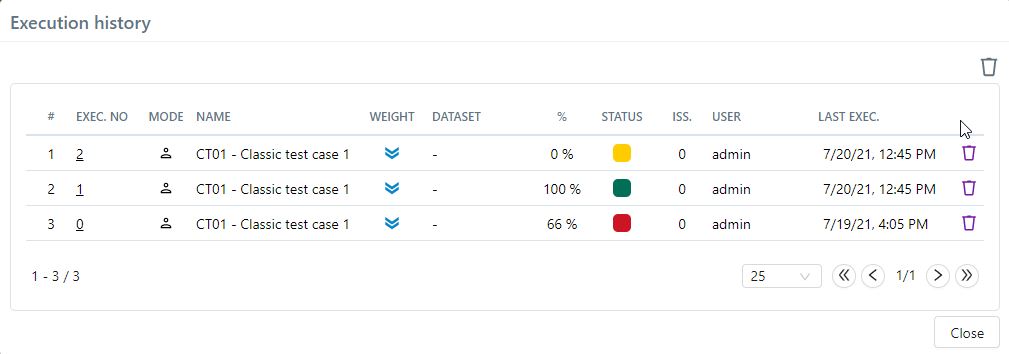
View a Test's Executions history
The status history of test plan items executions can be accessed directly from the execution plan in the form of status bars (maximum five status bars). A dot displays the status of the last item run. When the bars are hovered over, a tooltip displays the status, date and time of the execution. A status defined as 'Fastpass' is never shown in the execution bars.

Info
Whatever the launch mode (manual or automatic), the execution history is displayed in the form of bars in the Status column.
You can access a test plan item's executions history via the button and the option Executions history for every item of an execution plan.
The Executions history pop-up appears and lists all the item's executions, with their test step percentage with a passed status, their execution status, the user who executed the test, and the last execution date.
From this pop-up, you can also delete an execution.
From the Test case workspace, you can also view all the executions of a test case by clicking on the Executions anchor of the desired test case. As a reminder, a test case can contain multiple executions for one of these test plan items and can be executed in multiple iterations or test suites.
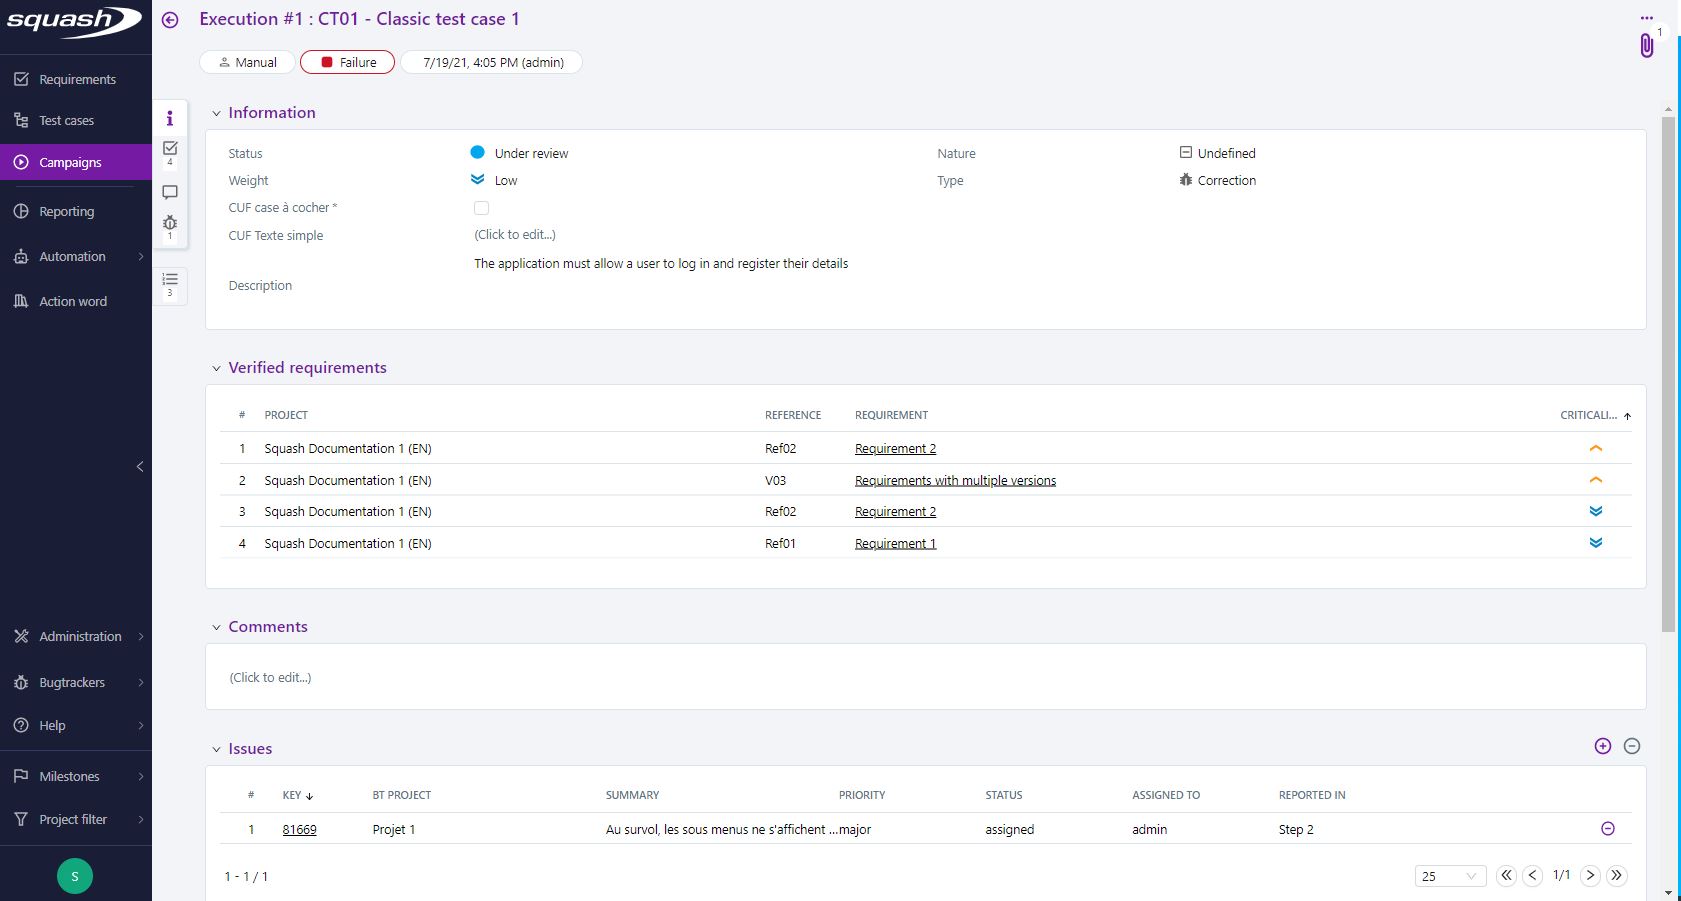
Execution consultation page
You can access an execution's detailed consultation page by clicking on:
- the link in the date in the column Last Exec. in the execution plan;
- the execution's number (column Exec. No), in the pop-up Executions history.
An execution's consultation page has several anchors:
- the Information anchor which contains the test case's progress status, weight, description, nature and type, as well as the custom fields linked to the test case (read-only) and to the execution (editable);
- the Verified requirements anchor contains the requirements linked to the test case;
- the Comments anchor to view or add a comment on the test case's execution.
- the Issues anchor to view or link issues to the test case during its execution.
Info
The Issues anchor only appears when a bugtracker server is linked to the project in the administration.
These first four anchors appear no matter the format of the executed test case.
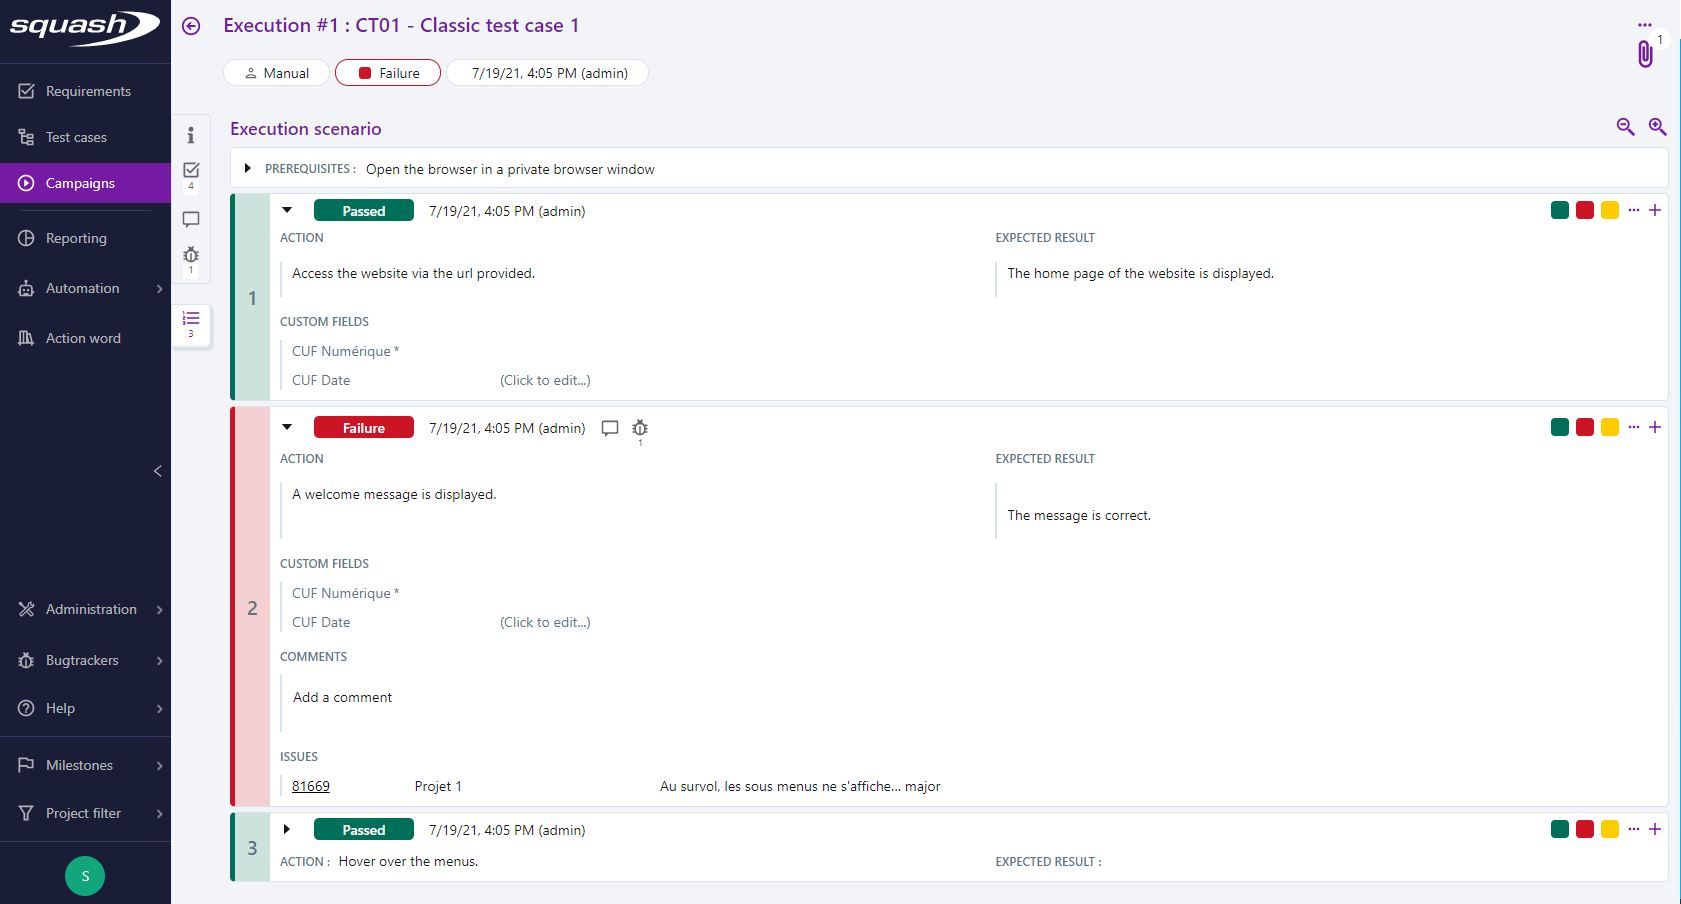
Classic Test Case
The anchor Execution scenario contains the test case's Prerequisite as well as all the test steps' following information:
- execution status;
- execution date and user login;
- content of the blocks Action and Expected result;
- a tab Custom fields linked to the test step (read-only) and to the execution step (editable);
- a Comments tab;
- an Attachments tab;
- an Issues tab.
Gherkin Test Case:
The Script anchor contains the Context as well as every test scenario from every execution step's following information:
- execution status;
- execution date and user login;
- the script of an execution scenario;
- a Comments tab;
- an Attachments tab;
- an Issues tab.
Info
- If the Gherkin script contains a scenario plan, it will be translated into as many execution steps as there are datasets in the examples table. Thus, a Gherkin test case is never linked to a SquashTM dataset.
- In a scenario plan's execution steps, Gherkin parameters (in between
<>) are replaced by their values in the example line considered. - If in the script the language tag is correctly filled, the execution takes into account the syntax highlighting of keywords.
- If the language tag is invalid, the script is treated as if it was written in English.
BDD Test Case:
The Execution scenario anchor contains all the execution steps with the following information:
- execution status;
- execution date and user login;
- Action block content;
- Comments tab;
- Attachments tab;
- Issues tab.
An execution's consultation page enables you to view or modify an execution that was already done; but it can also enable you to start a new execution from the execution plan with the button and the option New execution.