Manage Bugtrackers and Synchronization Servers
Bugtrackers vs Synchronization Servers
In SquashTM, there are bugtracking plugins and synchronization plugins, which both differ from one another.
Bugtracking plugins are used to report issues from SquashTM to third-party tools such as bugtrackers.
Synchronization plugins are used to synchronize issues from third-party tools dedicated to IT project tracking to SquashTM.
Here is the list of third-party tools that can be interfaced with SquashTM:
| Plugin Name | Category | Type in the Servers workspace | Third-party Tools |
|---|---|---|---|
| Mantis REST Bugtracker | Bugtracking | mantis | Mantis |
| Bugzilla Bugtracker | Bugtracking | bugzilla | Bugzilla |
| GitLab Bugtracker | Bugtracking | gitlab.bugtracker | GitLab |
| Xsquash4GitLab | Synchronization | gitlab.bugtracker | GitLab |
| Jira Bugtracker Data Center | Bugtracking | jira.rest | Jira Data Center |
| Jira Bugtracker Cloud | Bugtracking | jira.cloud | Jira Cloud |
| Xsquash4Jira | Synchronization | jira.xsquash | Jira Data Center, Jira Cloud |
| Jira Automation Workflow | Synchronization | jira.rest or jira.cloud | Jira Data Center, Jira Cloud |
| Redmine Bugtracker | Bugtracking | redmine3.rest | Redmine |
| Redmine Requirements | Synchronization | redmine3.rest | Redmine |
| Azure DevOps Bugtracker | Bugtracking | azuredevops.bugtracker | Azure DevOps |
| Tuleap Bugtracker | Bugtracking | tuleap | Tuleap |
Learn More
You have to install the plugin(s) corresponding to the tool you want to use to access these bugtracking and/or synchronization features.
To learn more about these plugins, please visit these pages: SquashTM Plugins, Install SquashTM Plugins.
Add, modify, and delete a Bugtracker and a Synchronization Server
You can manage bugtrackers and synchronization servers from the Administration workspace, in the Servers submenu, via the Bugtrackers and synchronization servers anchor  .
.
From the Bugtrackers and synchronization servers table, you can add  or delete
  one or multiple servers. You can also delete a bugtracker or synchronization server from their consultation page by clicking on the button [...].

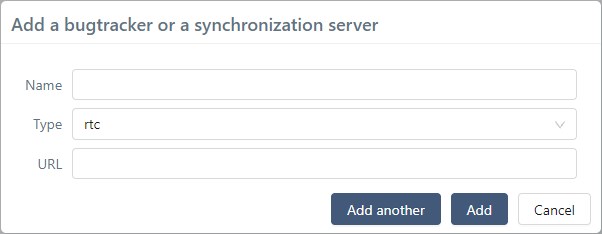
When you create a bugtracker or synchronization server, you must enter its name (unrestricted), choose the type of server it is in the drop-down list, and enter the URL of the third-party tool. The URL must be as short as possible because it is used as a base for every API request used by SquashTM to communicate with the third-party tool. All these fields are mandatory.
By clicking on its ID (#) or Name, the server's consultation page appears, so you can modify it. The anchor bar enables you to navigate between the different blocks.
Warning
When you delete a bugtracking server, it is automatically deleted from the project with which it was associated. The value "No bugtracker" appears on the project's consultation page.
All the associations with issues in the Known Issues blocks are also deleted.
Configure a Bugtracker or Synchronization Server
To get a bugtracker to accept to exchange information with SquashTM, you must identify SquashTM. By managing authentications, you can decide how users, or SquashTM will authenticate themselves on the server. The authentications page has two blocks:
- The Authentication protocol block that defines the security protocol used to authentify the connection;
- The Authentication policy that determines how users and/or SquashTM authenticate themselves.
Authentication protocol
The Authentication protocol block enables you to define the authentication protocol. The protocols supported by SquashTM are "Basic Authentication", "OAuth 2.0" (only for Jira connectors), and "Token Authentication" (only for GitLab, Mantis and Redmine connectors). The protocols suggested during the configuration depend on your type of bugtracker.
Focus
When you change the authentication protocol, the change immediately applies. The previous configuration becomes obsolete and is deleted from the server. However, the information remains on the page as long as the page is not closed or refreshed: if the protocol is accidentally modified, you can restore the previous protocol and save the configuration again.
Basic Authentication
Basic Authentication is the default protocol. The authentication is based on the user's login and password. It is supported by all servers except GitLab and Mantis. It does not require any additional configuration. Using Basic Authentication is only considered as secure when it is used with SSL/TLS (https).
Jira Cloud
To connect to Jira Cloud, you need an API Token instead of an usual password, although the Basic Authentication protocol is used.
Regardless of the chosen authentication policy, in the Login field, enter your user email, and in the Token field, enter the API token generated for the account on Jira Cloud.
The procedure to generate a personal API token is detailed on this page: Create and API token.
Azure DevOps
Azure DevOps needs an API Token instead of a password to authenticate, although the Basic Authentication protocol is used.
Regardless of the chosen authentication policy, in the Organization name field, enter your Azure DevOps organization name, and in the Token field, enter the personal API token generated for the user on Azure DevOps. "Read & Write" clearances on Work Items are enough.
The procedure to generate a personal API token is detailed on this page: Use personal access tokens to authenticate.
OAuth 2.0
For the moment, this protocol is only used by Jira connectors. Both Jira and SquashTM have to be configured. It differs depending on Jira hosting type (Data Center or Cloud).
Learn More
To learn more, visit the page Configure the OAuth 2.0 Authentication Protocol.
Token Authentication
For the moment, this protocol is only used by GitLab, Mantis REST, Redmine and Tuleap. This authentication is based on the user entering a token generated in a third-party tool, and does not require any further configuration.
GitLab
To generate a token on GitLab, please visit the page Personal access tokens.
Mantis
To generate a Mantis API token, go to My account (1), then API Tokens tab (2).
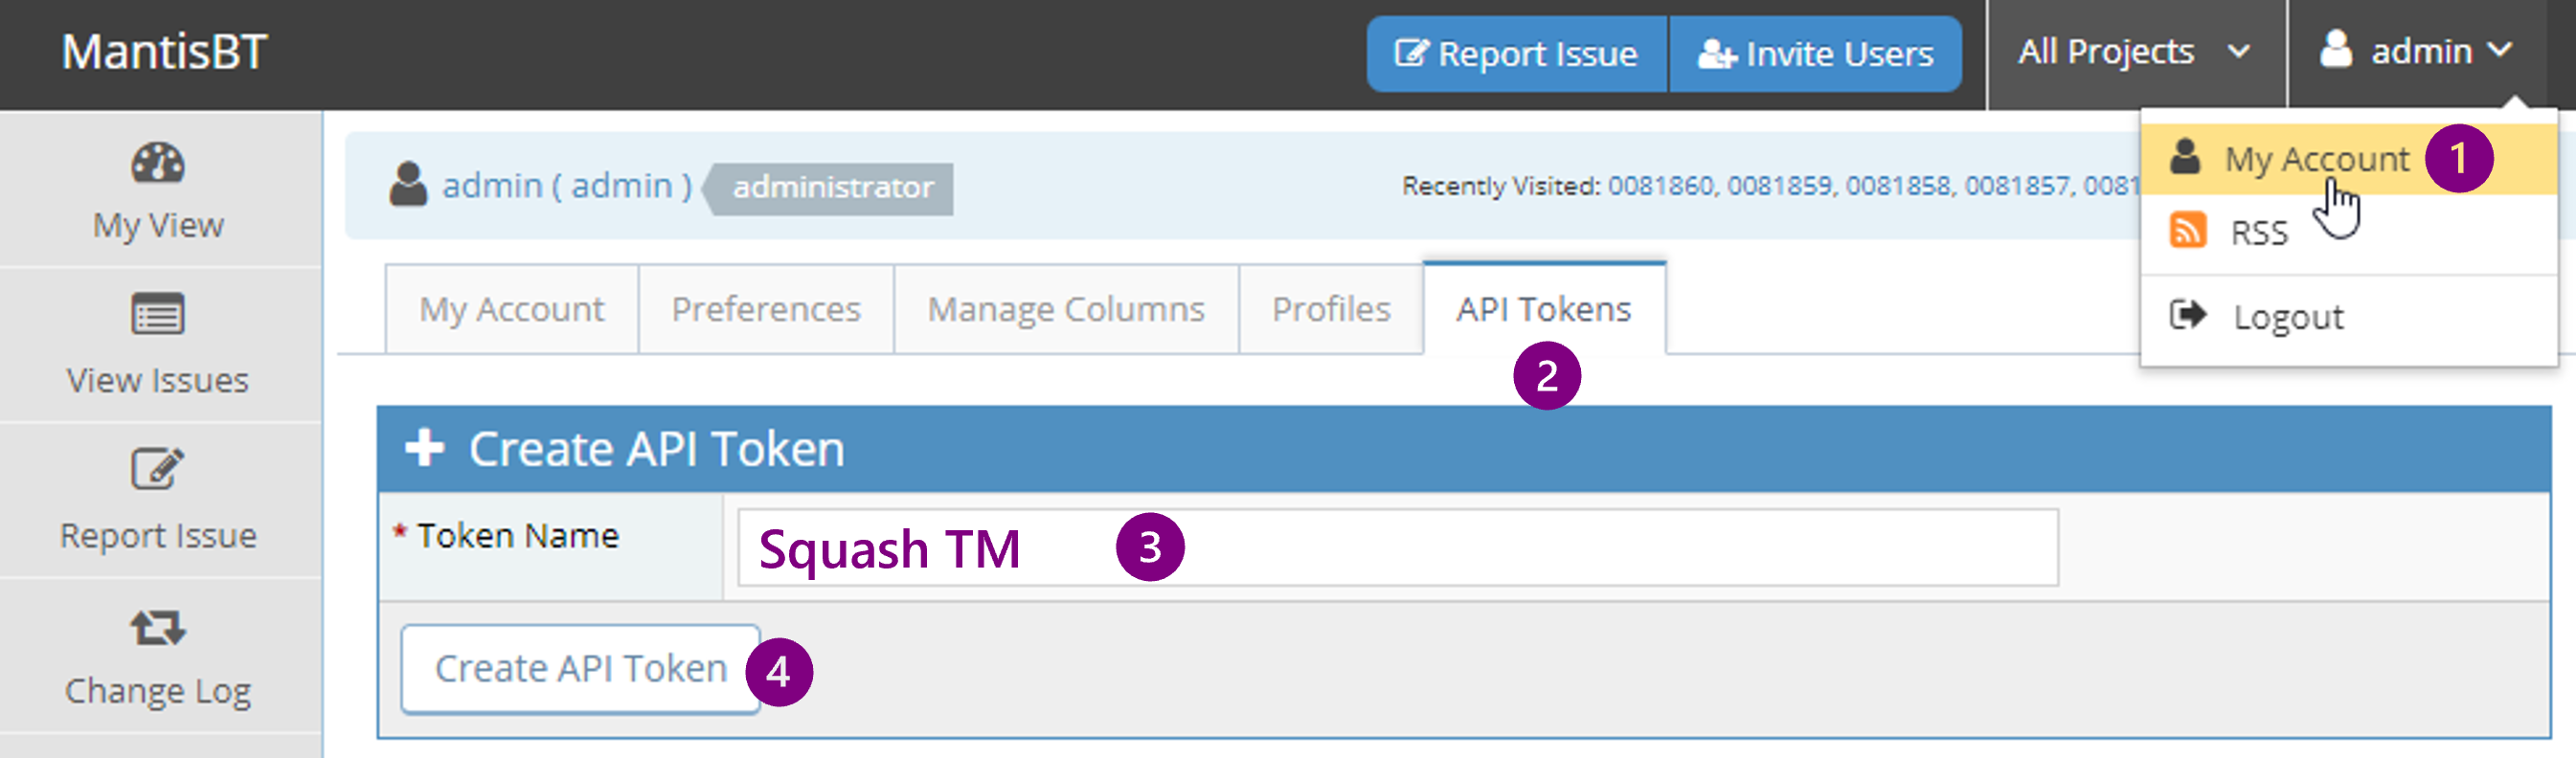
Enter an explicit Token Name in order to revoke it if needed (3), then click on the button [Create API Token] (4).
Copy the generated token and paste it in the appropriate SquashTM field, depending on the chosen authentication policy.
Redmine
To generate a Redmine API Token, go to My Account (1) then display the API access key (2).

Copy the generated token and paste it in the appropriate SquashTM field, depending on the chosen authentication policy.
Tuleap
To generate a new API token on Tuleap, go to Preferences (1), then in the Keys and Tokens tab (2). Then click on Generate new key (3)
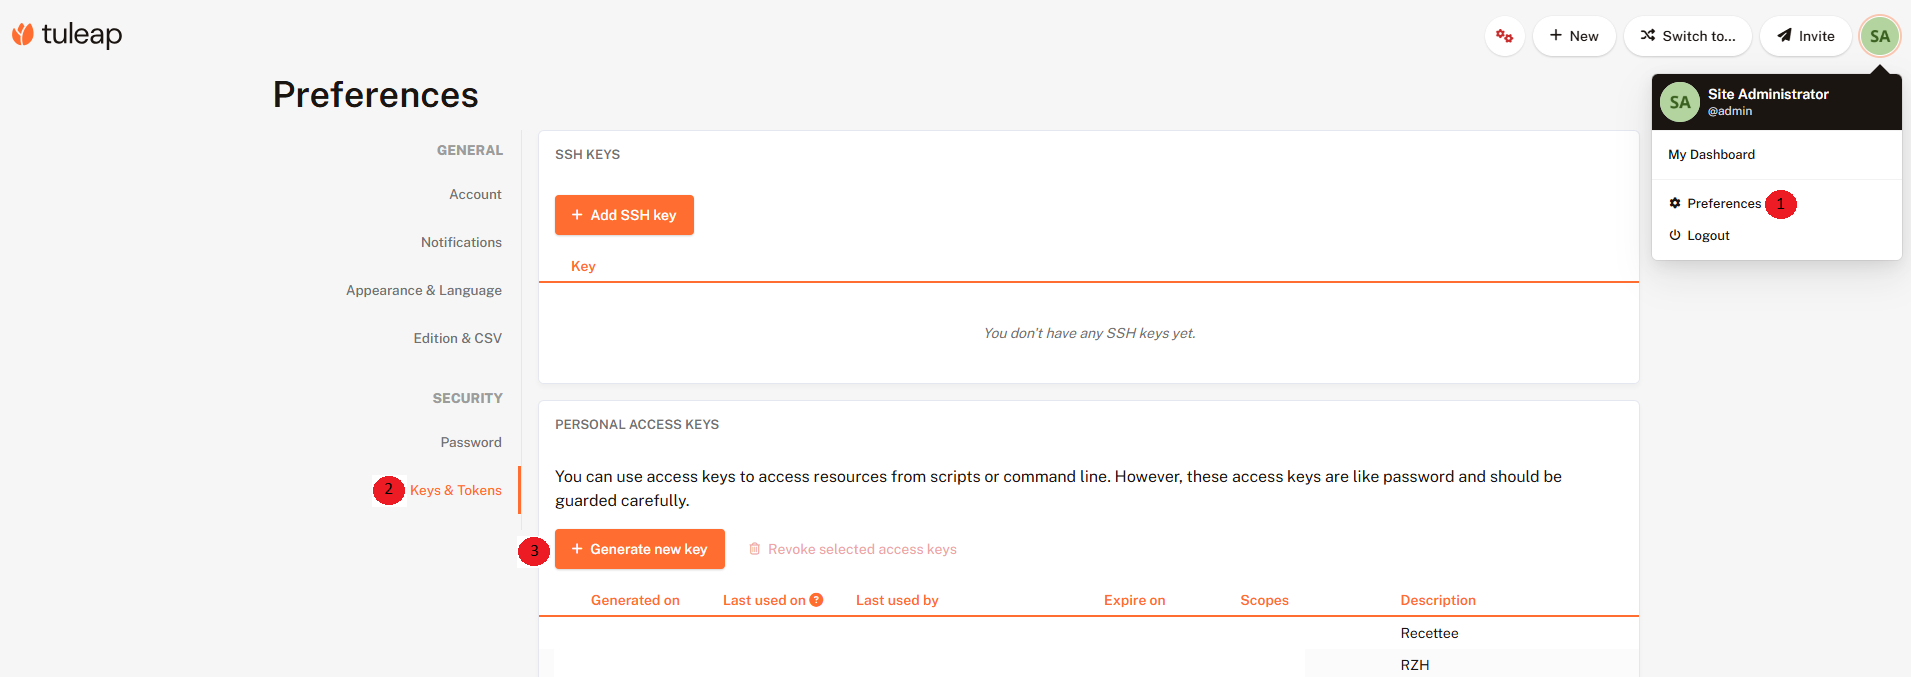
In the pop-up window, do not forget to check the Rest access to the REST API box, then click on Generate new key.
Copy the generated token and paste it into the appropriate SquashTM field, depending on the chosen authentication policy.
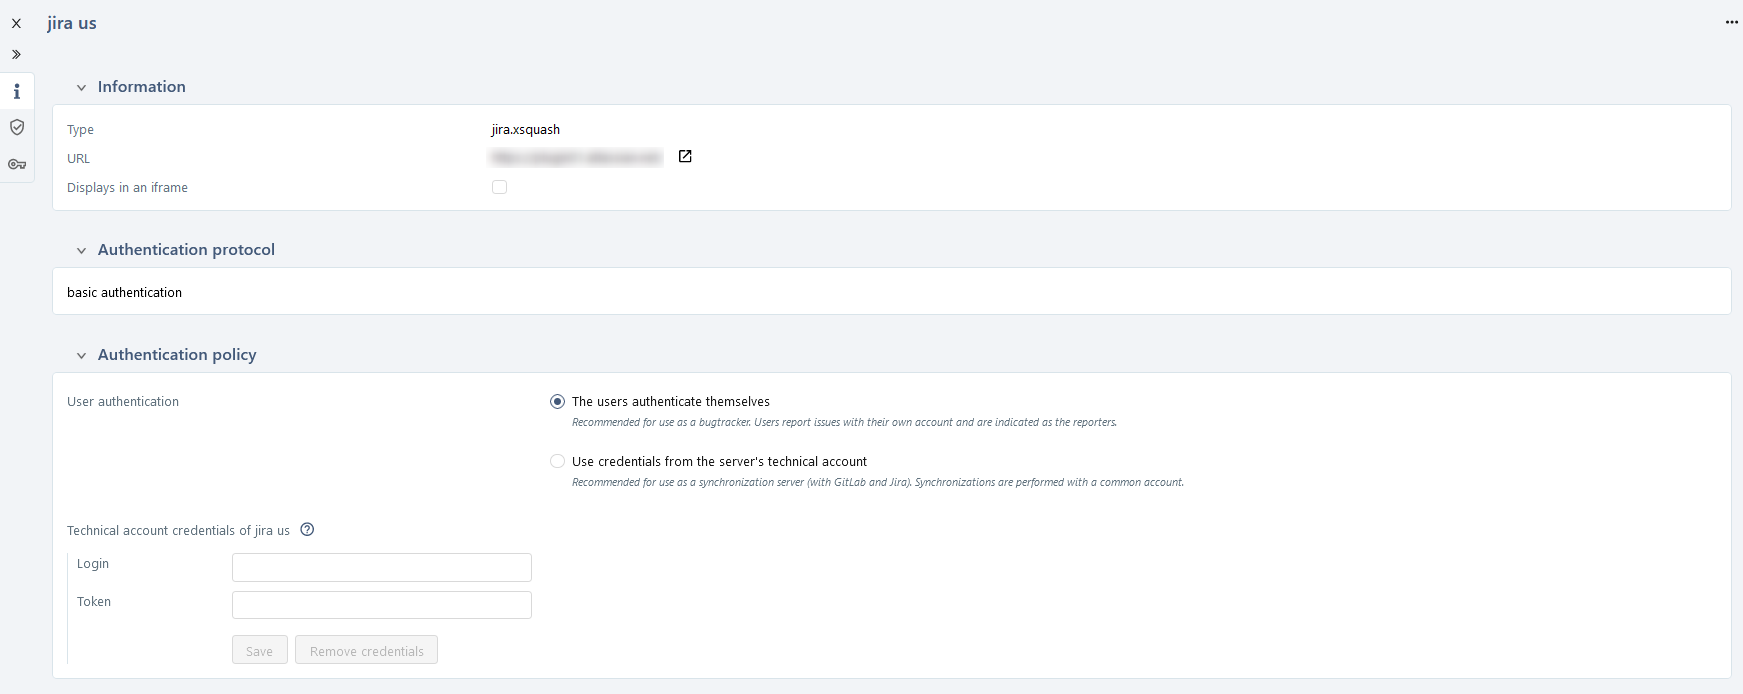
Authentication Policy
The Authentication policy block enables you to choose how users can authenticate on the bugtracker or synchronization server.
![]()
The users authenticate themselves: Every user must authenticate themselves to the third-party tool. The login procedure varies depending on the chosen protocol. For a Basic Authentication, the user must enter their login and password to connect to the third-party tool in SquashTM;
Use credentials from the server's technical account: users no longer need to authenticate themselves. The server automatically uses the third-party credentials entered in the field Technical account credentials. No matter the user logged into SquashTM, the data is transmitted to the third-party tool thanks to the user credentials entered in that block.
Info
We recommend the option The users authenticate themselves to configure bugtrackers. Thus, the username is entered as the issue reporter, instead of a common user. This enables you to trace the exchanges between SquashTM and the third-party tool.
You should use the option Use credentials from the server's technical account when configuring a synchronization server, especially for Xsquash4Jira or GitLab when synchronizing issues with a technical account.
You only have to complete the Technical account credentials field when the option Use credentials from the server's technical account is checked.
For the fields to be successfully saved:
- the third-party tool must be reachable;
- the credentials to connect to the third-party tool must be the right ones;
- the account associated with these credentials must have the necessary permissions in the third-party tool;
- the configuration of the server must be done correctly.
Info
SquashTM keeps some information regarding authentication in its database. This information includes the protocol configuration, the SquashTM app credentials, and the OAuth user tokens if need be. Users personal logins, passwords and tokens are encrypted and saved in the database.
Cache management
For GitLab, Azure DevOps and Redmine bugtrackers, the Cache configuration block enables you to configure a cache which stores values used for issue reporting.
For GitLab, these are:
- labels,
- users,
- milestones.
For Azure DevOps, these are:
- users,
- iterations,
- areas,
- tags.
For Redmine, these are the project-specific and server-wide data:
- project name,
- description,
- creation date,
- last updated date,
- project custom fields and custom fields available across all projects on the server,
- available trackers (issue types),
- list of issue priorities,
- list of issue categories,
- list of versions,
- list of members.
This cache reduces the number of requests sent to the bugtracker server and speeds up the display of the issue report form.
To configure the cache, enter the credentials that will be used to generate it. The token used must have at least read permission to the tickets of the bugtracker projects linked to SquashTM for issue reporting. The "Cache content" panel displays the current cache data as well as its status.
By default, the cache updates every 24 hours. You can override this interval by setting the squash.bugtracker.cache-update-delay or squash.bugtracker.cache-update-cron properties (see Manage SquashTM Configuration File). These properties apply to all bugtrackers that support this feature.
![]()